-

- Forums
- Chatrooms
- Gallery
- Gameplay Videos
- Upload
- Articles
- Mod Reviews
- Shop SP: Games, Movies, Books
|
|
Endless Paths - Level 15
15th Level Rockslide
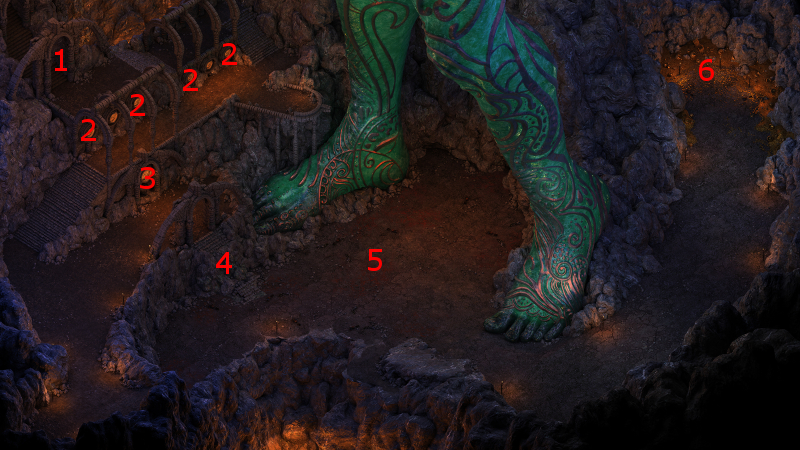
I start off at #1 on the map of the 15th level. I begin by collecting gems and other items at receptacles marked #2 and #3, easily slaughtering bands of Xaurips along the way.
At #4 is a rockslide which must be climbed down during a scripted interaction. Characters with lower Athletics scores risk suffering injuries afterwards.
The video concludes with the party resting, with the heavy hitters choosing the Accuracy vs. Beasts option.
The Master Below
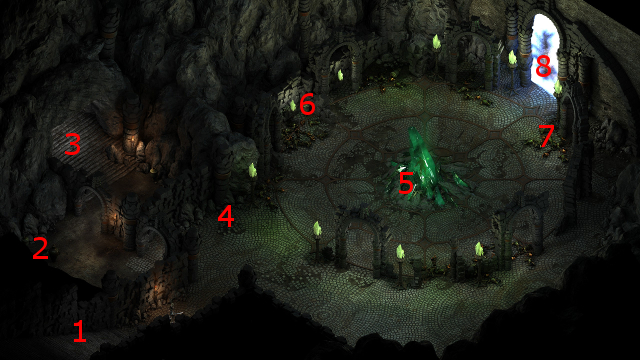
The Adra Dragon will be at #5, who is the focus of The Master Below quest. Pretty much the full gamut of disposition increases are available during the conversation. It is possible to complete this quest in a way that involves freeing her from the Endless Paths and without you fighting each other. This possibility requires choosing very specific responses during the dialogue as follows:
*Evil* The Master Below
Zakara isn't willing to take on Benevolent and Passionate disposition, so she cuts straight to the chase with an Aggressive dialogue option.
Adra Dragon
The Adra Dragon remains one of the toughest fights in the game, even for parties that have gone all the way up to 16th level. It has high resistances to pretty much every kind of damage, and its corrosive breath weapon can wipe out multiple party members, even with high Endurance. That is why I'm eking out every advantage I can by positioning myself close to the Adragans.
I adjust things a little by positioning Devil of Caroc next to the Adragan to the west, and Ituumak next to the Adragan to the east. I then have Alliria force-attack the Adragan that she's next to. After that, most party members take out the Adragans that they're next to. And indeed, what is important is for Grieving Mother to build up her Focus early on for when the Dragon shows up.
Hiravias puts a Moonwell over as many party members as he can. Kana uses a Scroll of Defense, and then a Scroll of Valor, over the party.
Once that is done, I have Devil of Caroc and Ituumak go a little southwest to bring the Dragon into the battle. Hiravias casts Weather the Storm as it approaches, to reduce the damage of the breath weapon should it hit the party. I have Ituumak then go south and hold up the Xaurips that will come from the south. Sagani keeps herself apart from the rest of the party, and shoots at the Xaurips that surround Ituumak.
The rest of the party get themselves close to the Dragon. Alliria tags it with Sworn Enemy. Grieving Mother uses Reaping Knives on Alliria to turn her into a Focus-generating battery.
After that, I have Hiravias cast Beetle Shell on Kana, and then have Grieving Mother use Defensive Mindweb to put everyone's Defenses through the roof. The party ends up practically untouchable by the Dragon's attacks. Grieving Mother can renew Defensive Mindweb whenever she needs to, since Alliria is constantly generating Focus for her with her own attacks. The Dragon soon falls before the party's onslaught.
The end of the battle also marks the conclusion The Master Below quest.
*Evil* Adra Dragon
The evil party has to take a different approach, accounting for the fact that the Xaurips and Adragans will be at a distance at the start of the fight.
Zakara immediately tags the Dragon with Sworn Enemy. She then imbibes a Potion of Power and a Potion of Ironskin.
At the same time, Eder and Maneha each bring out a summons from their figurines. Eder ingests a Potion of Ironskin and a Potion of Major Regeneration. The point behind the summons is to bait its wing slam and or breath attacks early.
Concurrently, Zakara holds back from summoning Concelhaut for the time being. There's a specific reasons why that I'll explain shortly.
Aloth, Durance and Zahua retreat towards the west. Aloth protects himself with Bulwark against the Elements and Llengrath's Safeguard. Durance protects himself with a Potion of Bulwark against the Elements, and then buffs himself up with a Minor Avatar spell. Zahua adds his own summons, and then imbibes a Potion of Power and a Potion of Ironskin
At some point the Dragon has hit me with her wing slam attack and her breath weapon, which leaves my party members quite wounded. I therefore have them imbibe Potions of Minor Endurance or Potions of Major Endurance to recover.
By now the Adragans and Xaurips have joined the battle in earnest. The warriors make the Adragans priority targets if any of them get close. Aloth and Durance obliterate the hordes that remain distant through repeated casts of Death Ring and Storms of Holy Fire respectively.
Meanwhile, once the Dragon has used its major powers and goes into melee mode for a while, that's when I play my key card. Zakara uses Concelhaut's Skull to summon him. He in turn hits the Dragon with a Concelhaut's Crushing Doom spell. He then casts Concelhaut's Parasitic Staff and charges right in. The strategy pays off, as the Crushing Doom spell suffices to keep the Dragon knocked Prone a lot of the time.
At some point all but one Xaurip amongst the Dragon's minions have been wiped out. It's at that point that I group all my warriors together and face the Dragon directly.
Durance gets himself close to his comrades, and initiates a buffing sequence of Devotions for the Faithful, Shields of the Faithful, Crowns of the Faithful, Consecrated Ground and Salvation of Time.
Aloth in his own turn uses Eldritch Aim and then an additional Concelhaut's Crushing Doom of his own on the Dragon.
The warriors are meanwhile hacking away. It is only now that Zakara uses her Flames of Devotion on the beast. It's only a matter of time before I wear it down.
Adra Dragon Scales
The Adra Dragon leaves behind a couple of Adra Dragon Scales, which I can use to add the Superb Quality enchantment to either an armor or a shield.
I use one of them on Hiravias' Redshield. Deflection (avoiding damage altogether) is usually better than Damage Reduction, since the former improves survivability a good deal more in comparison to the latter. *NOTE* Kana is about to get a new shield very soon.
I use the other on Kana's Argwes Adra armor. When I do have scales to spare for Damage Reduction, the primary tank is the first in line for it.
*Evil* Adra Dragon Scales
The evil party uses the Adra Dragon Scales to add the Superb Quality enchantment to Maneha's Argwes Adra Plate Armor and Aloth's Leather Armor.
A major companion adventure becomes available, although I don't care which one. It happens to be the What the Well Holds one. I assign Hiravias to it.
Adra Dragon's Treasure Hoard
The treasure hoard at #6 contains the following items:
*Evil* Adra Dragon's Treasure Hoard
Durance gets Little Savior in the evil party. It definitely helps with his role as off-tank. Although he can't use the defense bonuses upon Stunning or Prone in the same way the good party can, the +5 Defense aura still benefits his party as a whole.
He also gets the Padded Armor called Vengiatta Rugia. If you want an armor that provides a balance between fast-spellcasting and being able to meaningfully participate in melee combat, then Vengiatta Rugia is as good a choice as any. It is a light Padded Armor, it inflicts Retaliation on anybody who Hits or even Grazes its wearer, and it also offers a small amount of bonus damage against Flanked targets. And that is what off-tanks often do, swoop in from the side against a Flanked target after the combat positions have settled.
*Evil* 15th Level
Everyone now has enough experience to advance to their 15th levels. But first, I remember to add +2 Intelligence to Durance's Vengiatta Rugia armor.
Zakara gets Behold the Martyr. This ability requires first that a party member fall in party. Once that happens, the Paladin can make the fallen party member the focal point of an aura that increases Damage Reduction by +8 and Attack Speed for all allies within a certain radius, and imposes Damage Reduction and Attack Speed penalties on all enemies within the same radius. It is highly situational, given the requirement that a party member fall in battle. It is, however, undeniably potent when used. The tipping point for me using this in the evil party is that I don't have access to Druid spells that provide a comparable level of Damage Reduction bonuses.
Eder acquires Triggered Immunity. Should he lose at least 10% of his Endurance from a single attack, he will automatically become immune to the damage type from that attack (e.g. Slashing, Corrosive) for a short duration. It is a passive ability that augments his tank role.
Maneha acquires Blood Lust. This passive ability temporarily increases her Attack Speed by 20% should she personally kill two foes. This is another ability that allows a Barbarian to play at both a heavily-armored tank and a damage dealer at the same time.
Zahua acquires Resonant Touch. This ability allows a Monk, with each successful strike that inflicts at least 10 damage, to build up 'resonance' on any surviving targets that he has struck. He can, at a time of his choosing, choose to unleash the resonance. The more resonance that has been built up, the more Raw Damage his surviving targets take. Can be great for boss fights, especially Dragons.
Durance selects Devotions for the Faithful as his 4th-level Mastered spell. It allows him, each fight, to generate a long-lasting aura that provides the party with bonuses to Might and Accuracy, while imposing Might and Accuracy penalties on all enemies within the radius.
Aloth learns two spells. One is Minoletta's Piercing Sigil. It provides a powerful defensive resource for Aloth should he get swarmed, in addition to his other buffs. It will both push away and Stun any enemies who melee strike him in combat.
He also learns Wilting Wind. It inflicts a lot of Raw Damage over a very wide aura, and also inflicts Weakened on its targets. The latter point can also help Maneha take full advantage of her Brute Force and Threatening Presence abilities.
He also chooses Essential Phantom as his 4th-level mastered spell. He can now, every fight, summon a lightning cannon that can fire away on its enemies from a distance.
Master of Caed Nua
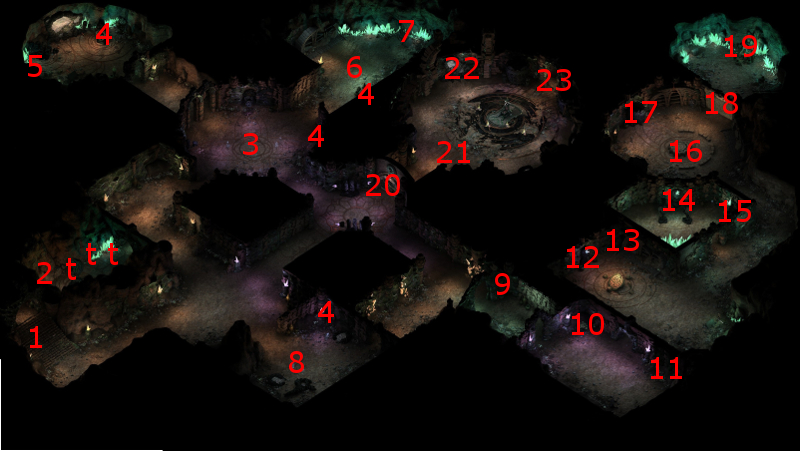
I start off at #8 on the map of the 14th level, and go up the stairs at #1.
I end up at #23 on the map of the 13th level. I recoup my Camping Supplies from the container at #13, and then head back down the stairs at #23.
From there, I go up the stairs at #3 on the map of the 14th level to reach the trap door at #4 on the map of Caed Nua.
I enter the Great Hall, and sell my excess loot to the Merchant. After that, I speak to the Steward who is now aware of the defeat of the Adra Dragon. That means a permanent +8 to both Prestige and Security for the stronghold. *Evil* The +8 bonus to Prestige is especially important for the evil party since it increases the odds of obtaining Legendary Companion Adventures, which in turn provide at least a couple of items that the evil party will want.
The good party leaves the Great Hall, and rests in the courtyard selecting the Hedge Maze bonus (+2 Stealth). They now return to Twin Elms, starting with Noonfrost, where one of the quests there is doable with sufficient Stealth.
*Evil* The evil party has done the rest of Endless Paths significantly sooner than the good party, so now they're off to do Part 1 of the White March expansion.