-

- Forums
- Chatrooms
- Gallery
- Gameplay Videos
- Upload
- Articles
- Mod Reviews
- Shop SP: Games, Movies, Books
|
|
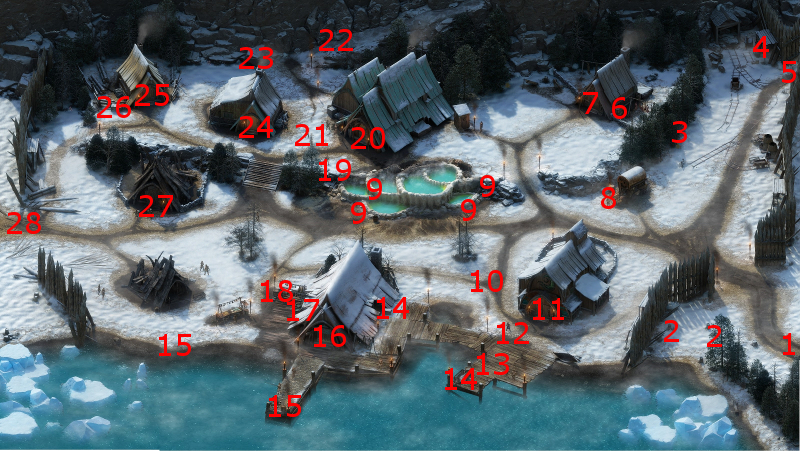
Durgan's Battery
Ista
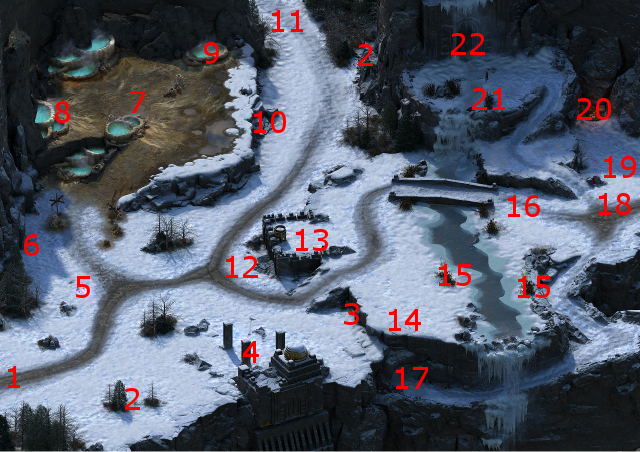
At #13 is a Dwarven woman named Ista, who wants me to test an Ore Detecting-Device for her. This conversation triggers the Sacred Instruments task.
Okrun
Okrun will be at around #13. He wants to recover his sister's medallion from the Priestesses of Ondra in the temple he's loitering near. Having this conversation triggers the Regrets Worth Trading quest.
This quest mostly focuses around the Russetwood, but I have the conversation anyway. It triggers an counter at Durgan's Battery that I'll want very soon.
As for Durgan's Battery, the gate at #22 provides access to a World Map Exit that paves the way to the Battery.
Frost Oozes and Bitter Spirits
I start off at #1 on the map of Durgan's Battery. There will be some Frost Oozes and Bitter Spirits at #22, but they're easy enough to kill by now.
Trapped Villager
At #23 will be a Villager who is trapped partway down an icy cliffside. Alliria clicks on it to begin a scripted interaction with his rescue as the objective. She has to expend a Rope and Grappling Hook to descend down the cliffside.
After that, there will be various stages:
Crag Ogres near Durgan's Battery
There will be quite a few Crag Ogres around #24. I conduct this battle a little differently. I have Hiravias go on the offensive right away with an Overwhelming Wave that hits them while they're oncoming, and then a Hail Storm that catches pretty much all of them. That pretty much suffices to soften them up plenty for physical attacks. Grieving Mother also makes them more susceptible to damage with Phantom Foes.
White Adra Gems
Points marked #25 are entrances to an ice cave. I go through the one closer to the southern edge of the Battery.
I tease a little ahead to the west, to get the attention of a nearby Frost Ooze, and then lure it eastwards so I can kill it without any other enemies present.
The north side of the cave will have several Lagufaeth, who can be dangerous with their paralytic bolts, especially for lower level parties. I have Kana ready himself with the Scrolls of Protection that he's been collecting along the way. The scroll will reduce hostile effects by 50%, which can really come in handy against Lagufaeth.
I creep forward, and position Alliria foremost. The point is for her to absorb the initial missile-fire, giving Kana a chance to use his scroll, and Hiravias a chance to cast spells.
Once battle is joined for real, I carefully position Hiravias along the right flank to catch as many enemies as he can with a Twin Stone spell, which won't hurt party members. He follows up with a Shocking Bolts spell. The battle pretty much takes care of itself after that.
The north side of the cave has White Adra Gems, which are relevant to the Sacred Instruments task.
Sacred Instruments
Now I return to Ista. There are three choices:
*Evil* Sacred Instruments
Zakara selects the Deceptive option to tell Ista that she didn't find anything. Ista rewards her with 300cp.
She then sells the White Adra Gems to Yduran for 1,500cp. This is probably the best option if maximum profit is what you're after.
Feara
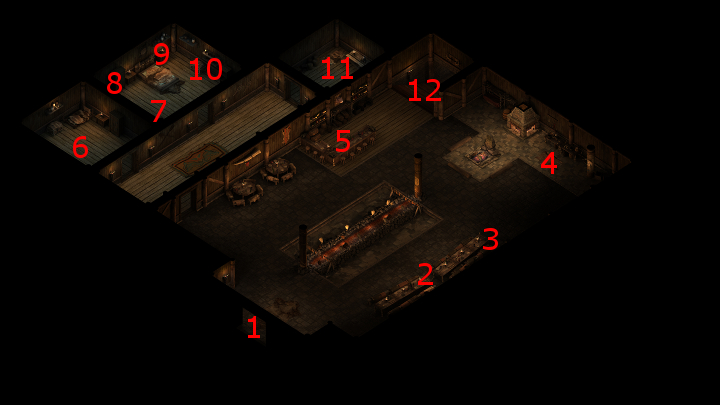
I start off at #1 on the map of the main floor of Gref's Rest.
I speak to Feara at #2. She's apparently the sole survivor of a party that was ambushed by Lagufaeth while transporting valuable artifacts. You can choose Benevolent, Cruel, Rational or Stoic replies to her plight. A Survival check of 7 means Feara will recognize that you're particularly capable of retrieving the artifacts for her. A Perception check of 13 reveals that her teeth and gums have unhealthy spots throughout them. This conversation triggers the quest called A Good Haul.
Now I grab the opportunity to sell my excess loot to the innkeeper, and rent the cheapest room available. The video concludes with the good party returning to Durgan's Battery.
Lagufaeth at Durgan's Crossing
Large groups of Lagufaeth, along with Greater Ice Blights, can be found at spotted marked at #16. I first take on the group due north of #1. I don't use a Scroll of Protection here, because there will be two more groups after this first battle that I want to use them for. I therefore tough it out. Hiravias' Returning Storm spell certainly helps. The party does take a beating, but a well-timed Flames of Devotion that triggers both Sword and the Shepherd and Strange Mercy manages to pick everyone back up.
The next group will be across the bridge. I have everyone but Kana edge forward to get their attention, so as to give Kana the time he needs to use a Scroll of Protection.
Hiravias leads off with Moonwell, then Returning Storm, and then a Twin Stones spell that is placed to catch as many enemies as possible.
Grieving Mother leads off with Phantom Foes to set up her enemies for massive damage by the Orlan Rogue. She then uses her Ectopsychic Echo once she rebuilds enough Focus. The battle is pretty much over by that point.
The party goes back across the bridge to #17. They rest up, and take a Prybar and Camping Supplies from a nearby crate. The video concludes with the party going back west across the bridge.
Battered Shipment
There will be another group of Lagufaeth near the southwest corner. I have Alliria move a little ahead of the rest of the party to get the enemies' attention, and then draw them onwards. This buys Kana enough time to use a Scroll of Protection, and Hiravias enough time to start off with Moonwell. He also follows up with well-placed Twin Stones and Shocking Bolts spells, which makes the battle considerably easier.
The crate at #26 has a Diamond, which I'll use pretty soon.
The trapped chest has a rapier called Spelltongue and Bracers of Deflection +9, which I don't really have any use for. It also has two Emeralds which I save for later.
A corpse at #28 has a Ring of Unshackling, and another random item or two. I'll just sell the ring.
The crate at #30 has the Battered Shipment that Feara wants. It turns out to be a Svef shipment.
The video concludes with the party returning to Stalwart Village.
*Evil* Spelltongue
I do however have Durance use Spelltongue, as an interim weapon. I add the Fine Quality, Burning Lash and Wilder Slaying enchantments.
I found two Emeralds and a Diamond amongst the other containers. I save the Emeralds for later. But now I use the Diamond to add +2 Intellect to Durance's Angio's Gambeson padded armor.
A Good Haul
I now return to Feara in Gref's Rest. I have four choices for completing the quest called A Good Haul:
*Evil* A Good Haul
Zakara extorts Feara for 1,000cp in order to keep her Svef trade a secret.
8th Level
The good party now has enough experience to advance to their 8th levels. Alliria selects the Apprentice's Sneak Attack talent. Anything that increases her chances of triggering Strange Mercy with a death blow is helpful. This talent will come into play quite often because other characters will have powers that can expose enemies to Sneak Attacks, like the Cipher's powers and Druid spells that can Stun.
Kana acquires the Ancient Memory talent. It recoups a little bit of Endurance every few seconds. It's not a big deal, but every little bit can help.
He also acquires the At the Sound of His Voice, the Killers Froze Stiff invocation. It provides an offensive option that won't affect party members, but will expose enemy targets to Sneak Attack damage, whether it's from Alliria or Devil of Caroc or Ituumak.
Hiravias acquires the Heart of the Storm talent. He frequently casts spells that inflict Shocking Damage, so selecting this talent is perfectly sensible.
Sagani also acquires the Heart of the Storm talent. The key point is that it will increase her damage from the Stormcaller bow, which she is very close to acquiring.
Grieving Mother acquires the Two-Handed Style talent, with the obvious point of increasing her damage with a two-handed sword.
She also acquires the Body Attunement power, which gives the Cipher the option of increasing her Damage Reduction at the expense of an enemy's Damage Reduction, which can be really useful in particularly intense melee combats.
The video concludes with the party resting up at Gref's Rest and then returning to Durgan's Battery.
Stags near Durgan's Battery
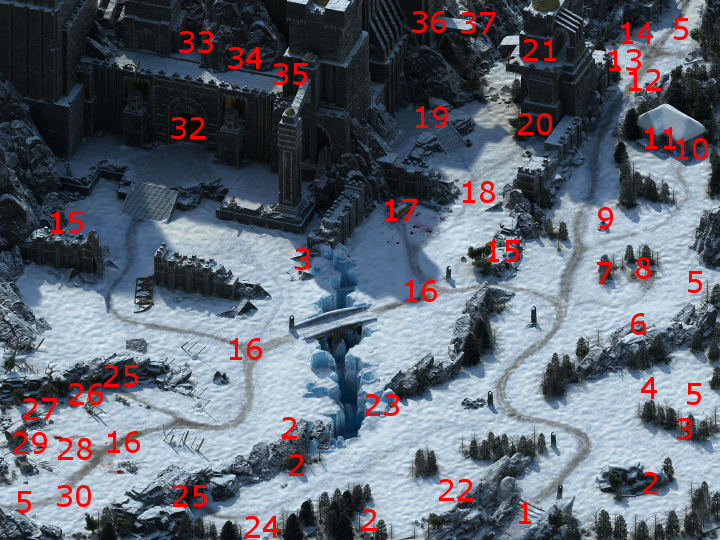
There will be several Stags at #4. Their antler attacks can damage several party members within a small radius, much like the Barbarian's Carnage ability. A mid-level party should still be able to outlast them.
Taragaer's Camp
Taragaer's camp will be at #8. He sells various assortments of miscellaneous items, but I don't need any of it. I do, however, sell off any excess loot I may be carrying.
Talisman of the Unconquerable
Now I go west and north towards #18, where I get attacked by several Ice Trolls and Frost Oozes. Here I show a couple of different themes. Grieving Mother waits until she accumulates enough Focus to unleash Silent Scream on a Troll that's in square in the middle of the rest of the enemies. Kana waits until he's built up 4 Phrases before unleashing his new paralysis wave Invocation. Hiravias meanwhile uses Returning Storm and Moonwell. The cumulative effect means the battle is rather easily won.
An urn at #19 has a Talisman of the Unconquerable. Its +2 bonus to Intellect and its bonus to Focus gain, both while Endurance remains above 50%, makes it perfect for Grieving Mother.
*Evil* 8th Level
The evil party now has enough experience to advance to their 8th levels. Zakara gets the Spirit of Decay talent. It augments all at once the base damage of her Bittercut sabre, the Corrosive lash enchantment I placed on Bittercut, as well as her use of Flames of Devotion in conjunction with the Remember Rakhan Fields talent. I am able to take this talent very shortly after having acquired Bittercut.
Eder acquires the Hold the Line talent. It increases by +1 the number of enemies that he can keep engaged, and thus increasing the number of enemies he can keep locked down around him.
Maneha acquires the Superior Deflection talent, which is sensible for any character that relies on a shield.
Zahua acquires the Sanctifier talent, and continues to hone his ability to damage various damage. Vessels such as undead and constructs are a pretty frequent occurrence by the time he gets to his 8th level, which makes this choice perfectly sensible.
Durance acquires the Weapon Focus (Noble) talent. It provides an Accuracy bonus with Rapiers (and other weapons). I will ultimately change it to Weapon Focus (Soldier) later on during a retraining at an Inn. But for now it enables me to use the Spelltongue rapier with increased accuracy as an interim weapon.
Aloth acquires the Secrets of Rime talent. I begin to take this line of talents not just to augment the damage from Aloth's offensive spells, but also to augment his damage when he uses Kalakoth's Minor Blights. It is sensible to take the Freezing damage talent at this point, since Aloth still makes frequent use of Chill Fog. There will be other offensive spells too like Ninagauth's Shadowflame.
He also learns the Iron Skin spell, since it will increase Aloth's Damage Reduction in case he needs it in the event that enemies get close to him and attack him up front.
Stormcaller
I go up the stairs at #20, to the top of the tower. At #21 will be the Stormcaller bow. It becomes a complete and soulbound weapon in the presence of the Silver Arrow. Sagani will use it for the rest of the game.
The bow has at least two distinct features. One is that it will allow Sagani to inflict Shocking Damage instead of Piercing Damage if her target has less Damage Reduction against the former. That is almost always the case. The other point is that, once she unlocks its powers, it will have a 10% chance on each strike to trigger a Returning Storm spell. Sagani's build is therefore centered around shooting as fast and as often as she can, and thereby maximizing her chances of triggering the Storm.
I also take the opportunity to add the Shocking Lash and Kith Slaying enchantments to her Tall Grass pike. *Evil* The evil party will assemble the bow, but will sell it at the next opportunity.
The video concludes with the good party going back east across the bridge, and then going north up the path a little.
Urthal
A mercenary band led by Urthal will be at #12, after having spoken to Okrun in Stalwart Village. They will attack on sight.
I pull everyone in to form a protective ring around Sagani. The reason is that I want to take out the two Wizards and the Priest as quickly as I can, who can become quite dangerous if I let them go to work on my party at a distance. I don't want anyone getting close to her and interrupting her ability to shoot arrows.
Everybody else has their tasks once they pull into the tight ring around Sagani. Alliria hits Urthal with Sworn Enemy. Grieving Mother uses Phantom Foes on the enemies once they start closing in.
Hiravias initiates a sequence of Moonwell, Form of the Delemgan and Returning Storm. He then peels off a couple of Shocking Bolts spells at the enemies once they're tightly clustered around my party.
Grieving Mother attacks with her sword, and always unleashes a Silent Scream that's carefully placed to catch as many enemies as possible whenever she builds up at least 40 Focus.
Kana hits the enemies with his paralysis wave Invocation once he has accrued 4 Phrases. Everyone else besides Sagani is otherwise hacking away at the up close enemies.
Sagani and Ituumak quickly take out the two Wizards, and soon only the Priest is left and not for long. The additional benefit of this strategy is that the enemy spellcasters kept their attention focused on Ituumak.
Urthal leaves behind two unique items. One is the Giftbearer Notebook, which may be helpful for the Regrets Worth Trading quest.
The other item is a Great Sword named St. Ydwen's Redeemer, which Alliria uses as her alternate weapon for the rest of the game. The Resurrection, and Holy Power abilities are nice, but they are really sugar on top. The 10% chance to inflict Divine Mark on a Hit or Critical Hit makes the weapon quite useful in its own right. However, the real perk is the chance to kill a Vessel outright, which in turn will trigger Strange Mercy. It becomes her weapon of choice whenever she's fighting corporeal undead or constructs.
*Evil* Urthal
I conduct this battle differently with the evil party. Aloth plants a Malignant Cloud trap at the top of the pathway, just south of Urthal and his band. Durance plants a Searing Seal a little north of the trap. Zakara runs ahead by herself to get Urthal's attention and then lead them down the trail towards the rest of the party.
Durance initiates his sequence of Devotions for the Faith, Consecrated Ground, Circle of Protection and then Interdiction on the enemies as they approach.
Aloth begins his sequence of Eldritch Aim, Pull of Eora at the same spot as the trap, and Chill Fog at the same spot. He then sets up Kalakoth's Minor Blights and Merciless Gaze, and begins to bombard the enemies at a distance. This is almost enough to win the battle by itself, since only Urthal managed to break out late in the battle. Even then, Zakara had tagged him with Sworn Enemy and took him down quickly with Flames of Devotion.
Zakara binds herself to St. Ydwen's Redeemer, and for similar reasons.
Another point of interest is that Aloth loots a Singed Grimoire. He scribes the Wall of Force spell from it. Wall spells are best used at narrow chokepoints, where mobs will often trip over each other trying to get through and take damage from the wall multiple times. My preference amongst the wall-type spells is the Wall of Force, partly because I have other spells in mind for other spell levels, and partly because it also inflicts Hobbled on its victims.
I also scribe the Gaze of the Adragan spell, which won't become available until Aloth can cast 6th level spells. Its enemies-only radius may be smaller, and it doesn't last very long. The key point behind Petrification is that it both inflicts a massive hit to Deflection, and any character that hits the target will inflict double damage. It can be very effective in the right situations.
*Evil* Greenstone Staff
Here I show the perspective of the evil party, where I take a brief side trip to the Longwatch Falls. The Greenstone Staff can be looted from a skeleton at #4. Taking the staff results in several Bitter Spirits and Spectres attacking me, with a Cean Gwla to join in.
This fight can be tough for a lower level party. The Bitter Spirits by themselves are not particularly dangerous. But the Spectres can use projectile attacks that both Stun and inflict cold damage on their targets. The Cean Gwla is basically the undead spirit of a Menpwgra that can use the Cipher's Silent Scream power. Being stun-locked is the chief danger of this fight for a lower-level party, and that was why I was forced to reload a few times.
Durance started with a Circle of Protection, and he hoped to tag the Cean Gwla with his Spelltongue in order to prolong the buff and thereby improve everyone's chances against getting stunned. Unfortunately, he got stunned just as he closed in on the Cean Gwla, so I have to tough it out.
I do, however, minimize the concerns a couple of ways. One way is that I send Eder and Maneha ahead to the right to occupy the attention of the Spectres and thereby minimize the harm they inflict on other party members.
The other point where I succeeded is that I managed to have Zakara take out the Cean Gwla relatively quickly by first tagging it with Sworn Enemy, and then nailing it with two Flames of Devotion. Those events help me to outlast the spirits to victory.
This encounter served two purposes. One purpose is that Zakara inflicted 200 points of damage on Spirits with St. Ydwen's Redeemer, and thereby obtains the first upgrade for the blade. The next upgrade requires that she kill 10 Vessels or 50 enemies with the sword. And I'm soon going to venture to Galvino's Workshop, which is filled with constructs.
Note that I have the other party members hold back somewhat until I confirmed that Zakara had gotten her 200 points of damage against spirits by periodically checking her inventory window. Once I got that confirmation, I had the rest of the party go into free fall and take out the remaining enemies.
The other purpose is the acquisition of the Greenstone Staff, which I bind to Zahua. Its on-hit powers are far too infrequent for me to get it for that reason. The key perk, once it's fully upgraded, is the ability to use Iron Skin twice per Rest. That can be a nifty benefit for a Monk who spends a lot of time in close quarter combat and yet has low Deflection.
*Good* I do the same thing for the Good party, however nobody in that party has any use for the Greenstone Staff. I do it anyway with the point of obtaining the upgrade for St. Ydwen's Redeemer for Alliria.
I will stop off at Gref's Rest for the Golden Whale resting option, although that won't show up until the next video. The rest is on the way to my next destination, which is Galvino's Workshop.