-

- Forums
- Chatrooms
- Gallery
- Gameplay Videos
- Upload
- Articles
- Mod Reviews
- Shop SP: Games, Movies, Books
|
|
Galvino's Workshop
Galvino's Cabin
I now return to Gref's Rest and choose the Golden Whale resting option (+2 Dexterity, +2 Constitution, +2 Might) in order to maximize my power for the coming fights. I also sell off my excess loot.
I go back to Durgan's Battery after having rested up. The entrance to Galvino's Cabin is at #10 on the map of Durgan's Battery.
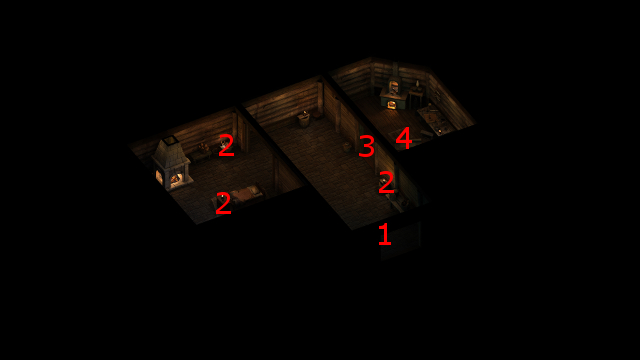
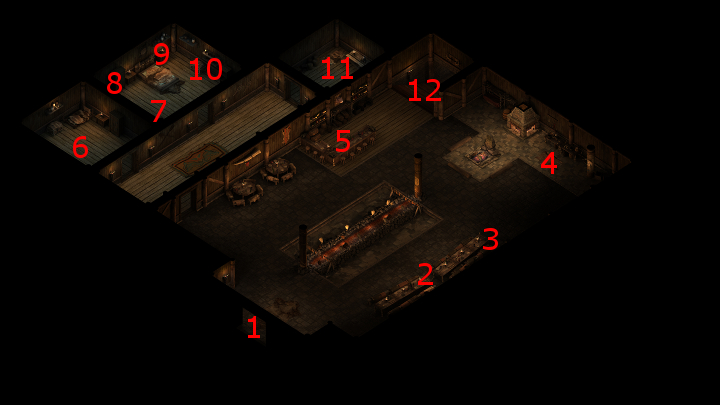
I start off at #1 on the map of the Cabin. There will be a couple of traps in the cabin, which the Orlan Rogue disarms. The trapdoor leading to Galvino's Workshop will be at #4.
Workshop Key
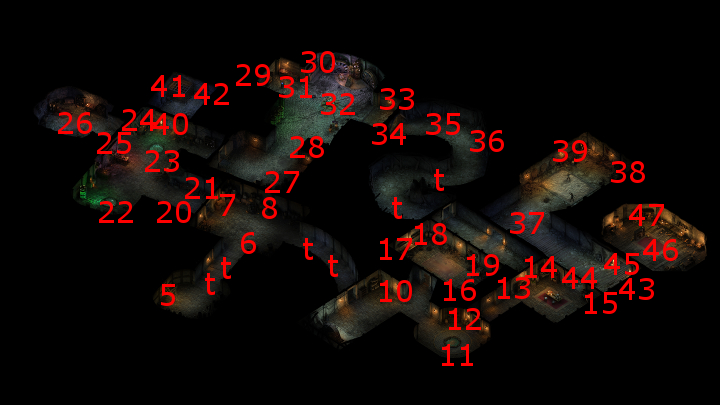
I start off at #5 on the map of the Workshop. The room at #6 will have a couple of Rotting Flesh Constructs, plus a few Misshapen Constructs that can shoot Freezing Damage projectiles and use the Kalakoth's Freezing Hand spell.
This can be a tough battle. First, I disarm a couple of traps along the hallway. I then have the Orlan Rogue plant a Malignant Cloud trap about half-way and a little on the east side of the hallway. I reposition the party to the south end of the hallway. Now I have Kana go ahead, get their attention, and lead them back across the trap. This has two advantages. One is that the Misshapen Constructs will take some Raw Damage in the Malignant Cloud. The other advantage is that only one Flesh Construct can reach me. The other one won't be able to walk past the Misshapen Constructs. That allows me to gang up on the first Flesh Construct, aided by the occasional Phantom or Grieving Mother's Silent Scream power, and kill it quickly.
I work my way after that through two of the Misshapen Constructs, and after that the remaining Misshapen Construct and the remaining Flesh Construct. The other thing to keep in mind during this process is that one of my priorities is to acquire the next upgrade for Alliria's St. Ydwen's Redeemer. That upgrade is easier to get if she lands the killing blow with the weapon on 10 Vessels. Therefore, whenever I judge that one of the Constructs is very close to death, I have the party break off and attack the nearest relatively healthy Construct, and leave Alliria to get the killing blow. She got 3 of the 10 killing blows she needed from this battle.
The hallway leading east will have a couple more traps. The room east towards #10 will have a Flesh Construct, an Iron Construct, a couple of Misshapen Constructs, as well as a few of a new enemy, Unstable Constructs. Unstable Constructs have no objective other than to get close to you and then self-implode with a Fireball effect. The antidote is simple. I simply lead one of them on, wait until Kana has accumulated three Phrases, and then have him summon a Phantom to get the Unstable Construct's attention. The Unstable Construct will explode on the Phantom, and at a safe distance from the party. The alternative but more difficult method is to shoot them down at a distance. *Note* Furthermore, dmc adds that if multiple Unstable Constructs are still coming at you despite your best efforts, another trick is to using something like Puppet Master to take control of one of the Constructs in the group, which will also trigger the Unstable Constructs into detonating themselves.
*EVIL* My tactics are a bit different for the evil party, the reason being that they don't have infinite Phantom summons without Kana in the party. Therefore, as much as possible, I only want to deal with one Unstable Construct at a time. If I only have to deal with one, I lead it onwards and have Aloth and Durance shoot at it and retreat, rinse and repeat, until it's brought down the hard way (i.e. taking down all its Endurance). Of course, that can mean retreating through multiple rooms to get the job done. I do have Figurines available to me, but I only use them when I have no choice but to deal with multiple Unstable Constructs, in which case the hope is to get all off them to implode in reaction to a single Figurine summons. The trick for the evil party then is to make enough progress without too much harm until they can rest and thereby renew their Figurine uses. That in turn means making the most of my time in between Rests, of which I have three including the two Camping Supplies I came with and the other that is available in the Workshop.
*Back to the Good Party* I repeat my summoning process for a second Unstable Construct. I have a rare opportunity for the third one though. Sometimes a Phantom can lock an Unstable Construct and prevent it from exploding with Stun attacks. At some point my Phantom brought the third Unstable Construct to near death, so Alliria seized the opportunity to kill it off with Flames of Devotion, and get 4 Vessels kills for purposes of the next upgrade.
I then go east and kill off the Flesh Construct, Iron Construct, and two Misshapen Constructs. Alliria how has 7 Vessel kills counting towards her upgrade.
The Orlan Rogue also now has enough experience to advance to the 8th level. I select the Savage Attack feat, which provides +20% Damage at the expense of a -5 Accuracy penalty. The Accuracy penalty is negligible for a Rogue that already has very high Accuracy and will frequently be attacking debuffed enemies anyway. I also get to use both Reckless Attack and Savage Attack at the same time as modal abilities.
There will be another trap in the room at #10, which I disarm. There are a few more constructs at around #11. I draw one or at most two of them forward at a time, until Alliria gets three more Vessel kills and thereby obtains the second upgrade for St. Ydwen's Redeemer.
There will be a few Iron Constructs and a couple of Unstable Constructs in the room north of #10. First, I have the Orlan Rogue set a Freezing Pillar trap at the end of the hallway. I then then send Kana and Sagani forward. Sagani hits one of the Iron Golems with her bow in order to get their attention. As she and Kana run back, Kana leaves behind a trail of Freezing Damage hazards that chip away at the oncoming enemies. Also, once he regroups, he'll have enough Phrases to summon a Phantom that will cause the slower Unstable Constructs to implode.
The room to the north has some odds and ends. I manage to get a Ruby from a hidden mannequin.
I lead the other group of Constructs away from the room at #11, and then wipe them out. *Note* I prematurely pursued a strategy of letting Alliria get knocked unconscious hoping for the next upgrade. I had not yet gotten an item with the Second Chance power that would revive her from getting knocked unconscious. That'll have to wait till later. Anyway, the Orlan Rogue disarms a trap near #11.
The crate at #13 has the Workshop Key. I rest up, grab the Camping Supplies from the crate at #14, and then return to the room at #6.
Broken Construct
There will be a pair of Unstable Constructs at #20. My next priority is to try and obtain the next upgrade for Sagani's Stormcaller bow, which requires that she land the killing blow on 25 targets with the bow (or kill 5 Kith Druids with it). So instead of using Phantoms on them, I lead them on a chase whereby Sagani safely shoots them with her bow while retreating and maintaining a safe distance when she has to.
There will be two Iron Constructs, a Misshapen Construct and a Burning Flesh Construct at #22. I gang up on the Iron Constructs and Burning Flesh Construct. I let Sagani and Ituumak go to work on the Misshapen Construct. I have Ituumak stop attacking once the Construct is near death, so that Sagani and claim the kill.
There will be about three Iron Constructs and three Misshapen Constructs at #23. I take out the Iron Constructs. A process I now use is to gang up on the Misshapen Constructs until they're near death, but then let Sagani have the killing blow.
A hidden lever at #24 opens the door at #25. The Orlan Rogue disarms the trap in the room on the other side, and loots the containers within for various items.
The door at #40 requires either the Cell Key (more on that later), or a Mechanics skill of 10 to open. The Orlan Rogue uses his Mechanics skill to open the door. On the other side will be a Broken Construct. You can either give it some money to make it go away, or fight it. I chose the latter. Keep in mind that it is like an Unstable Construct, but a good deal faster. So I combine retreating combined with a Phantom summoned by Kana in order to hold it up. The Phantom also manages to stun-lock it and damage it enough to bring it near death. At that point, Sagani is able to deliver the killing shot and inch closer towards her upgrade.
A hidden niche at #41 will have a pair of boots called Echoing Misery, but I have no use for them.
Baelsyr
There will be a large group of Iron Constructs, Misshapen Constructs and Unstable Constructs in the room at #28. I go forward to get their attention. Now keep in mind that Iron Constructs like to start off with a Noxious Vapor power, and getting hit with it multiple times can be really devastating for the party. I therefore keep on the retreat until they've expended their vapors. Once that is done, I kill off as many Iron Constructs as I can until the slower Unstable Constructs start to catch up. By then, there's only one Iron Construct left. So I go into retreat mode again, having Kana summon a Phantom whenever he has enough Phrases in order to encourage the Unstable Constructs to self-detonate. I kill off the last Iron Construct once there's only one Unstable Construct left at a distance, and I hold up the latter with another Phantom.
I return to #28 to finish off the remaining Constructs. I gang up on any Iron Constructs after dodging their Noxious Vapors. However, I leave the Misshapen Constructs to Sagani and Ituumak so that Sagani can acquire more killing blows towards her upgrade. She now has nine in total.
Now I carefully position the party around the lever at #31. The Orlan Rogue disarms a trap near the lever at #30, and then switches the lever. He also switches the lever at #31. A spirit named Baelsyr now shows up, but my party is positioned to surround it and gang up on it, thought it still gets in a damaging spell or two.
The video concludes with the party hitting the switch at #33 to open the door at #34.
Cell Key
There will be a Burning Construct and several Unstable Constructs at #35. There will be too many of the latter, so I retreat and use Phantoms to get them to self-detonate at a safe distance. But I do save two of them for Sagani to land killing blows on.
I disarm a trap, and kill off another Iron Construct in the winding path ahead.
There will be a few Iron Constructs, a lot of Unstable Constructs, and couple of Misshapen Constructs in the room at #37. I kill the Iron Constructs off as quickly as I can. I now have enough retreat space to let Sagani kill off all the Unstable Constructs by herself one by one. She and Ituumak then take care of the Misshapen Constructs. Her kill count is now at 19 for purposes of the upgrade.
The Cell Key will be in a chest at #39, but I've already taken care of the Broken Construct so I have no use for it. The video concludes with the party heading for the door at #45.
The Recluse of the White March
I use the Workshop Key to open the door at #45. That leads to a conversation with Galvino (and the Devil of Caroc) at #46. Galvino informs me that I will need an ancient verse called a Cantec to be able to open the way to Durgan's Battery. To that end, he gives me Galvino's Resonance Amplifier. It will help me find a presently living Dwarf who was also a Paragrun Dwarf in a past lifetime, and therefore knew the cantec. It's a matter of using Watcher abilities to Awaken the Dwarf's soul and cause it to remember the cantec.
This conversation marks progress for both The Recluse of the White March and the Durgan's Battery quests.
Devil of Caroc Joins
The next part of the conversation leads to Devil of Caroc joining the good party. Her own personal quest, The One That Got Away, is now triggered.
Galvino's Favor
The conversation then continues on to Galvino's request for a favour. He would like me to expose the head of Stalwart Village's fisher, Grynde, as a Ripple Sponge Addict. That particular dialogue triggers The Fisherman's Penance task.
Devil of Caroc Levels Up
The good party hits the lever at #43 to open the door at #44, and then leaves the Workshop. Along the way, I also equip the Devil of Caroc with the same items that the Orlan Rogue had been using, except for the body armor.
Once I've left the Workshop and am now back at Durgan's Battery, I level her up, using the same ability and talent choices as for the Orlan Rogue.
The video concludes with my raising the enchantment of her Devil of Caroc's Body to Fine, and then making for Stalwart Village.
Grynde
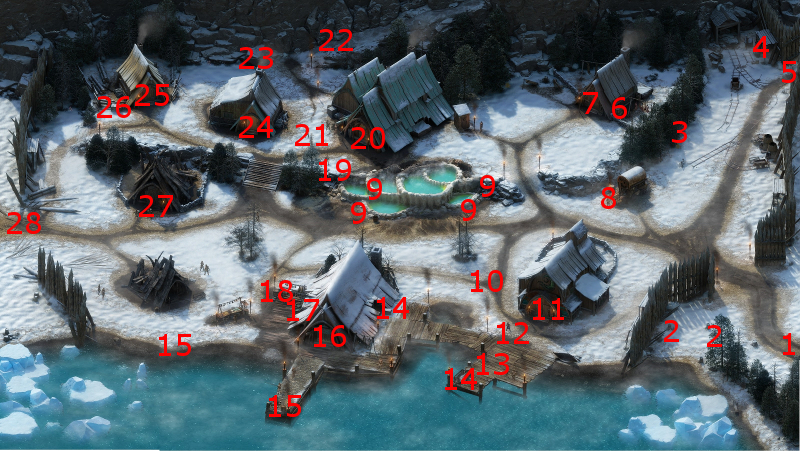
The entrance to the Fishery is at #16 on the map of Stalwart Village.
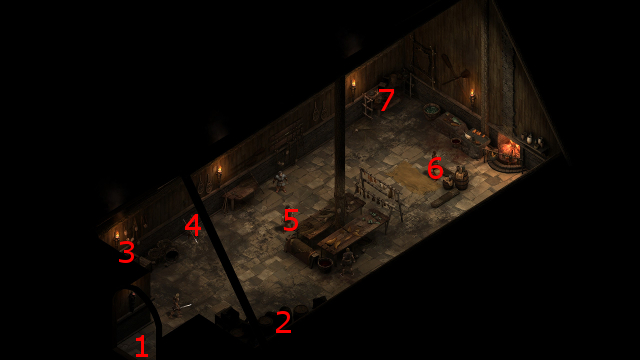
It is now night time so I go inside the Fishery. In a barrel at #7 will be Arda's Bracelet. Taking the Bracelet allows Alliria to access the memories of Grynde's sister, Arda, and learn that Grynde accidentally killed Arda while high on Ripple Sponge.
Grynde and several of his Guards, including Lurgolder if you had saved him from the fire earlier, will now come in and confront you. Several choices are available:
*Evil* Grynde
Zakara prefers to slaughter Grynde and his guards.
Speaking with Devil of Caroc
Simply coming back to Stalwart Village will now mean that the Devil of Caroc wants to speak to Alliria. The conversation topics include her acrimonious relationship with Galvino, the past murders she committed, and her motivations for them. The dialogue helps progress her personal quest, The One That Got Away.
The video concludes with the party making its way to the entrance of the Gref's Rest at #20.
*Evil* The Fisherman's Penance
Zakara returns to Galvino. He is somewhat pleased over Grynde's downfall, and rewards me with two Potions of Major Endurance, 2 Sapphires and 2 Topaz.
*Good* Alliria doesn't even bother with Galvino, since he won't like that outcome and won't reward her.
Owynna
First, I sell off my excess loot to Haeferic and then rest up.
A Dwarven woman named Owynna will be at #7 on the map of the main floor of Gref's Rest. The Galvino's Resonance Amplifier can be used to reveal that she shares a soul with a Durgan's Battery ancestor. But at any rate, it's simple enough to speak to her, find the memories of a dishonest guard captain named Gergun, and Awaken her in order to learn the cantec.
This conversation concludes The Recluse of the White March quest.
*Evil* Taena
Zakara prefers the soul of Taena, whose house is at #25. She borrows Eder's Ring of Changing Heart.
Once inside, she reads Taena's soul and then awakens it. A particularly harsh and violent member of a Dwarven mining crew named Zenove emerges. Zakara first makes a Resolve check of 17 that earns Deceptive disposition, and then a Lore check of 7, to convince Zenove to recite the cantec that I need.
I now have a choice about whether to let Taena regain control over her body, or let Zenove take it over. I chose the latter, and Taena taken over by Zenove attacks me. I easily gang up on her and kill her. This event marks the conclusion of The Recluse of the White March quest.
A minor Companion Adventure called A Forgotten Hollow becomes available. I don't mind that, and don't bother reloading. I figure the Wyrwood Ring will make a decent interim item for somebody. I assign Kana to the adventure.
The video concludes with me looting Taena's house for any items that I can find.
Devil of Caroc's Quarry
Now Devil of Caroc has witnessed Alliria using her Watcher powers on another soul, she'll want to speak to her. She lets on that she's seeking revenge on a woodcutter named Harmke, and would like Alliria's assistance in that endeavour. The dialogue progresses her personal quest, The One That Got Away. It also results in Harmke now being in the nearby Russetwood, but I won't get around to that until much later.
The video concludes with the party returning Caed Nua.
Lord Sidroc
Alliria has a visitor waiting for her, Lord Sidroc. He wants her aid in ridding his keep of Thieves. My possible options are:
Celebrant's Gloves
The good party now collects the Celebrant's Gloves from the rewards chest as a reward for The Celebrant's Dirge companion adventure. I have Grieving Mother wear them on an interim basis.
*Evil* Wyrwood Ring
The evil party also returns to Caed Nua. I enter the Curio Shop and purchase a couple of Vithrack Brains. I found a Ruby earlier as well during the battles in the Workshop, so now I add the Exceptional Quality enchantment to Zakara's Bittercut Sabre.
I also have two Sapphires as a reward from Galvino. I therefore add the Exceptional Quality enchantment to Durance's Angio's Gambeson armor.
I enter the Great Hall. In the chest at #3 will be the Wyrwood Ring as a reward for companion adventure called A Forgotten Hollow. I have Maneha wear it on an interim basis.
*Evil* Azzuro
Zakara puts down the 5,000cp to aid Azzuro. I don't want to lose Eder for the 10 days, and Sagani and Pallegina are obviously not available.
Both the good party and the evil party now return to the city of Defiance Bay, with Ondra's Gift as the next destination.