-

- Forums
- Chatrooms
- Gallery
- Gameplay Videos
- Upload
- Articles
- Mod Reviews
- Shop SP: Games, Movies, Books
|
|
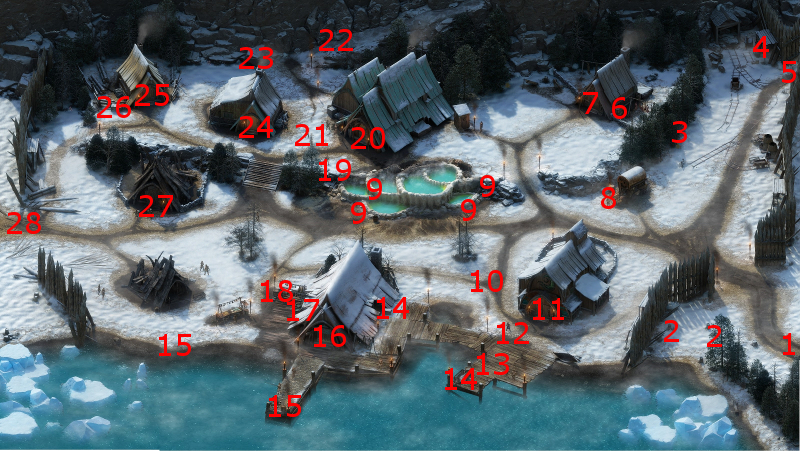
Stalwart Village
Crag Ogres in Stalwart Village
Now I arrive at #1 on the map of Stalwart Village. The first time you come here, the village will be under attack by a lot of Crag Ogres throughout the whole map. In fact, there will be three in immediate view. They hit for a lot of damage, and their front line warriors can basically do an exaggerated version of the Barbarian's Carnage ability that can also knock characters Prone. They have a lot of Endurance, and yet weak Deflection and Will and Reflex Defenses. Therefore, ganging up on them one at a time, and using spells that target those defenses will prove effective.
They will also be helped out by the odd Winter Wolf or two. Much like their D&D equivalents, these wolves can use a breath attack that can inflict cold damage on multiple party members.
There are only one of two ways to end the assault on Stalwart Village. One is to take out their leader, Warleader Darzir, who is near the west gate at #28. If you succeed at that, any remaining Crag Ogres and Winter Wolves still alive will flee the village. The other way is to wipe out every single Crag Ogre and Winter Wolf in the village, Darzir included. Keep in mind that you cannot camp in the village or rest in the local tavern while the village is under attack.
A lower-level party simply will not have the resources to wipe out everything off the map and still have enough for Darzir. However, a relatively unscathed lower-level party can defeat Darzir and his bodyguards with some effective strategy (and a little luck). And remember that there is no extra xp for killing everything, and therefore no real incentive to do things the hard way. My advice after the first fight is to make your way south and west along the shoreline where you should run into at most two or three enemies at a time, and hopefully keep everyone close to full health and enough resources to manage Darzir.
It's easy enough for the good party. What typically happens is that Grieving Mother uses Puppet Master on one of the Ogres, making ganging up on the uncontrolled Ogre that much easier, and likewise ganging up on the previously controlled Ogre once his Domination ends also becomes that much easier since he'll no longer have any aid. Sagai and Ituumak go after any Cannoneers at a distance.
*Evil* My only objective for an upcoming scripted interaction is to pilfer a certain ring. Therefore, the only preparations I make for it is for Aloth to temporarily switch out his Gloves of Mechanics for the Bracers of Enduring he found earlier in one of the random drop chests in order to raise his Constitution to 12, and to choose the Tower resting bonus in Caed Nua (+3 Perception). *Note* If I hadn't previously found those Bracers of Enduring, an alternative would have been for Aloth to borrow Eder's Girdle of Eotun Constitution for this part.
Warleader Darzir
Warleader Darzir and several other Crag Ogres, including a couple of Canoneers, will be between #27 and #28 on the map of Stalwart Village.
Alliria begins by tagging Darzir with Sworn Enemy. Kana inserts himself in front of Hiravias in order to absorb the onslaught.
That in turn allows Hiravias to initiate a sequence of Returning Storm, Form of the Delemgan and Moonwell.
Grieving Mother uses a cycle of using Puppet Master on Darzir, hitting the nearest enemy to recoup Focus, and then using Puppet Master on Darzir again once the previous power has expired. This has the effect of not only keeping him from attacking my party members until he's the last enemy, but also turning his physical attacks on his own helpers.
Kana summons a Phantom whenever he can. Hiravias also peels off a Shocking Bolts spell to catch as many enemies as he can. It's otherwise a matter of cutting them down until only Darzir is left, and then gang up on him. His death prompts any surviving Crag Ogres and Winter Wolves to flee Stalwart Village.
*Evil* Warleader Darzir
The evil party wins this differently. Eder inches just a little ahead of the party and just enough to get the attention of the Crag Ogres most nearby in order to get the horde to come forward. Zakara ingests a Potion of Power at the outset. She will also tag Warleader Darzir with Sworn Enemy once he comes into view. She, Kana and Eder form a front-line to keep the spellcasters safe.
Durance begins a sequence of Devotions for the Faithful, Watchful Presence, Consecrated Ground and Interdiction on the oncoming foes. He also keeps an eye out for chances to cast other spells as the opportunity arises, and as the battle wears on. And in fact, he ends up casting Consecrated Ground at least two more times over the course of the battle to keep the party healthy and on their feet.
Aloth begins a sequence of Eldritch Aim, Pull of Eora ahead of the party, followed by Chill Fog at the same spot. The concept is to keep the enemies, while they're at their most numerous, at a distance from the party with the front-line only having to fight the odd straggler that might break through.
Aloth follows up with Kalakoth's Minor Blights and Merciless Gaze, and begins bombarding his enemies at a distance. It is a long battle, and the Pull of Eora and Chill Fog last for only about a third of it. But by then they've been weakened enough that I can wear down what's left with a combination of melee attacks, bombardment from Aloth, and healing spells (i.e. Consecrated Ground) from Durance.
Keydy's House
Keydy's House is at #27. It will be in the process of burning to the ground once the Crag Ogres have been driven out. If you wish to do so, you will have limited time following the Crag Ogre attack with which to save both her and/or a guard named Lurgolder. It involves a scripted interaction that proceeds in stages. You need to select either your main character or one of your companions to handle the entirety of the scripted interaction.
The first stage of the scripted interaction is to safely gain entry into the house without smoke inhalation. You need a Survival check of 5 and a Constitution check of 16 to avoid inhaling any smoke. A Survival check of 5 and making a Constitution check of 12 will result in inhaling only a little smoke.
The next stage is to deal with a wooden beam that threatens to crash on whichever character you send in. The possibilities are:
*Evil* Keydy's House
As I previously mentioned, the only intention the evil party has for this scripted interaction is to retrieve a magic ring, and not to save anyone's lives. I send Aloth. He has a Constitution of 12 thanks to temporarily wearing the Bracers of Enduring he found earlier in one of the random drop chests, and a Perception of 15 after using the Towers rest bonus at Caed Nua.
I use the following sequence:
*Evil* Zahua Joins
I show this part from the perspective of the evil party. I click on the barrel at #17 and begin a scripted interaction with the result the evil party is now joined by the Monk named Zahua.
The build that I have in mind for Zahua is that he'll emphasize the use of Torment's Reach in conjunction with weapons that have on-hit effects whenever he's faced with mobs of lower-level enemies through the use of his Aggressive AI. However, he'll switch off his Aggressive AI when instead he needs to emphasize damage against singularly powerful enemies with high Defense. I choose Turning Wheel, Stunning Blow and Rooting Pain on his 3rd, 5th and 7th level-ups respectively. I choose the Lesser Wounds, Two Weapon Style and Wilder Hunter talents on his 2nd, 4th and 6th level ups respectively.
I now begin to equip him some items that I've been saving for him. I equip him with the Mourning Gloves:, which he'll wear for the rest of the game. It was a reward for the The Mourning Circle companion adventure. Bonuses to Attack Speed and Endurance on kill are the key benefits. Minor increases to Defenses, Concentration and Interrupt are sugar on top. They are arguably the best gloves in the game, but especially so for a dual-wielding character that places a premium on Attack Speed and Endurance recovery.
The next item I equip him with is the Ring of Overseering. The point is to increase the area of effect of abilities such as Torment's Reach and Rooting Pain.
The video concludes with me equipping him with some interim items to hold him over, including the Sun-Touched Mail of Hyran Rath, Boots of Stealth, the Aattuuk dagger, and the Oidreacht stiletto.
Renengild
I first begin this video by beginning construction of the Chapel upgrade for the Stronghold. The reason is that I will soon want the Resolve resting bonus.
The entrance to Renengild's house is at #24. Once inside, she asks for my help in opening up access to Durgan's Battery, as well as sharing information about possible leads.
The conversation advances the Durgan's Battery quest. It also starts The Ogre Matron and The Recluse of the White March quests.
Odeyna Fyrgest
The good party returns to the Great Hall in Caed Nua. I have two visitors waiting for me. One of them is Odeyna Fyrgest, a war hero who apparently has Post-Traumatic Stress Disorder (PTSD). Your options are:
Solmar the Shackler
The next visitor is Solmar the Shackler, who has a dilemma regarding Orlan slaves that he wants to sell off in Iximitl. Your options are:
Silver Arrow
I begin by resting up until the Chapel upgrade is complete. After that, I rest with the Chapel bonus (+3 Resolve) and then travel directly to the Russetwood.
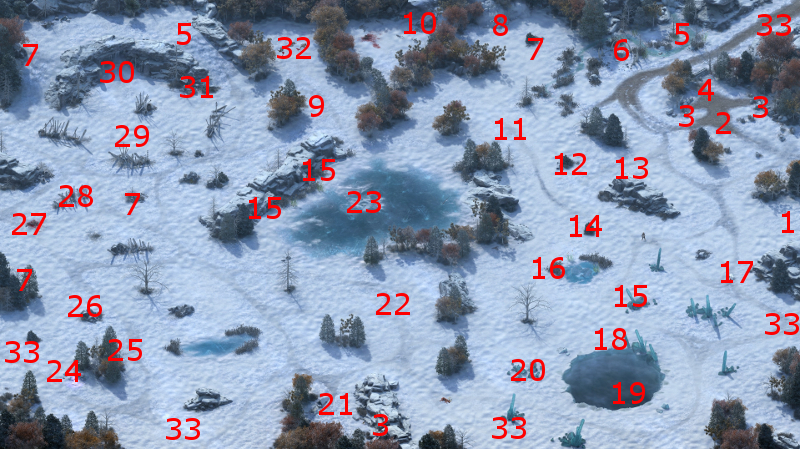
I start off at #1 on the map of the Russetwood. A wounded Winter Wolf will be at #17.
You can extract a Silver Arrow from the Wolf. Whether you do it by safely removing it so that it can heal, kill it in the process, or outright kill it, is up to you. The arrow is a component of the Stormcaller Bow.
The Wolf is also relevant to The Hunter's Favor quest. How you extract the arrow from the Wolf will not be fatal to completing the quest, but extracting it safely without killing the Wolf will allow good characters to complete the quest in a way they may find morally optimal.
Extracting the arrow safely from the Wolf without killing it requires the main Watcher character to perform any one of the following:
*Evil* Vamrel
Zakara makes a stop at the Russetwood. At #11 will be a group of Elven Slavers led by Vamrel who are trying to haul along a Crag Ogre captive. I get aggressive by punching one of the Elves in the face to pick a fight. The fight is actually pretty easy, because the Crag Ogre breaks free and essentially forces the Slavers to divide themselves into two groups, each of which I can bring down one at a time.
*Evil* Bittercut
Now I loot the bodies. One of the items I find is a Fine Plate Armor, which becomes an upgrade for Eder.
The other item is a sabre called Bittercut, which becomes Zakara's main weapon for the rest of the game. The key feature is that the ability to inflict Corrosive damage on its targets if the target's Corrosive Damage Reduction is lower than its Slashing Damage Reduction, which is almost always the case.
I add the Fine Quality and Corrosive lash enchantments to the weapon.
This is probably the weapon of choice for a Bleak Walker. The Spirit of Decay talent, which she will take on her 8th level up, will augment the base damage of her new weapon, the Corrosive lash enchantment I placed on the weapon, as well as her use of Flames of Devotion in conjunction with the Remember Rakhan Fields talent.
The video concludes with me returning to Stalwart Village.
*Evil* Maneha Joins
I show this part from the perspective of the evil party. I head over to #10, where I will now find the Aumaua Barbarian named Maneha.
I have a tank-build in mind for her, so I choose my abilities accordingly: Savage Defiance, Brute Force and Thick-Skinned on her 3rd, 5th and 7th level-ups respectively. I also select the Accurate Carnage, Gallant Focus and Weapon and Shield Style talents for her during her 2nd, 4th and 6th level ups respectively.
I now begin to equip him some items that I've been saving for her. One item I equip her with is the Ring of Overseering. The point is to increase the range of Carnage and Threatening Presence (later on).
Another item is the Boots of the Long March. The bonus to Endurance, both directly and indirectly through the bonus to Athletics, is welcome for any tank character.
I also equip her with a Plate Armor, the Hearth Harvest hatchet, and the large shield called the Larder Door as interim items.
Ruphec's Watchful Cloak MKII
Yduran's Wares will be at #8. He sells various weapons and armors, as well as Potions, Scrolls and Traps.
The only item I bought from him was Ruphec's Watchful Cloak MKII. Hiravias wears it for the rest of the game. The +2 Perception bonus is welcome for any character that attacks with great frequency (either melee or with spells). That it makes its wearer harder for enemies to Flank also makes it an ideal cloak for any tank or off-tank character.
*Evil* Maneha gets the cloak in the evil party, and for the same reasons.
*Evil* The Burden of Memory
Here I show the evil party stopping off for a sleep at Gref's Rest. Maneha wakes up from a Nightmare, and I select the Cruel option to get her back to sleep.
She afterwards explains that she is troubled by a haunting memory from a past life, and she hopes to rid herself of it at a Salt Well in the as yet unfound Abbey of the Fallen Moon. This event triggers her personal quest, The Burden of Memory.
Second Skeletons Attack
The good party has to deal with another Skeletons attack at Caed Nua. It's much like the previous one, but with the significant difference that my lone hireling starts off surrounded and is therefore in real danger of getting ganged up on. I therefore have Hiravias cast a couple of Shocking Bolts spells, which won't hurt allies, to speed things along.
Second Cutthroat Bandits Attack
Well, now it's another attack, this time by Cuthroat Bandits. Again, there's the potential concern about my Hireling getting ganged up on. So I position Hiravias into the thick of it to let off a Returning Storm and then a Moonwell.
I begin construction on the Warden Hall upgrade once the battle is over, and return to Stalwart Village.
Durgan's Battery will be my next destination.