-

- Forums
- Chatrooms
- Gallery
- Gameplay Videos
- Upload
- Articles
- Mod Reviews
- Shop SP: Games, Movies, Books
|
|
Halls of Silence
*Evil* Wave Crested Key
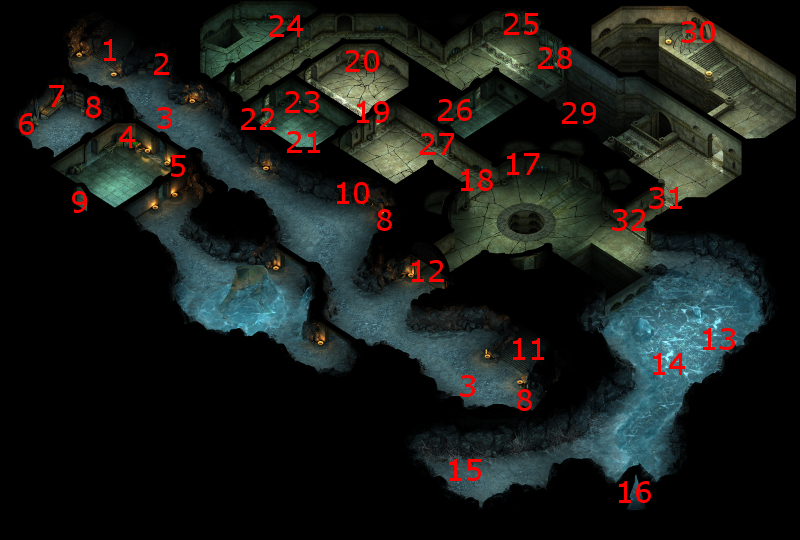
The evil party starts off at #11 of the Halls of Silence map. Points at #3 will have plenty of Ondrites that will attack me on sight. Durance's usual buffs often suffice. Aloth often uses a sequence of Eldritch Aim and Call to Slumber to hold them up, followed by Death Ring.
The table at #10 has another Wave Crested Key.
I loot the containers found in the room off the westernmost corner of the halls. The crate at #7 has Boots of Speed, but I already have a pair for occasions when I may want a character to move especially fast across a map.
I rest up with the Damage Reduction bonus, and then grab the Camping Supplies from the crate at #6.
The video concludes with me using the Wave Crested Key to open the door at #12.
*Good* The good party covers the same ground, and again without having to kill anyone.
Low Tide Brethren
Several Low Tide worshippers of Ondra will be in the circular room north of the door at #12. They will not attack, for now.
However, I need to switch the lever at #17 in order to open the gate at #18 in order to make progress, and that will cause the Low Tide to go hostile.
I position Kana and Ituumak west of the lever. Alliria holds the east side, while Devil of Caroc holds the south side, completing a little barricade surrounding Hiravias, Grieving Mother and Sagani.
The main annoyance will be the Priest who comes in from the west, but Ituumak is perfectly placed so that he and Sagani can take him out quickly. Kana and Devil of Caroc hold tanking positions.
Hiravias casts Moonwell, Returning Storm and Nature's Mark. Alliria uses Reinforcing Exhortation on Kana and Devil of Caroc.
Grieving Mother starts with Phantom Foes. She then attacks the nearest foe to build her Focus up to 60, and then uses Amplified Wave to knock all my enemies Prone. The battle pretty much takes care of itself after that.
Farentis
I head west and speak at length with Farentis at #21. Unlike Kaoto, he would like me to perform the Rising ritual in a way that allows his Low Tide brothers and sisters to escape. It doesn't matter how I react to him, he'll still give me the Ornate Cracked Key to open the door at #22.
*Evil* Farentis
Zakara will also hear Farentis out, but also prefers to straight up murder him. In addition to the Ornate Cracked Key, he also leaves behind:
Low Tide in the Halls of Silence
Now I go about slaughtering Low Tide brethren and sisters in the hallways of the north side of the Halls of Silence. The usual tactics suffice.
The Rising Waterway
At #28 is a series of tiles. The objective of arranging them correctly during a scripted interaction is to pave the way across to the east. The correct order is:
Ondra's Witness
At #30 is what's for all intents and purposes a lever that involves a fundamental choice regarding your quest.
You can choose to switch the lever to the open gate setting, which will allow the Low Tide brethren to escape and free themselves. Doing so will cause any remaining High Tide brethren to become hostile and attack you on sight, including High Abbott Kaoto.
You can instead choose to switch the lever to the rising tide setting, which will cause most of the Halls of Silence to flood over, causing all of the Low Tide brethren within to drown to death.
Either choice leads to all of the Low Tide brethren being gone for good, and you acquiring Ondra's Witness, an item you'll need to make progress.
Alliria switches the lever to cause the flooding, both as an act of mercy killing and to stay on the good side of Kaoto for the time being.
*Evil* Zakara likewise opens the floodgates, but more out of sheer cruelty and enjoyment of murder than as a mercy killing.
Arthek's Cord
The lever at #31 opens the door at #32.
Alliria uses her Watcher powers on the corpse at #13 to witness last memories before the drowning. The corpse itself has a belt called Arthek's Cord, which offers interesting bonuses depending on whether its wearer has over 75% Endurance or less than 75% Endurance. It doesn't fit into any of my plans though, so I'll just sell it.
*Evil* Moon Spiderlings
Here I show the perspective of the evil party again. At #15 will be a Moon Spider and several Moon Spiderlings. They're very easy to kill by now.
Now I rest up with the Accuracy vs. Vessels option. I next grab the Camping Supplies from the nearby corpse.
The video concludes with the evil party going back up the stairs at #11 so as to return to the Halls of Presence.
Veil of Tears
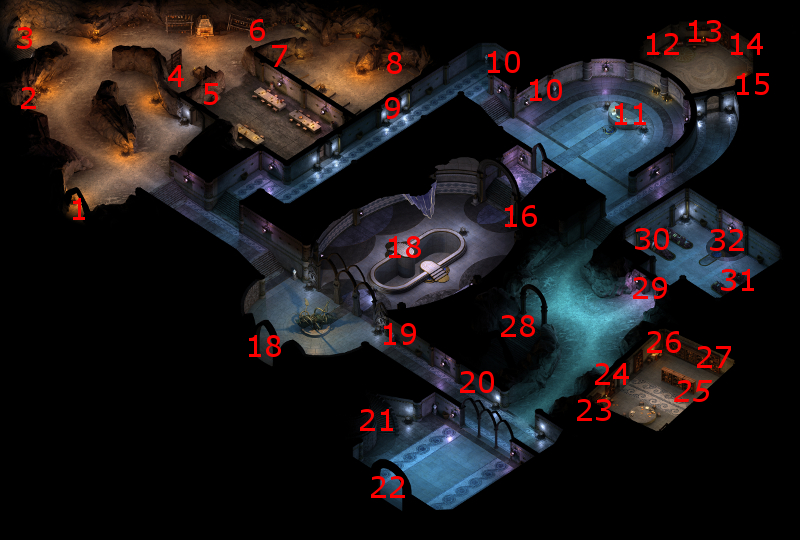
I speak again to High Abbott Kaoto. As I now have Ondra's Witness, he now beckons me to join him in a place called the Reliquary. I go up the stairs at #21.
*Evil* The evil party continues on straight to the stairs at #21 since they've already defeated High Abbott Kaoto on the map of the Halls of Presence.
I arrive at the door at #21 on the map of the Abbey of the Fallen Moon. High Abbott Kaoto and several of his brothers and sisters of the faith will now be gathered near the door at #23.
He will now want to back out of becoming Low Tide. He will explain further, and becomes resolute on fighting you. You can reciprocate and attack him straightaway. Alternative, you can make either a Perception check of 15 or a Resolve check of 13 to convince some of Kaoto's allies to take your side, which can make the battle significantly easier. He and the others will drop the same items as if you had killed them earlier.
Alliria makes the Perception check to begin the battle. A few foes will come from the south, and Kana holds tank position against them. Sagani and Ituumak also help him take them out, since the south group includes at least one Priest.
Alliria tags Kana and Devil of Caroc with Reinforcing Exhortation, and then Kaoto with Sworn Enemy. Hiravias uses Moonwell and Relentless Storm. Grieving Mother uses Phantom Foes, attacks the nearest enemy, and then uses Amplified Wave whenever she has enough Focus.
The Amplified Waves and a paralysis wave from Kana once he's freed up pretty much seal the deal. Soon only Kaoto is by himself, and Alliria hits him hard with her Flames of Devotion. The end is inevitable.
Now I rest up, with my heavy hitters using the Accuracy vs. Vessels resting option in anticipation of fighting the Eyeless. After that, I grab the Camping Supplies from a nearby crate east of where the battle had taken place.
I take back Ondra's Witness from Kaoto's body, and make the Veil of Tears at #23 dissipate to clear the way.
*Evil* The evil party arrives at #21 on the map of the Abbey of the Fallen Moon. They've already defeated Kaoto as it is, so things are now much simpler. I simply check out nearby containers for loot, and then use Ondra's Witness to open the Veil of Tears at #23.
The Rising Tide
Now I click on the base of the skull at #25, which prompts a lengthy dialogue with the goddess of the sea and forgetfulness, Ondra. There are at least two results. One is I acquired the Fragment of Ondra's Hammer. The other is that she reluctantly offers her aid in destroying the Eyeless. To that end, she directs me to a place called Cayron's Scar. This conversation marks the conclusion of The Rising Tide quest.
The exit at #29 allows me to travel straightaway to Durgan's Forge.
*Evil* Abydon's Hammer
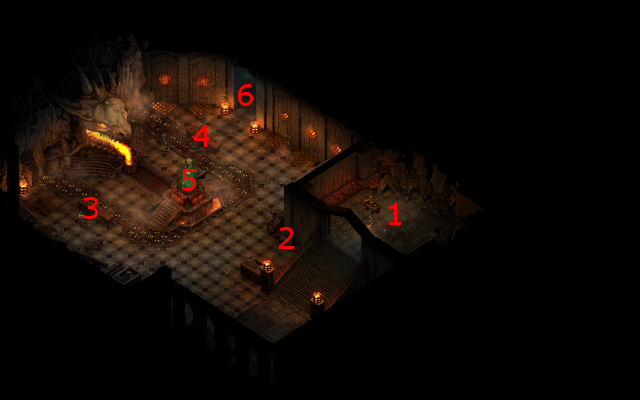
This part is especially pertinent for the evil party. Zakara clicks on the forge at #5. The Fragment of Abydon's Hammer is transformed into Abydon's Hammer.
Aloth wields it for the rest of the game, strange as it may sound. The hammer, despite all the buildup and cool-sounding abilities, is actually not that great of a melee weapon. You can't 'Durganize' it to increase its attack speed, nor does it have much of anything in the way of 'on hit' effects. What it does have going for it is that its +4 Might will stack with the +4 Might bonus from Aloth's Maegfolc Skull. The hammer is actually an ideal weapon for a damage-caster for that reason. Granted, Aloth doesn't have the greatest stats to be an optimized damage caster. But he does well enough, and the idea certainly commends itself if you wanted a Might-maximized damage caster for your own Watcher build. The stun all enemies within 4m once per encounter power is sugar on top, and may come in handy during some battles.
I now have also have enough Durgan Iron Ingots to make two Refined Durgan Iron Ingots. I invest both of them into enhancing Durance's Pliambo per Casitas so as increase its Critical Hit Modifier, its chances of turning Hits into Critical Hits, but most especially its Attack Speed so that he can reload it faster.
*Evil* Marked Amulet
The evil party afterwards returns to the rewards chest at #3 in the Great Hall. Inside will be the Marked Amulet, which is a reward for the companion adventure called A Solitary Mark.
I have no use for it though. I sell off all the excess gear that I've accumulated and make my way to Cayron's Scar.
Abydon's Hammer
The good party goes through with the creation of the hammer, but do not themselves have any real use for it in combat. Another major difference is that they've gotten some allies along the way, unlike Zakara who pretty much went out of her way to destroy any potential allies she might have made.
Deyran arrives and gives me a Durgan Iron Ingot.
I previously completed the Ready the Cannons quest, so Wengra shows up to give me the Heavy Cannon Blast talent. The talent provides an area-of-effect attack that inflicts both Crushing and Piercing damage, and also knocks its targets prone. It can only be used once per Rest, and can only be used in Cayron's Scar.
I previously completed The Iron Flail quest in a way that persuaded Adaryc to depart willingly, so he shows up to give me the Burning Pitch Trebuchet talent. It's again another area-of-effect attack that can only be used once per Rest and can only be used in Cayron's Scar.
*Note* These allies will not actually travel with you to Cayron's Scar. Their help is limited to what is described above.
I also completed The Ogre Matron quest without slaughtering the Ogre clan. That means Matron Beregan shows up to give me her horn, which can be used once per rest to summon three Crag Ogres.
I now have five Durgan Iron Ingots, so I click on the forge at #5 to create another Refined Durgan Iron Ingot. I use it to enhance Hiravias Godansthunyr hammer.
Both parties now head for Cayron's Scar.