-

- Forums
- Chatrooms
- Gallery
- Gameplay Videos
- Upload
- Articles
- Mod Reviews
- Shop SP: Games, Movies, Books
|
|
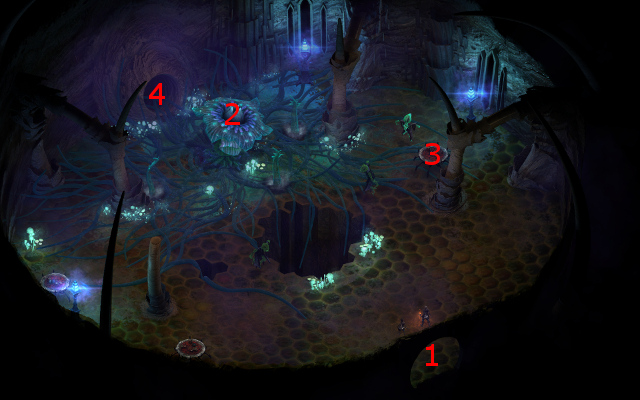
Luminescent Caves
Vithrack Luminary and Miners
I start off at #1 on the map of the Luminescent Caves. Just a little ahead at #2 will be a Vithrack Luminary in control of a pair of Miners. I kill them off easily enough.
Vithrack Luminary and Brutes
I travel northwest along a gangway until I reach #6. There I have to fight several Crystal Eaters, several Vithrack Brutes, all led by a Vithrack Luminary. I win the fight with standard methods, although it is a little more challenging on account of having to cut my way through the Brutes before I can reach the Crystal Eaters, who get several rounds of free missile shots at me.
I've taken a beating over the long haul, so now seems like a good time to take a rest.
Radiant Sporelings
I go north from #6, and fight several Radiant Sporelings and Crystal Eaters. I manage to win routinely through the usual tactics.
Vithracks and Radiant Sporelings
I now travel to the northeast corner of the caves, where I beat out a large group of Vithracks and Radiant Sporelings. The theme of sending Ituumak against the distant Vithracks, and then using him as the focus for Amplified Wave figures very strongly here as well.
The video concludes with collecting gems and scrolls from the urns, despite tripping relatively harmless traps, and then making my way back to #6.
Vithracks and Dominated Adventurers
I continue northwest to the room at #7, where waiting for me are a couple of Vithrack Luminaries in control of a large number of Dominated Adventurers. The usual methods work, but with a twist.
The enemies approach me from the north. I send Sagani and Ituumak to the west. That allows the pair to attack the Luminaries from the west right away, avoiding the need to have to fight through a wall of thralls and animated weapons first. Ituumak of course makes a handy focus for Grieving Mother's Amplified Wave.
Elryn's Jacket
Now I go to the room at #10, where I defeat a few Vithracks and a few Crystal Eaters easily enough. A trapped container in the room has a Padded Armor called Elryn's Jacket. I have no use for it though, so I'll just sell it.
Terenat
Now I speak to a Vithrack named Terenat at #9. He informs me that a monstrosity called a Radiant Spore is at the root of all the troubles besetting the Mines and the Caves, and that a hidden crystal is needed to reach it.
Vithrack Crystal
The room in the southwest corner has a lot of traps. Devil of Caroc is able to disarm them with the help of her Gloves of Manipulation.
However, there are also plenty of Vithracks in the area. So I hold most of the party back and send Devil of Caroc on alone to disarm what traps she can find while in Stealth mode. When just one shows up, I lure it back to the party to kill it off quickly.
The rest of the group shows up afterwards, and I lure them back to the rest of the party and away from the traps so I can conduct the battle properly, and with buffs.
A container at #12 has the Vithrack Crystal. I bring it to the door at #13, which causes the energy barrier to evaporate, and thereby opening access to the Vithrack Common House.
Radiant Spore
I start off at #1 on the map of the Vithrack Common House. Devil of Caroc switches back to her Gauntlets of Swift Action, while Alliria puts on the Ring of Changing Heart with a view towards making Resolve checks.
At #2 will be the Radiant Spore. It is surrounded by several of its tentacles, as well as several Vithracks and Radiant Sporelings. I willingly ingest its spores, and then make a Resolve check of 13. I immediately thereafter demand the release of the Vithracks, followed by making a Resolve check of 15. That means that the Vithracks leave without helping the Spore. Only the Spore itself and its several Radiant Sporelings will attack me.
Hiravias leads off with Relentless Storm and then Moonwell. Kana starts off with a Scroll of Protection and then a Scroll of Defense to help weather the initial onslaught.
But it is Grieving Mother who steals the show on this one. Hiravias casts Beetle Shell on Kana, stunning him in the process. That causes Kana, with the help of his items, to enjoy +100 bonuses to all his Defenses. Grieving Mother then casts Defensive Mindweb while everyone is close to Kana, causing everyone to benefit from Kana's jacked up Defenses.
Once she regains enough Focus, she then uses Reaping Knives on Alliria, turning her into a Focus-generating battery. That means Grieving Mother spends the entire battle with loads of Focus that she can use to either knock the enemies down with Amplified Wave, or renew the Defensive Mindweb after another Beetle Shell on Kana. It's only a matter of time before the Radiant Spore goes down.
A container at #3 has a Blunderbuss called the Silver Flash. I have no use for it, so I'll just sell it.
I'll use the tunnel entrance at #4 to return to the Stalwart Mines.
*Evil* Radiant Spore
Zakara chooses the attack dialogue option right away, and this commits the party to fighting both the Radiant Spore as well as the Radiant Sporelings and the Vithracks.
Durance begins a buff sequence of Prayer Against Treachery, Devotions for the Faithful, Crowns of the Faithful, Consecrated Ground, and Circle of Protection.
Aloth begins with Merciless Gaze, Kalakoth's Minor Blights and Essential Phantom. As the enemies close in around the party, he then protects himself with Llengrath's Safeguard, and then uses Eldritch Aim. After that, he uses multiple Death Ring spells to whittle down the surrounding enemies.
It's a matter of the party cutting down the Vithracks and Sporelings helped along by Aloth's spells. Even so, this is a much tougher battle for the evil party, since the Stun powers of the Vithracks can expose party members to massive damage from the Radiant Tentacles. Aloth falls, as does Maneha even after the Second Chance from her armor and after receiving a Resurrection spell from Durance.
Nonetheless, the surviving party members manage to wipe out the Sporelings and Vithracks, then cut down the Tentacles one by one, and then the Radiant Spore itself.
A Legendary Companion Adventure now becomes available. I insisted on it being The Coal Eater. The intention is to procure the Blighted Coals as a summoning item for Zakara. I assigned Pallegina to the adventure.
Whispers in the Dark
I am back at #16 on the map of the Stalwart Mines. I make my way back to Foreman Ismey at #4 and inform him of what happened.
The Foreman is still unsure of what to do with Gamdel, leaving the choice up to me. Alliria pleads for Gamdel's innocence and release, which results in a small subtraction of positive reputation with Stalwart Village.
Whatever choice is made, I get 2,000cp for concluding the Whispers in the Dark quest.
*Evil* Whispers in the Dark
Zakara selects the Cruel option that condemns Gamdel to punishment for Sameth's death.
Either party leaves the Mines and set about exploring Stalwart Village, which has changed quite a bit during Part 2 of the White March expansion.