-

- Forums
- Chatrooms
- Gallery
- Gameplay Videos
- Upload
- Articles
- Mod Reviews
- Shop SP: Games, Movies, Books
|
|
Stalwart Village
Hamond's Emporium
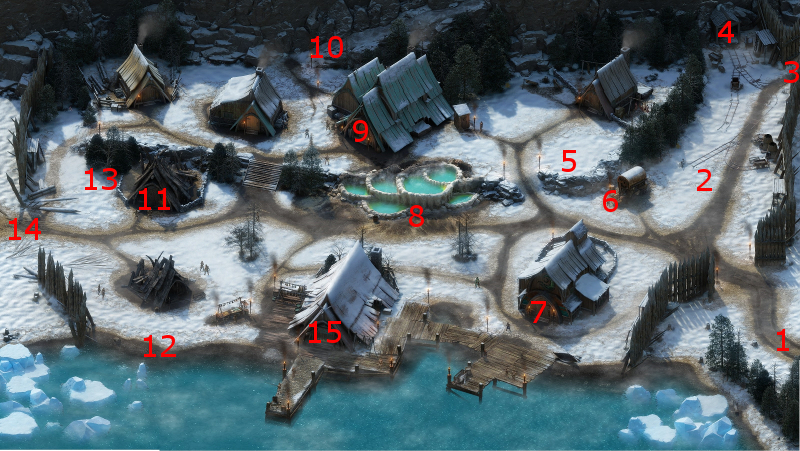
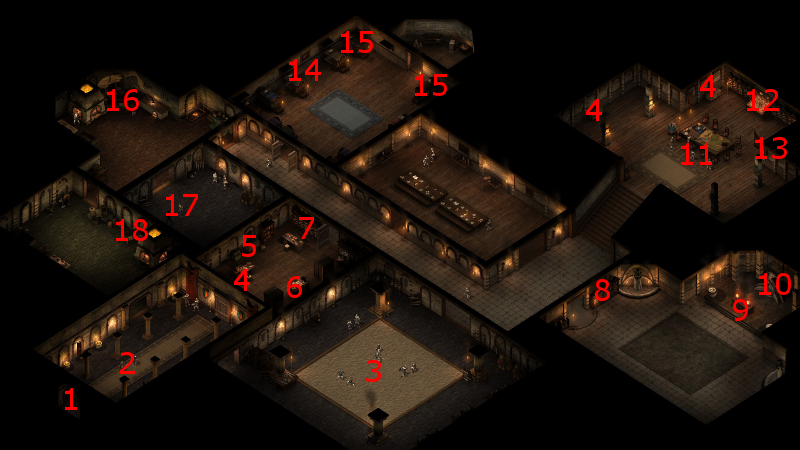
Keydy's house has now been replaced with Hamond's Emporium, the entrance to which is at #11 on the Part 2 version of the map of Stalwart Village.
There are a few items I'm interested in. One is the Twin Sting, which becomes Devil of Caroc's ranged weapon for the rest of the game. Although she is not primarily an archer, the crossbow does present some interesting possibilities for a Rogue, such as inflicting a small amount of Raw Damage with each hit, and the potential to trigger Merciless Gaze for the Rogue on a Critical Hit or Hit.
The other is the Argwes Adra's Helm, which Devil of Caroc wears for the rest of the game. The +3 Resolve bonus will help her in her off-tank melee combatant role.
I also replenish my Camping Supplies.
*Evil* Hamond's Emporium
The only item evil party purchases from Hamond is the Argwes Adra's Helm for Maneha. The obvious point is to increase her Resolve (and thus her Deflection) by +3, thus improving her durability as a tank.
Mayor Tarfos
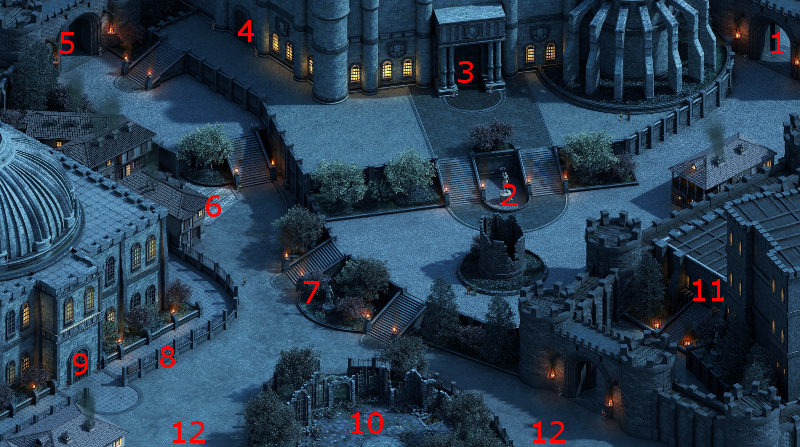
I speak to Mayor Tarfos at #2. He wants me to negotiate a trade agreement on behalf of Stalwart Village with a representative of Defiance Bay, Nesta. This conversation starts the Risk Tolerance task. *Note* Both the good and evil parties do this task pretty much the same way, but I show it from the perspective of the good party.
Tarfos indicates that Nesta can be found in Gref's Rest, so I head over to the door at #9.
Nesta in Gref's Rest
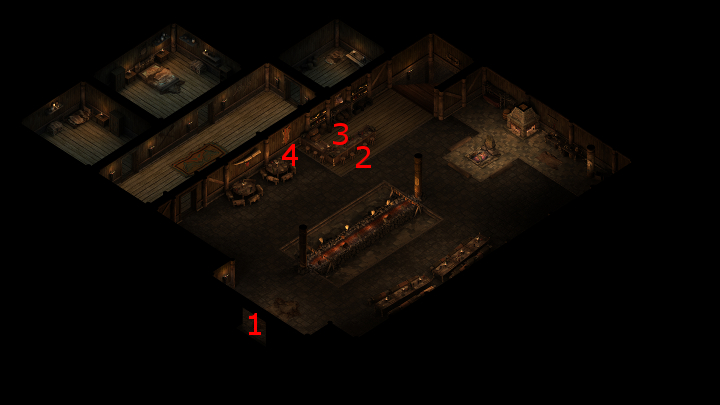
I rest up, and then speak to Nesta at #2 on the map of the main floor of Gref's Rest. She asks me to meet up with her at the Fishery.
Nesta at the Fishery
I find her waiting outside the front door to the fishery, which is at #15 on the south edge of the village. Her initial inclination is to close it down. The Stoic reply or the response of leaving it to her decision will acquiesce with Nesta's preference, and result in the fishery getting closed down, which is bad for the village itself.
The Diplomatic (which Alliria chose) and Rational replies convince her to allow the fishery to remain open, which will be beneficial for the village.
She informs me that she wants to check out the Mines next, and leaves for them. The entrance to the Mines as at #4.
Nesta at the Mines
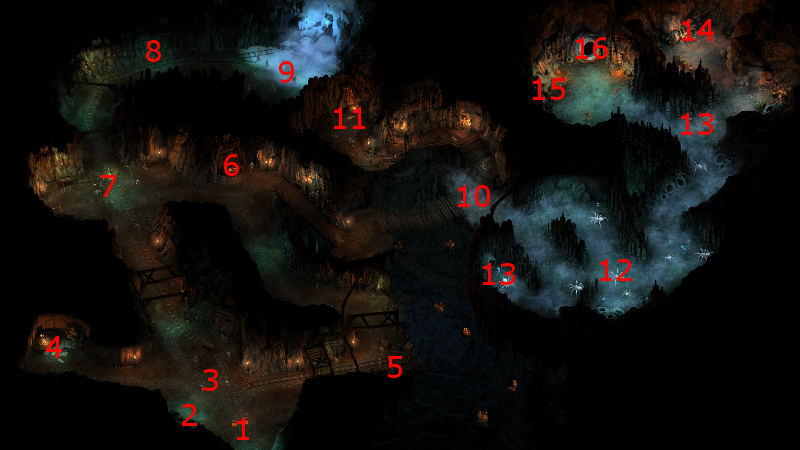
You will start off at #1 on the Stalwart Mines map. Nesta will be near Foreman Imsey at #4. She will have heard of troubles besetting the Mines, and her preference is to have the Knights of the Crucible guard the Mines instead of the Stalwart Militia, which would be bad for the village.
*Note* If you have NOT previously completed the Whispers in the Dark quest, then it will be a foregone conclusion that Nesta will insist on having the Knights of the Crucible guard the Mines, and there is nothing you can do to convince her of otherwise.
If you did previously complete the Whispers in the Dark quest, then Aggressive and Rational (which Alliria chose) replies will convince her to let the Stalwart Militia continue to guard the Mines instead of the Knights of the Crucible, which will be good for the village.
She informs you that she is making her way to Durgan's Battery, and departs for it thereafter. I follow after her.
Sadon Twice-Hanged
I start off at #1 on the map of Durgan's Battery during part 2 of the expansion. I step forward just a little, and Nesta shows up fleeing from a gang of Brigands led by Sadon Twice-Hanged. I defeat them easily. Nesta tells me to meet her at the White Forge and departs. I get there through the doorway at #4.
Nesta at the Forge
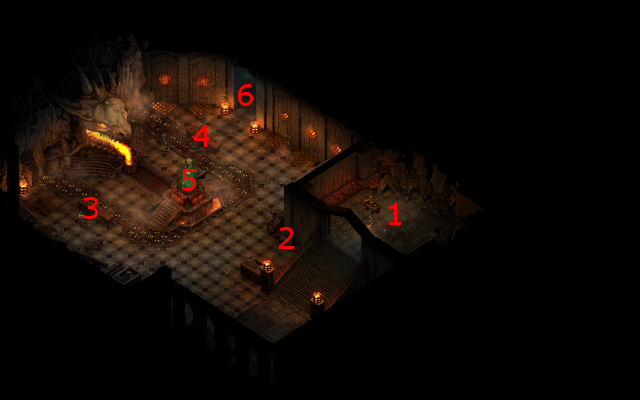
Now I'm at #1 on the map of Durgan's Forge. I grab a Durgan Iron Ingot from the table at #4. I then click on the White Forge at #5 to merge three Durgan Iron Ingots into a Refined Durgan Iron Ingot.
I use that ingot to 'Durganize' Devil of Caroc's Body. The reason is simple, it will increase yet further how frequently she attacks with her axe.
Nesta will be near the statue at #5. She predictably prefers that smiths from the Crucible Armory run the Forge. A Deceptive response, and a dialogue option implying that the village locals won't appreciate it, will convince her to let the local smiths stay in charge of the forge, which is good for the village. Other replies acquiesce in her initial preference, which is bad for the village. Alliria uses the Deceptive reply, since the effect is so small that it won't actually increase her Deceptive disposition such as to bring about penalties to her Defenses.
It is at this point that she'll indicate that she's ready to formalize an agreement with Tarfos. I exercise the option to return straightaway to Stalwart Village instead of trekking it back the long way.
Risk Tolerance
I speak to Mayor Tarfos again, who informs me that a favorable trade agreement with Defiance Bay has been reached. I gain a minor increase in positive reputation with Stalwart Village for reaching favorable terms. I also get the Tax Collector's Mantle as a reward to conclude the Risk Tolerance task.
Now I make my way to the entrance to the Temple of Abydon, which is at #7.
Masca
I start off at #1 on the map of the Temple of Abydon. I speak to Masca at #2, who gives me the Forge Hammer with the hopes that I can get it blessed by both Abydon and Magran. The dialogue starts the Iron and Flame quest.
I leave Stalwart Village and make for the First Fires district.
Shrine of Abydon
I make my way to the door to Crucible Keep, which is at #11 on the map of First Fires.
I start off at #1 on the map of Crucible Keep. I make my way to #10 and click on the Shrine of Abydon there, which results in Abydon giving his blessing to the Forge Hammer.
I thereafter make my way to Magran's Fork.
Shrine of Magran
I click on the Shrine of Magran at #8 on the map of Magran's Fork. That results in Magran also giving her blessing to the Forge Hammer.
However, as a test, she also sends several Flame Blights and a couple of Drakes to attack the party. I can deal with them easily enough by now. I now travel to Caed Nua.
The Looking-Inward Chime
The good party returns to the rewards chest at #3 in the Great Hall. Waiting inside will be The Looking-Inward Chime, which is a reward for the companion quest called A Place of Great Silence. I have no use for it though, so I'll just sell it.
I rest up and then make my way back to Stalwart Village.
Iron and Flame
I enter the Temple of Abydon and give the Forge Hammer to Masca. I now have two basic choices. One choice is to talk her out of going ahead with using the hammer for the ritual with either Benevolent or Passionate dialogue choices. That results in Masca staying in the Temple, and you earning a minor boost to positive reputation with Stalwart Village.
You could, even if you initially try to talk her out of going ahead with the ritual, change your mind and tell her to proceed. One of the dialogue options in that respect earns Aggressive disposition. If you go this route, that leads to the next basic choice.
The next basic choice is to let Masca proceed with the ritual. Problem is, Engrim will catch on and call her out. His initial inclination is to expel her from the Temple. You then have another choice between speaking on behalf of Masca and convincing Engrim to let her stay, or holding your tongue and acquiescing in Masca's expulsion.
Options to convince Engrim to allow Masca to stay include:
*Evil* Iron and Flame
Zakara also lets Masca go through with it, but she gets exposed as a cheat when her sword breaks apart. Engrim's initial inclination is to expel Masca from the Temple. I could try to talk him out of it. However, Zakara gleefully supports the expulsion with the cruel dialogue options.
Masca still gives me The Unlabored Blade, as it is still the quest reward no matter how I resolve the quest.
*Evil* Blighted Coals
The evil party returns to the rewards chest at #3 in the Great Hall. Waiting inside will be the Blighted Coals, which is a reward for The Coal Eater companion adventure.
Durance equips it in one of his quick-item slots, since it will allow him to summon a Magma Blight once per Rest.
*Evil* The evil party by now has pretty much done almost everything, so now they head for the Abbey of the Fallen Moon.
*Good* The good party makes for the Longwatch Falls.