Pillars of Eternity logo


Pillars of Eternity Online Walkthrough by David Milward


INTRODUCTION & ABOUT  |  WORLD MAP  |  WHITE MARCH MAP
General:  
Quests  |  Tasks  |  Bounties  |  Items  |  Characters
Areas:  
Act 1 Areas  |  Act 2 Areas  |  Act 3 Areas  |  Act 4 Areas  |  Caed Nua  |  White March - Part 1  |  White March - Part 2  | 
Disable all ads!

Quests:   Main Quests  |  Act 1 Side Quests  |  Act 2 Side Quests  |  Caed Nua Side Quests  |  Act 3 Side Quests  |  White March Part 1 Quests  |  White March Part 2 Quests  |  Companion Quests  | 

White March Part 2 Main Quests:   The Forgotten Army  |  The Iron Flail  |  The Rising Tide  |  Lair of the Eyeless  | 
White March Part 2 Optional Quests:   Iron and Flame  |  Whispers in the Dark  |  Ready the Cannons  |  The Phylactery's Promise  | 

The Iron Flail

  1. The quest triggers once you have completed The White Forge quest, and have rested anywhere outside the White March map. What ensues is a dream of an army marching over the north. That becomes an obvious cue to return to Stalwart Village to find out more.

  2. Stalwart Village

    Part 2 of the White March expansion begins when you've rested in an area not on the White March map after having completed The White Forge during Part 1.

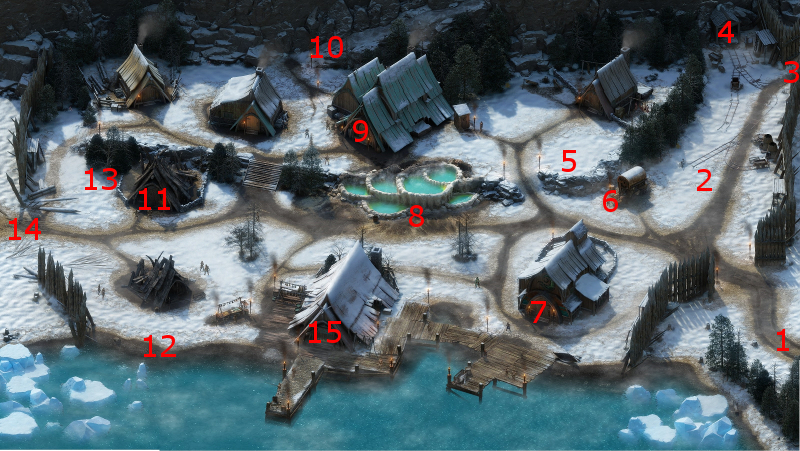
    The first time you return to Stalwart Village after completing Part 1, you'll find yourself at #1 on the Stalwart Village map.

    Step forward just a little, and you'll find yourself at #5. A cutscene ensues whereby a crowd of bystanders gather anxiously around a man named Deyran. Benevolent, Cruel, Passionate, Rational, and Stoic replies are possible during the conversation. The sequence triggers the quest.

    Iron Flail Fort

  3. You start off at #1 on the map of the Iron Flail Fort. There is more than one way to go about things.

  4. One way is to try and sneak your way to the back gate at #8. Keep in mind that this endeavour is very difficult to pull off without everyone in your party having high ranks in the Stealth skill. The perimeter around the fort itself is pretty narrow, and the odds are good that your party will bump into multiple soldiers no matter how you go about things.

    An Idle Soldier and a Villager will be having a tryst at #6. A Benevolent option is available if you want to assure them you're not going to hurt them, while Aggressive, Honest and Rational replies are possible when they become afraid of getting caught by the rest of the soldiers of the Fort. Conversing with them reveals that it is possible to sneak in through the back gate at night.

    The back gate is at #8. It is possible during night time for a character with a Stealth skill to use a Rope and Grappling Hook during a scripted interaction and then open the gate from within without alerting any of the soldiers. Attempting this action during day time or failing the Stealth skill check results in the soldiers being alerted and a fight immediately near the gate.

    *Note* If you need a Rope and Grappling Hook, there is one in a crate at #2.

  5. The front gate is at #14. There are two ways to open it.

    One way is to use the logs from #12 to force them open, although that is likely to result in an injury to at least one party member.

    Another way is possible if you had previously completed the Ready the Cannons quest. You can signal Durgan's Battery to use the cannons to blow the gate away.

    However you do it, you will have to fight a large force of Iron Flail Soldiers as they come for the gate. The opening where the gate itself had been, however, is rather narrow and therefore affords you the opportunity to plant crowd-control spells over it as a bottleneck to your advantage. That also means committing yourself to slaughtering every other soldier inside the courtyard.

  6. The entrance to the Command Post is at #24.

  7. Command Post

  8. White Forge
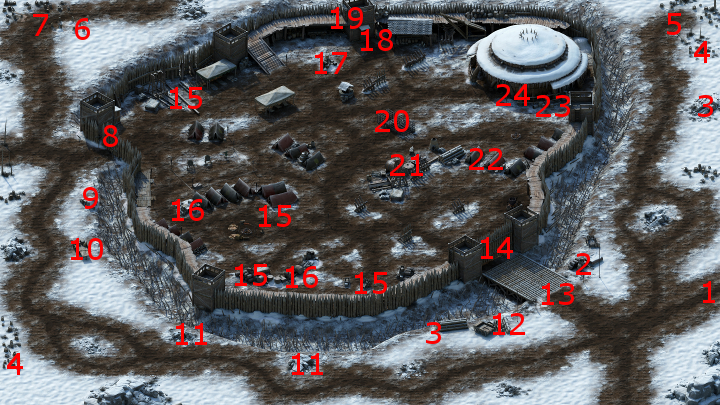
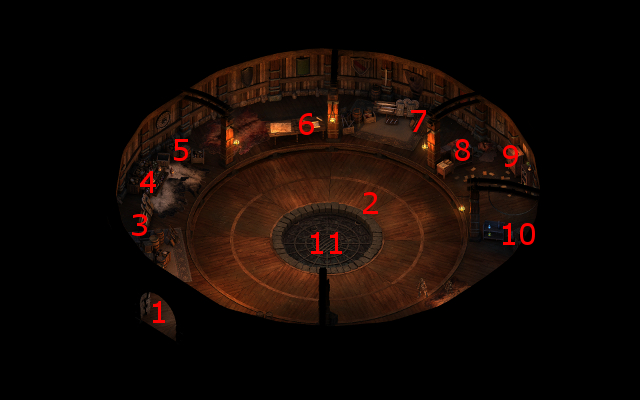
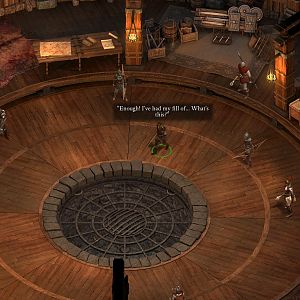
You start off at #1 on the map of the Command Post. The Commander of the Iron Flail, Adaryc, will take up position at #2. The rest of his men will station themselves about the builing.

    You could try to get Adaryc to depart willingly. However, he is himself a Watcher and one of the more unstable individuals you'll encounter in the game, so it's obviously easier said than done. Nearly the full gamut of disposition-based responses are available at multiple points in the conversation, as are multiple checks based on Intellect, Perception and Resolve. If you succeed, he'll give you his soulbound Sword called Steadfast and the Cell Key. He and his men will depart. You also get a moderate gain of positive reputation with Stalwart Village, but immediately followed by a minor loss of reputation with Stalwart Village for letting Adaryc leave alive. *Note* And I suspect that it will be easier if you didn't kill any of the Fort's soldiers outside either, since he will bring it up if you did. I have no confirmation of that suspicion at this point though.

    The other option is to simply slaughter him and his men. In addition to the sword and key, you can also loot Adaryc's body for a Breastplate called the Blackwarden's Breast. Killing him will earn a major gain of positive reputation with Stalwart Village.

    However you deal with Adaryc, you will now gain the Severed Soul talent. This talent allows you to, once per Rest, make a full attack against an enemy that has 25 Damage Reduction Bypass and will leave the target Weakened.

  9. Open the grate at #11 with the Cell Key to free the delegates. The full range of disposition-based responses will be available during the ensuing conversations, often at multiple points.

    One of the delegates, no matter what you say or try, will slit her own throat to commit suicide. You can use your Watcher abilities to discover that she was an agent of a nearby cult dedicated to the goddess named Ondra, whose mission was to manipulate the Iron Flail into attacking Stalwart Village.

    This event leads to the Abbey of the Fallen Moon becoming available on the White March map. Meanwhile, you hear some rather thunderous booms outside.

  10. Two (three on Hard or Paths of the Damned settings) gigantic monsters called Eyeless will attack you once you leave the Command Post. They can inflict hefty damage and knock characters prone at the same time. They also have a tendency to target spellcasters with rays of fire. However, two or three of them shouldn't be very difficult at this point and you should be able to overwhelm them.

    Killing them marks the conclusion of this quest, and also triggers The Rising Tide quest.

    *Note* If Adaryc still lives, he'll arrive shortly thereafter and inform you that Readceran forces will prevent more Eyeless from coming into the Dyrwood through their adjoining valley border.


Amazon.com
Amazon.ca
Amazon.co.uk
Sorcerer's Place is a project run entirely by fans and for fans. Maintaining Sorcerer's Place and a stable environment for all our hosted sites requires a substantial amount of our time and funds on a regular basis, so please consider supporting us to keep the site up & running smoothly. Thank you!

Disable all ads!