-

- Forums
- Chatrooms
- Gallery
- Gameplay Videos
- Upload
- Articles
- Mod Reviews
- Shop SP: Games, Movies, Books
|
|
Endless Paths - Level 2
*EVIL* For the next while, Zakara leaves Sagani out of the evil party, and runs with a party of five that includes herself, Eder's, Kana (cause his Phantoms are still really useful at this point), Durance and Aloth. I only take Sagani back on when I'm ready to sacrifice her in a ruin near Dyrford Village. My rationale at the time was a little more xp for each party member.
Brighthollow Restoration
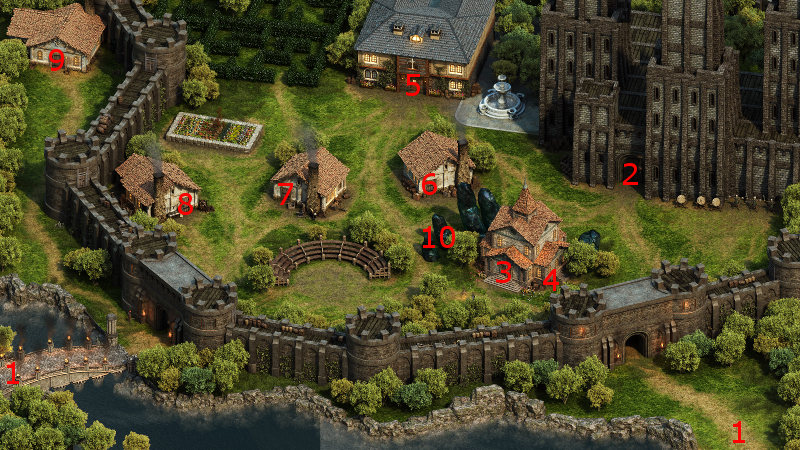
I return to the Black Hound Inn in Gilded Vale to sell off my excess loot and rest up. I then go back to Caed Nua.
I am informed that the Main Hall restoration has been completed upon arrival. I go to the Stronghold menu, and order that the Brighthollow be restored. Resting in Caed Nua will expend Camping Supplies UNTIL the restoration of the Brighthollow has been completed. That was why this particular restoration was my next priority (after the Great Hall, which was my first priority after speaking with the Steward).
The video concludes with me going down the trapdoor at #4 in order to directly travel to the first level of Endless Paths.
Time and Tide
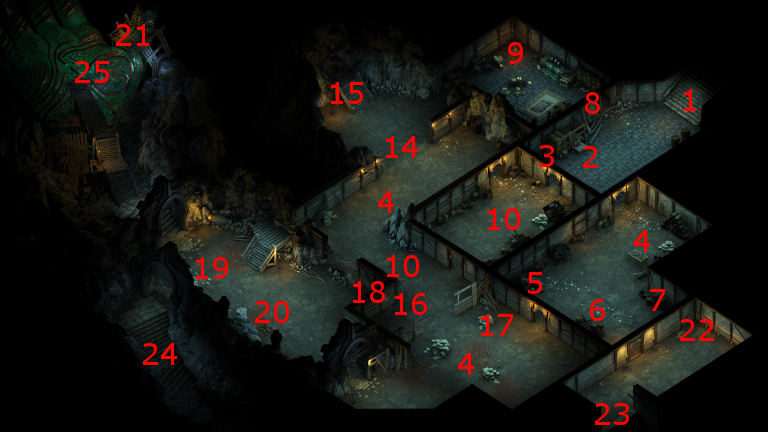
I start off at #21 in the northwest corner of the map. I travel towards the room at the south side of the level. South of #6 and #7, and in between #22 and #23, is a now open doorway without any physical door. It had previously been closed off by a magical energy field that was impassable until I had completed The Old Watcher quest.
Kana will want to speak with Alliria once I reach the doorway. The subject is his search for the Tome called the Tanvii ora Toha, the Book of Virtue. Having this conversation advances the Time and Tide quest.
At #23 is a hidden cache that has an item from the "Endless Paths - 1st Old Watcher - Exit to 2nd" section of the random drop list. I don't care which item it is at this point. It happened to be a Ring of Minor Deflection. *Evil* The evil party similarly doesn't care either.
The video concludes with the good party going down the stairs at #23 in order to descend to the 2nd level of Endless Paths.
First Broken Blade
I go east a bit and easily defeat a small group of Xaurips and a Wurm. I continue south and have the Orlan Rogue sneak forward. He waits until any monsters are out of view before disarming a trap.
There will be a very large group of Xaurips led by a Xaurip High Priest in the room at #4. This can be a pretty tough battle for a lower-level part. I position the party so as to set up a kind of curl just outside the door. Alliria, Kana, Hiravias and Ituumak line up along the north wall. Grieving Mother, the Orlan Rogue, and Sagani complete the curl west of the doorway. The point is to provide everyone with an opportunity to attack from multiple sides as the enemies pour out the door.
Kana hits them with a Scroll of Tanglefoot and then a Scroll of Fan of Flames as they're oncoming. Hiravias casts Returning Storm, which covers a very wide radius and will periodically hit single-targets with a Lightning Bolt that will also stun.
A Xaurip Champion rushes the north group almost right away, so Sagani tags it with Wounding Shot and trains Ituumak on it. Alliria also helps bring it down. Sagani also uses Combusting Wounds on a cluster that gather by the north group.
The west group attacks any that get close to them. In particular, Grieving Mother seizes any opportunity to land blows with her Great Sword and build up Focus. That's when she starts to use her Powers. First, she targets Phantom Foes on a Xaurip Priest who is at an optimal placement so that the Power affects pretty much every enemy.
The Xaurip High Priest comes close to the party, so I devote some resources to bring him down as quickly as possible. Hiravias catches the High Priest and as many other enemies as he can with an Insect Swarm spell. Sagani tags him with Wounding Shot, and then trains Ituumak on him. Grieving Mother has meanwhile built up more Focus, so she uses Puppet Master on a close by Champion, and then commands it to attack the High Priest.
I've cleared out pretty much every melee Xaurip at some point, so I retreat westwards to force their archers to come out the door. Victory follows as a matter of course.
The room itself will have a couple of urns with random items. The tent at #4 is trapped, and has a Broken Blade which is relevant to The Blade of Endless Paths task.
Dying Xaurip
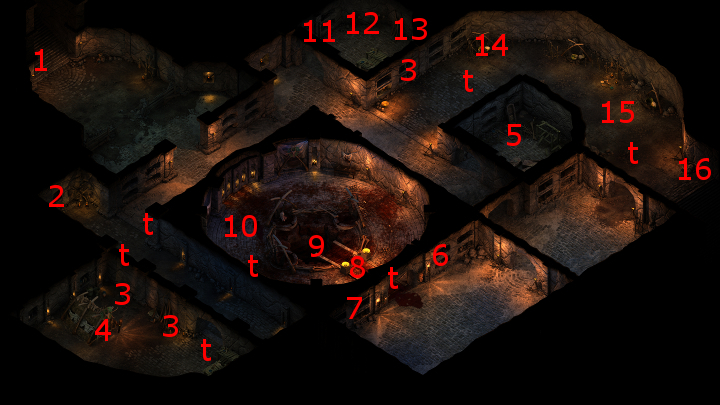
There will be items of various points in the containers at #11 and #13. There will be a Dying Xaurip at #12. A Perception check of 16 will revealed that it has been poisoned. However, I can't help it recover. Alliria decides to leave it be.
Zakara prefers to cut out its throat.
Tiny White Wurm
There will be a large group of Xaurips and Wurms near #14. I want to win this battle with both minimal overall loss to party members' Health, and without expending any spells as it were. Charging ahead isn't recommended on that point, since the Wurms will peck at me from a considerable distance.
So I bunch the party in the room at #12. Alliria and Kana will be near the west wall. Hiravias and the Orlan Rogue will be to the right of the door. Grieving Mother and Ituumak will be well back in the room, ready to hit from the side and through the gap. I now have the Orlan Rogue set an Arrow Trap just a little south of #3, and get the enemies' attention to lead them back to the room. The point is that the Wurms aren't nearly at as long a distance, and all the enemies are clustered together. They'll actually split into two groups. One comes in and attacks me in the room itself, while the other (including the Wurms and a Xaurip Priest) hang back.
I try to take out the group coming into the room as quickly as I can, and I make a point of letting Grieving Mother get in a swing or two with her Great Sword.
She uses Puppet Master on one of the Wurms once she has 30 Focus. Kana summons a Phantom once he has 3 Phrases. My strategy therefore is a combination of delaying, distracting (through a summons) and sowing division.
Note also that once a clear path for it exists, I send Sagani's pet after the Priest, and have the two of them take out the Priest as quickly as possible. The battle is eventually won with the objective I hoped for.
There will be a hatched egg at #14 that has a Tiny White Wurm pet. Alliria has her pet for the rest of the game, and the choice is a more thematic one than anything else.
*Evil* Zakara leaves it where it is.
*Evil* Measured Restraint
Now I show this part from the perspective of the evil party. I charge east beyond the room at #5, where I charge and wipe out another group of Xaurip.
I stop just short at the door near #6. There will be another group of Xaurips and Wurms to the south. I position my warriors at the door with the spellcasters safely behind. I have Eder lead the enemies to the door. Aloth hits them with a Chill Fog and Arcane Blasts, allowing the party to win rather routinely. Aloth now plants an Arrow Trap near the door. I finish off another straggler Wurm to the south.
At #9 will be a sacrificial pit that can lead to the fifth level of Endless Paths, but I'm not interested in that. There will be a very large group of Xaurips and Wurms in the room. I set things up the same way. Warriors will be at the door just north of #6. Durance and Aloth remain safely behind.
Eder goes ahead to the pit and leads the horde back to the rest of the party. Durance begins a sequence of Blessing, Consecrated Ground, followed by Watchful Presence. Aloth starts with Eldritch Aim and then a Chill Fog just in front of the warriors. After that, he casts Kalakoth's Minor Blights followed up with Merciless Gaze. Thus he begins to bombard the horde at a safe distance. The battle is soon won as a matter of course.
I go into scouting mode near the northwest corner of the room. A corpse at #10 has a magical rapier called Measured Restraint, which becomes Eder's weapon for the rest of the game. This is the perfect weapon for an Overbearing Guard-based Fighter build. It is the only weapon that both increases the number of enemies subject to Disengagement attacks AND with an additional Accuracy bonus that increases the chances of Disengagement attacks knocking their targets Prone.
*Good* The good party will sell it off.
Hand and Key
At #5 will be a letter called Faramund's Curse, as well as a Breastplate called Hand and Key. Both Alliria and Zakara will wear the armor in the interim.
There will be the odd Xaurip or two towards the northeast corner that are easily killed off. I rest up afterwards. I take a random weapon and Camping Supplies from the hidden corpse at #15.
The stairs to the third level is at #16.