-

- Forums
- Chatrooms
- Gallery
- Gameplay Videos
- Upload
- Articles
- Mod Reviews
- Shop SP: Games, Movies, Books
|
|
| Pillars of Eternity 2 Video-Based Walkthrough by David Milward |
Return to Serpent's Crown
Netehe and the Harapo Epic
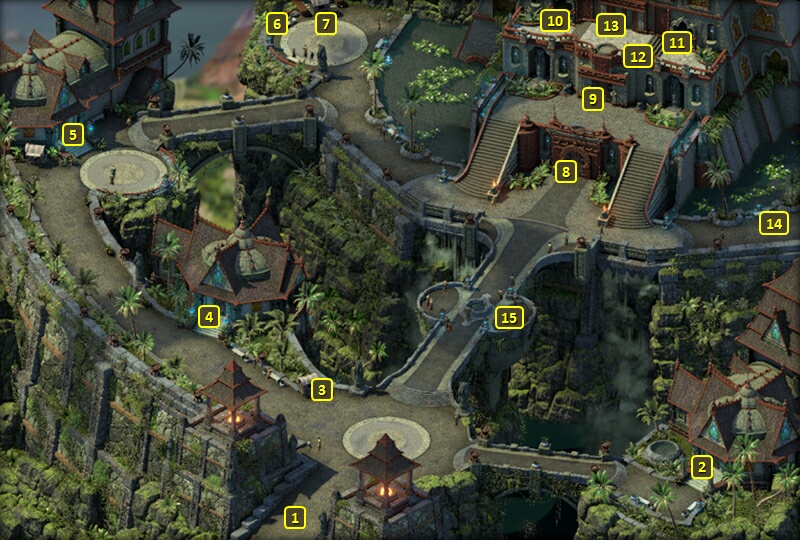
Now I switch out Aloth and Mirke for Serafen and Pallegina. The party members with the lowest xp are in the party. I travel to Serpent's Crown.
I travel north to near #8, and give the Harapo Epic to Netehe. I get 2,500cp, 12,000+ xp and a major gain of reputation with the Huana as rewards for completing The Archmage's Vault Quest.
An Imp arrives and informs me that Arkemyr the Archmage now wants to see me. That starts the Task called A Cordial Invitation.
Now I go up the stairs and through the door at #9.
*Evil* Bounty on Diccila
Zarathos puts his Fine Brigandine back on and gets rid of Arkemyr's Old Robe. I also switch out characters who've already levelled up for characters who haven't yet.
Serafen takes Blood Frenzy on his 7th level. Sometimes Spirit Frenzy is preferable if you can also take advantage of Brute Force through Spirit Frenzy and a way to inflict Constitution Afflictions to effect a -20 Fortitude penalty. Absent that, the advantage of Blood Frenzy is that it can be upgraded to Blood Storm, which means that killing targets will prolong the duration of Frenzy.
He also takes Unflinching. It provides Resistance to Constitution, Dexterity and Might Afflictions while the Barbarian is at 50% or more Health. This is often a staple Passive for Barbarians as it can prevent the Staggered and Sickened Afflictions from undoing the benefits of Frenzy.
Aloth takes Debilitating Strike when he levels up to 7th level. It upgrades Crippling Strike so that it also applies the Distracted Affliction to targets in addition to the Hobbled Affliction. It's a good upgrade to take if the Rogue also doesn't have Persistent Distraction (which would mean redundancy). It's a very cost-effective way to apply two Afflictions on enemy strikes, as using the ability will still only use one Guile. And it will also help set up the damage bonuses that will be provided by Deathblows.
He also takes Kalakoth's Minor Blights. It provides a single-hand weapon that inflicts ranged elemental damage (rotating through various types during its duration) on enemies in an area-of-effect. And as a weapon attack, that means bonuses like Sneak Attack and Deathblows and Backstab can come into play against multiple targets. The point of eventually having the Eye of Wael in the off-hand is that it can trigger Invisibility from the off-hand, and that in turn means the Blights can score Backstab damage on multiple targets.
Eder takes Disciplined Strikes on his 7th level-up. It upgrades Disciplined Barrage so that it adds +1 Concentration, and provides the Intuitive Inspiration instead of Awareness. The Intuitive Inspiration provides a 30% chance of converting Hits to Critical Hits. And that will mean a greater chance to trigger the area-of-effect attack of Amra.
He also takes Debilitating Strike, for fundamentally the same reasons as Aloth.
Tekehu automatically gets two new abilities on his 7th level-up. One is Great Amira Let Her Wrath Be Shown, which is basically a replication of the Crackling Bolt spell.
He also gets Chill Fog. This is one of his key offensive spells. His use of the Fog inflicts its usual Freezing Damage and Blindness on enemies caught within, but it won't affect allies. Tekehu can therefore freely drop it in the thickest part of the battle without a worry.
He takes Ancient Memory on his 7th level up. Although the evil party is not as reliant on passive regeneration as the evil party is, I still find this helpful to improve survivability, especially during the early phases of battles. And it can be prolonged endlessly with Salvation of Time.
He also takes Nature's Balm. It applies the Robust Inspiration to all allies, but within a very small radius. The Robust Inspiration provides both +2 Armor Rating and +10 Health every 3 seconds. A standard game plan will be to huddle everyone close together to start combat so that I can apply my buffs, including this one. And eventually I can prolong its duration endlessly through Salvation of Time.
The evil party likewise travels to Serpent's Crown and then goes through the door at #9. They don't give the Harapo Epic to Netehe. That will be for Tamaru later on.
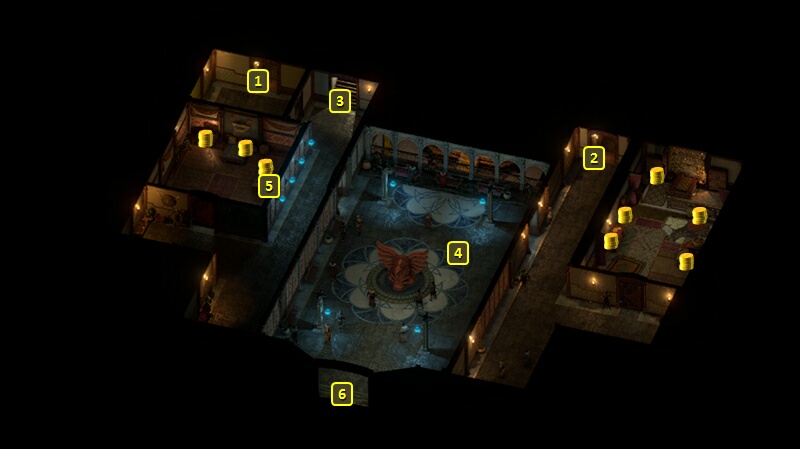
The door brings them to #6 on the map of the Upper Floor of the Kahanga Palace. I go to Barati at #4, and collect the 1,500cp and 4,000+ xp for the Bounty on Diccila. I now accept a Bounty on Oheiro.
I leave the palace and make for the exit at #14 on the east side of Serpent's Crown. I put my core party back together.
*Evil* The Flames of Hell
It's also time for the evil party to put its ship together. I purchase a Dhow, which is the fastest ship in the game.
I also purchase three Magranite Flamethrowers and fit them on the starboard side.
I also purchase two Aedyr Channel Guns, and fit them on the portside along with Haeferic's Nose.
I transfer my crew from the Sloop to the Dhow, and hire Tuliak Longfrost as my newest Deckhand.
The evil party now boards its new ship and leaves Neketaka. The good party has one more thing to attend to.
Fassina Joins
The good party now travels directly to The Dark Cupboard. They come in through the front door at #1.
Alliria offers Fassina a place in the party, and the latter readily accepts. The Imp is left in charge of the store.
I equip her with the Cabalist's Gambeson. I may, given the opportunity and resources for it, add the Arcane Extension enchantment that will prolong the duration of her buffs.
I also equip her with The Spine of Thicket Green. I plan to add the Empowering Lifeblood enchantment, which will add +2 Plant Power Levels and +2 Restoration and Rejuvenation Power Levels. The former will increase the power of some of her offensive spells, while the latter will increase the Health recovered by some of her healing spells. The Garden of Life spell, which she will learn, will benefit from both bonuses.
She takes Kalakoth's Sunless Grasp on her 2nd level-up. It's a Conjuration spell that inflicts Freezing Damage and a -10 Accuracy penalty to a single target. She takes these and the next two spells even if they're in Fassina's Grimoire that she starts off with. They won't be in the Snakeskin Grimoire that she will change over to.
She takes Ghost Blades on her 3rd level-up. It's a Conjuration spell that inflicts Piercing or Slashing Damage to enemies only in a cone, and it also gives the Hobbled (-5 Dexterity, reduced Stride) Affliction.
She automatically gains The Moon's Light, a healing spell with a small radius, on her 4th level-up. She also chooses two more abilities.
One of them is Two-Handed Style. The bonus to Damage will apply to when she's fighting with a Quarterstaff, whether that's when she summons Concelhaut's Parasitic Staff or when she's using The Spine of Thicket Green.
She also takes Arcane Veil. It provides a +50 bonus to Deflection, although that bonus is ignored by firearms and Veil-Piercing Attacks from Spirits. It is a Conjuration spell, so its duration will be extended both by Fassina's Intellect and the +2 bonus Power Levels for being a Conjurer when using a Conjuration spell.
She takes Necrotic Lance on her 5th level-up. It's a Conjuration spell that inflicts Corrosive Damage on a single-target, and continues to apply Corrosive Damage over a short period of time.
She takes Two Weapon Style on her 6th level-up. The -15% reduction in Recovery Time will come into play when she summons Nannasin's Cobra Strike through the Snakeskin Grimoire.
She automatically gains Returning Storm on her 7th level-up. A bolt of lightning will hit a single-target and Stun it, every 6 sec for at least 20 sec. She also acquires two new abilities.
She takes Nature's Balm. It applies the Robust Inspiration to all allies, but within a very small radius. The Robust Inspiration provides both +2 Armor Rating and +10 Health every 3 seconds.
She also takes Combat Focus. It adds +1 Concentration at the start of combat. It's a natural choice for a character who frequently uses spells with significant casting times.
I leave through the door at #1.
I go south to the exit at #1 on the map of Periki's Overlook, and put my core party together. It is now time to explore the Southern Deadfire by ship.