-

- Forums
- Chatrooms
- Gallery
- Gameplay Videos
- Upload
- Articles
- Mod Reviews
- Shop SP: Games, Movies, Books
|
|
| Pillars of Eternity 2 Video-Based Walkthrough by David Milward |
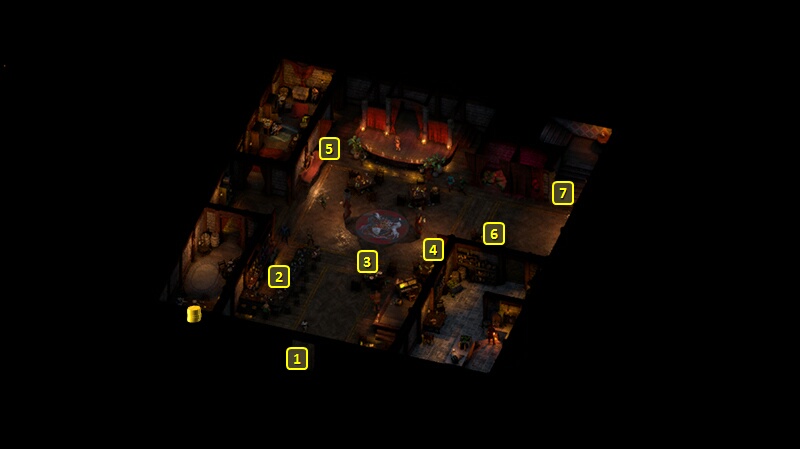
Queen's Berth
Kaoha the Harbormaster
The Watcher gets accosted by several Aumaua led by Kaoha the Harbormaster at #2 on the map of Queen's Berth. Berath encourages Alliria to use her powers to scare them off, which works.
Pallegina
I go east until I see Pallegina at #8. Alliria asks her to join, but Pallegina will not at this point. That won't happen until later, and reflects the Pillars of Eternity 1 history of Pallegina acting on her conscience and defying the Duc's orders.
*Evil* The Pillars of Eternity 1 history for the evil party had Pallegina obeying her Duc's orders, so they won't even meet her until they make their way to Serpent's Crown.
Zamar
Now I go a little north. I purchase a couple of Tahiwa Snappers. I merge them, two Fire Kelp and Spices together into one of the Food items that I'll want, Hot Razor Skewers.
While I'm at it, I also merge four Arracks and two Grogs together into another Food item that I'll want, a Forgetful Night.
I also merge three Pork, two Fresh Fruit and two Salt together into another I want, Glazed Chops.
I next buy Spices from the Hunter at #5, as they can be a valuable crafting component.
A Pet dog named Levin can be found at #6.
Now I speak to Zamar at #7. He wants to collect on an outstanding debt from a Captain named Zadora. He would also like a way out of a forced deal with the Principi. The conversation starts The Shipwright's Plight Task.
Luminous Adra Mill
I go east and through the door at #21, nearer the center of the district. That brings me inside the Luminous Adra Mill.
I go upstairs through the door to the left. That brings me outside on a balcony, where I find a Pet dog named Abraham.
I go back down the stairs. Now I send Mirke into Stealth mode. She filches Luminous Adra Dust and Crates of Crude Luminous Adra whenever she can do so undetected. I thereafter leave out the east door.
That brings me to the door at #21 closer to the east edge of the district. I go south, looting any items that I can find. I happen to find another Pork. So once again I merge three Pork, two Fresh Fruit and two Salt together into another Glazed Chops.
I go through the door at #24.
Aloth and the Leaden Key
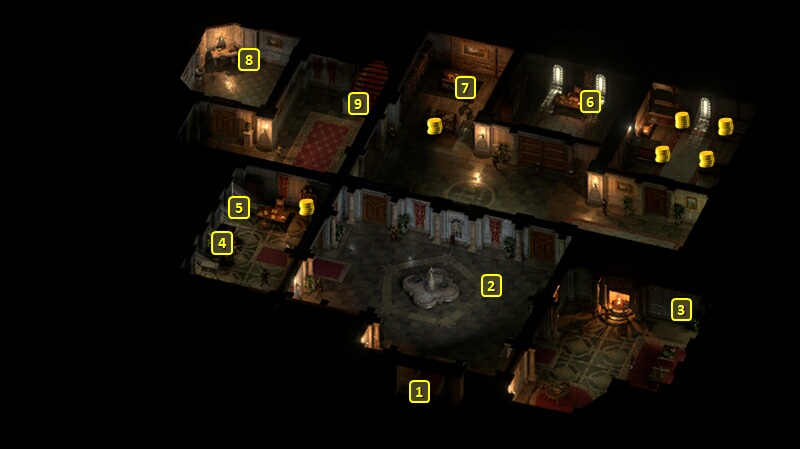
I start off at #1 on the map of the main floor of the Wild Mare. I switch out Eder for Xoti. Eder hates the Leaden Key, and I don't want to lose any influence with him on that point during the next conversation.
Alliria now speaks to Aloth, who has regrets over some of his past actions as head of the Leaden Key. Alliria is encouraging and non-judgmental towards him, and increases her reputation with him. He has a follow-up conversation afterwards to express gratitude towards her.
I switch Eder back in. Night time is almost over, so I "Wait" for 4 hours to resume a Task that can only be started during Day time.
*Evil* Captain Radora
It is at this point that Zarathos finds out what's up with Radora. Radora will be at #6 on the map of the main floor of the Wild Mare. It won't take much to get her to admit that she got robbed of Zamar's payment by a pirate gang on the north side of the Berth. You could kill her on an assumption that she's lying, but it won't help advance the Task.
The evil party immediately leaves out the door, for it is still night and they have time to complete The Shipwright's Plight Task.
*Note* An alternative would have been to speak to a little girl named Tiela at #9 on the map of Queen's Berth during the daytime. She'll also explain that Radora got robbed by Cotta's gang. You can give her an Egg to earn Benevolent disposition if you like.
*Evil* The Shipwright's Plight
The evil party is back at the door at #24. They go north to pay Cotta a visit at #12.
Zarathos prefers to side with Zamar. One way is to kill Cotta and his band. Doing it through a dialogue option will result in Aggressive disposition. You may prefer to get your party members in optimum position first (e.g., ready to attack their Priest right away) and then force-attack to start things. You can also make use of the nearby Gunpowder Barrel, although you have to be careful not to have your own party members caught in the blast. Should you win, Cotta himself will leave behind a Ring of Minor Protection.
The way I handle things is to make an Intimidate check that involves threatening his Wolf. It would have resulted in reputation loss with Eder had he been in the party. It does earn a hit in reputation with the Principi faction, which is what I want for now. I make a History check of 5 (not being able to make a Streetwise check of 6) to avoid a fight with Cotta, and to take another hit with the Principi.
The reason I do things this way is that I want negative reputation with the Principi for now so that I can get a specific armor for Xoti.
I give the good news to Zamar for 400+ xp and a discount on his goods.
Zarathos takes Clarity of Agony on his 6th level-up. The key point here is to shorten the duration of the Confused effect that comes with using the Berserker's version of Frenzy. The -50% duration of all hostile effects is also a good buff that can be extended endlessly through Xoti's use of Salvation of Time.
Xoti takes Mortification of the Soul. It can sometimes be a good way to bring her Wounds total back up to 10 in a pinch.
Serafen takes One Stands Alone. It adds +20% Damage when he's within melee range of more than one enemy, and it will take at least three enemies to put the Flanked status on him. It's pretty much a staple passive for Barbarians.
Coming to Terms
I go a little west from the Wild Mare. Tawenu will be near the door at #28 on the map of Queen's Berth during the day time. He feels his Huana tribe has been tricked into an unjust contract by the Vailian Trading Company, and would like the Watcher's help. Alliria agrees to help, and she goes in through the front door.
The good party will now be at #1 on the map of the main floor. Luca will be at #4. Keep in mind that any resolution to the Task that restores the island to Tawenu's tribe will result in a small loss of reputation with the Vailian Trading Company and a small gain in reputation with the Huana.
Even if you can't solve the Task during this dialogue, speaking with him about the contract and learning that Tawenu tried to resolve matters by use of a forged contract is necessary to open up other options for completing the Task. Alliria makes an Insight check of 3 to notice that he has spilled wine on his shirt. That can open up other possibilities should I wait until he's on the main floor of the Wild Mare at night before speaking to him again.
I won't be able to convince Luca the first time around. But Alliria makes a Streetwise check of 4 to convince him to give 1,100cp to stay quiet. The Task will still be uncompleted though, so further action will still be needed to seal the deal. A benefit is that the good party still has all of its options open after collecting the 1,100cp.
I go outside and speak to Tawenu again. And it's obvious that he didn't intentionally try to pass off a forgery against Luca, but that brings him no closer to a resolution. Alliria assures him that she'll keep trying, and goes back inside the Company Headquarters.
There is more than one pathway. The Forged Contract is in the chest at #5. You can undo the lock and have a character in Stealth mode steal it. You could also use Sleight of Hand to pickpocket Luca for Luca's Key if your Mechanics skill isn't good enough, as the key will also open the chest.
There is a shelf at #7. To make use of it for purposes of the Task requires that you first speak to Luca about the contract, and learn of the Forged Contract without Tawenu. You won't have the needed options during the scripted interaction with the shelf unless you first explored the relevant dialogues with Luca.
As for the shelf itself, clicking on it with a character who is still visible will prompt the nearby Clerk to warn you that the shelf is not for outsiders. Having a character click on the shelf while in Stealth mode sets up the needed scripted interaction. You can now switch out the contract that Tawenu doesn't like, and leave the Forged
Contract in its place.
Speak to Luca again, and he'll notice that the only copy of the contract on hand now leaves the Island in the possession of Tawenu's tribe. Alliria didn't go this route because it earns Shady reputation.
I could wait until Luca goes to the Wild Mare at night for some wine. He'll be at #3 on the map of the main floor of the Wild Mare.
The different set of options requires having spoken to him beforehand about the contract in the Headquarters, and making an Insight check of 3 to notice that he has wine stains on his shirt. Options then include:
Captain Radora
It is at this point that Alliria speaks to Captain Radora and learn about the Principi gang that accosted her.
I temporarily switch in Xoti for the purpose of levelling her up. She also takes Dance of Death on her 6th level-up. If her A.I. has her activate it during ship combat, the bonus to Accuracy can help her overcome the Accuracy penalty involved with using the Savage Attack modal with a Great Sword that I'll get for her during the later parts of the game. There are also some battles where I do have her as part of the core party, and where a key strategy will be to have her passively recoup Wounds at a distance and on an ongoing basis.
I switch Mirke back in after that. I next "Wait" for 8 hours until it's Evening, so that the Good party can take the next step in completing The Shipwright's Plight.
*Evil* Aloth and the Leaden Key
Zarathos and the evil party return to the Wild Mare after completing The Shipwright's Plight. He switches out Xoti and Mabel for Aloth and Eder.
I also wait a few hours inside the Mare so that it will be morning when I leave, meaning I can start the next Task.
I go back to near the landing dock, as Aloth had not been in the core party when I first docked at Queen's Berth. Being just a little east of the Docks, near #8, is what prompts Aloth's desire to speak about his experiences as leader of the Leaden Key. Zarathos fully indulges in Cruel and Shady dialogue options. He doesn't mind losing reputation with Aloth, but wants to avoid it with Xoti, which is why he switched her out. Shady dialogue options often trigger Xoti's sensitivities about "Skulduggery".
I've also earned plenty of reputation with Serafen, who now gifts me with an amulet called Cipher's Shackle. I have no use for it though.
*Evil* Coming to Terms
Zarathos begins by speaking to Tawenu at #28, and earning Shady disposition when he pretends to be a lawyer to Tawenu.
I go inside and speak to Luca. I earn Cruel disposition by suggesting I can "get a sad native off the streets". I then make the Streetwise check of 4 to blackmail Luca for 1,100cp. Luca ends the conversation after that.
But I speak to Luca a second time, and suggest that I'll make Tawenu see reason.
Now I leave briefly and inform Tawenu that I'm siding with Luca. That earns a minor hit in reputation with the Huana, but gains reputation with the Vailian Trading Company.
I go back inside and inform Luca, who gives me another 1,700cp. *NOTE* Doing the Task this way means I won't get Luca as a Boatswain, so I'll have to find an alternative. Doing the Task in a way that sides with Tawenu would have earned Benevolent disposition, which I don't want for the evil party. It's purely a roleplaying decision on my part.
Eder advances to his 6th-level and selects Confident Aim. It's a passive that will turn 30% of Grazes into Hits. Mirke also gets it.
Aloth gets Merciless Gaze. It's a spell that converts 15% of Hits to Critical Hits, and lasts a long time. I select it during level-up because it won't be available in Arkemyr's Grimoire.
The Shipwright's Plight
Another way of completing this Task is now to go back to Zamar at #7, but without confronting the gang that Radora referred to. You can offer to buy Radora's Commission, which is for 1,000cp. A mouthy comment from Maia if she were in the party will prompt Zamar to up the price to 1,500. At least 2 points of Rational disposition can in either instance result in a reduction to 500cp.
If you resolve things this way, the Task will already be resolved should you thereafter confront Cotta. That means the subject of Zamar or Radora won't come up in dialogue with Cotta, and any options for resolving the Task by confronting Cotta or helping Cotta force his deal on Zamar will no longer be available. You can still kill Cotta and his band if you want. It just won't be relevant to the Task anymore.
On the other hand, if you went through Cotta first on your way to completing the Task, you'll still have the option to purchase the Commission from Zamar as long as you mention first that Radora got robbed.
Alliria falls in with Cotta's request to force his terms onto Zamar. She gets 700cp from Cotta (200 in advance and 500cp after the deal is done). She would have suffered a reputation hit with Maia had the latter been in the party. It won't take much to cajole Zamar into going along with it, but Streetwise checks are available to help it along. Alliria still gains a 10% reduction at Zamar's store, but with the difference that she also has a moderate increase in reputation with the Principi.
I go east and up the stairs to the exit at #18, which provides access to Periki's Overlook.