-

- Forums
- Chatrooms
- Gallery
- Gameplay Videos
- Upload
- Articles
- Mod Reviews
- Shop SP: Games, Movies, Books
|
|
| Pillars of Eternity 2 Video-Based Walkthrough by David Milward |
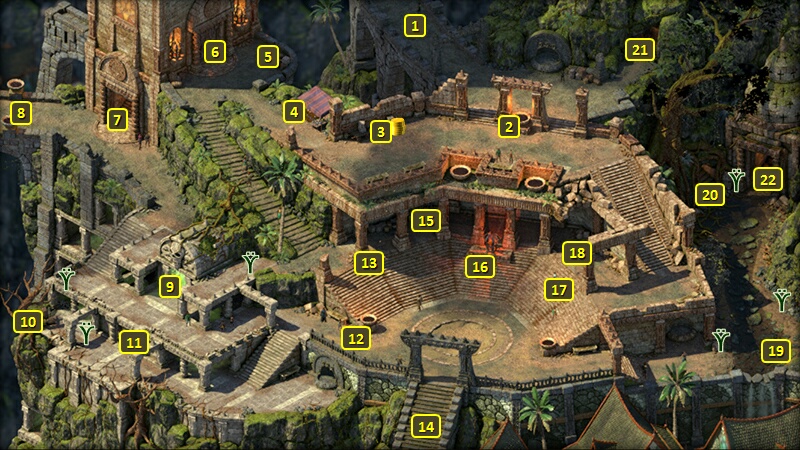
The Sacred Stair
*NOTE*: I don't do Xoti's personal quest at the Temple of Gaun, either for the good party or the evil party. That quest can get her a great until Rest bonus, but I don't want to get that bonus until the No Rest Run has been properly set up first.
*Evil* Ydwin Joins
The evil party starts off at #1 on the map of The Sacred Stair. I go west and up the stairs at #6.
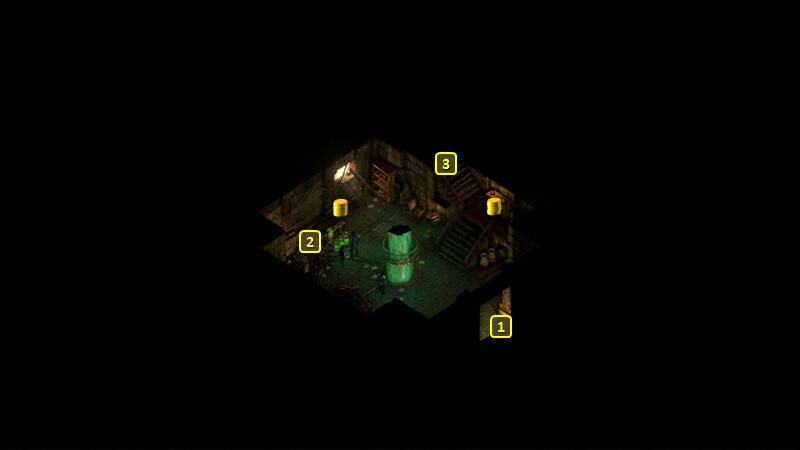
That brings me to the stairs at #1 on the map of the Spire of the Soul Seers. I go up the stairs at #3.
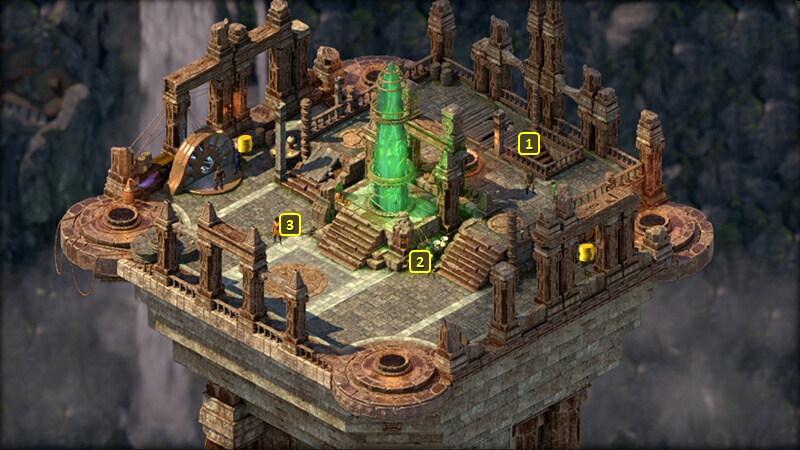
And that brings me to the stairs at #1 on the map of the Rooftop of the Spire of the Soul Seers. Now I take the Boots of Stealth away from Maia.
I speak with Ydwin at #2 and recruit her into the party.
She starts with Tenuous Grasp, and levels up to 6th level.
She takes Lingering Echoes. Plenty of her powers inflict negative status effects, so it makes sense to take this passive to prolong their duration by 10%.
She takes two abilities on her 3rd level up. The first one she takes is Draining Whip. It increases Focus gain from weapon attacks by 100%. This is the passive to take when you want your Cipher to emphasize spellcasting instead of physical combat.
The other is Two-Handed Style. She'll benefit from the +20% bonus to Damage when she uses either her Rod to attack multiple foes, or her War Bow when attacking a single target.
She takes Phantom Foes on her 4th level-up. It puts the Flanked condition on multiple enemies over a very wide area. It basically becomes a primer for both her spells and Tekehu's spells. It can also set up enemies close to the front-line combatants in the party for getting mowed down quickly.
She takes two abilities on her 5th level-up. One is Combat Focus, which adds one Concentration at the start of each Encounter. It's usually obligatory for any spellcaster who cannot immunize herself against Interrupts.
The other is Hammering Thoughts, which adds +1 Penetration to her weapon attacks. And by extension that means enhancing her ability to gain Focus with her weapon attacks.
She takes Puppet Master on her 6th level-up, which Dominates a single target for a significant duration. An enemy who hits hard but has a low Will score tends to be the perfect target. In fact, I sometimes run my mouse-clicker over enemies until I find that candidate. And it can be a real game changer as it can result in a significant number of your enemies having to turn their attention on the traitor. And from there other good things can flow. Sometimes the enemies have to gang up to take out their hard-hitting traitor, or the traitor himself wreaks some havoc before it wears off.
Zarathos also gives her a few items that he's been saving up. Those include the Boots of Stealth that I took from Maia. Ydwin sometimes needs to disarm traps that are rather close to enemies. And the best way to do that is to give her just enough Mechanics that she can disarm most locks and traps, and take care of the rest with a little help, and to pump the rest of her active skill points into Stealth. That way she can go into Stealth mode and take care of the traps without being detected by nearby enemies. The boots add a welcome +2 bonus to the Stealth skill.
She also gets Thaos' Headdress. The +5 bonus against Mind Afflictions for all allies within 5m is certainly welcome, as is the +1 boost to Intelligence for a Cipher. The bonuses for attacking Flanked enemies kick in after she's primed them up with Phantom Foes.
She also gets the Protective Eothasian Charm. The key point is the +1 bonus to Perception it provides. It both improves her Accuracy and her ability to detect traps and hidden doors or items.
I also give her Watershaper's Focus. This is in my opinion the best weapon there is for a Cipher when used against multiple enemies. The Blast modal for Rods means collecting Focus on everything caught within the Blast radius. And for this particular rod, its bounce ability means that will be two Blasts collecting Focus from multiple enemies. There is the drawback of increased Recovery Time. But I find that she can often max out her Focus with just one shot, so I ultimately found I could live with that drawback.
I leave the Spire after all that is complete.
Ydwin Joins
Ydwin joins the good party as a Mindstalker, a Cipher and Rogue multi-class.
I equip her with the Fine Spear and Exceptional Small Shield that I found earlier.
She also gets Thaos' Headdress. The +1 bonus to Intellect will certainly help her Cipher powers. The real perk is the bonus Damage against Flanked targets, which she can realize both through Phantom Foes and through the Persistent Distraction passive when she gets it.
I also equip her with the Boots of Evasion I bought from No-Nut Ned. The bonus to Reflexes will assist her use of Adept Evasion.
She takes Monastic Unarmed Training on her second level-up. This one requires some explanation. Taking full advantage of Riposte, which is part of this build, requires high Deflection along with a weapon in the main-hand and a bashing shield in the off-hand. The reason is that Riposte responds with a Full Attack (i.e., attack with weapons from both hands) but also needs high Deflection to trigger. But most bashing shields aren't very serviceable, even the ones you find in the later stages of the game. The reason is that their Accuracy and Penetration remain static and never scale, so they pretty much never land and never do much damage even when they do land. The one exception to that rule is Tuotilo's Palm. Its bashing attack is considered an Unarmed Attack for purposes of the Monk's Transcendent Suffering. And it will therefore scale its Accuracy and Penetration as a Monk gains Power Levels. Monastic Unarmed Training is the passive that allows a non-Monk to scale the Accuracy and Penetration of his or her Unarmed Attacks. Tuotilo's Palm + Monastic Unarmed Training or Transcendent Suffering is in my opinion the one pathway to make a Bashing Shield a viable weapon. And therefore the best opportunity for a Rogue who has not multi-classed with Monk to make real use of Riposte.
She takes Lingering Echoes on her 3rd level-up. Some of her powers inflict negative status effects, so it makes sense to take this passive to prolong their duration by 10%.
She takes two abilities on her 4th level-up. One is Biting Whip. I would definitely prefer Draining Whip on a single-class Cipher who concentrates on spellcasting. Biting Whip is a good choice to put extra punch (+30% Damage with Weapons) into the Melee Attacks of a Cipher/Rogue multi-class.
She also takes Weapon & Shield Style. Adds +6 to both Deflection and Reflexes when using a Shield. The former will augment the use of Riposte, while the latter will augment the use of Adept Evasion.
She takes Phantom Foes on her 5th level-up. It puts the Flanked condition on multiple enemies over a very wide area. And a key part of her build is inflicting bonus Damage against Flanked enemies.
She takes Two Weapon Style on her 6th level-up. It reduces the Recovery Time with weapons by -15% when using a weapon in each hand. If the character is using a weapon in the main-hand and a bashing shield in the off-hand, the character will benefit from both Weapon & Shield Style and Two Weapon Style.
Her Last Request
I go towards the southern portion of the district, and speak to High Priest Hati at #15 in the Sacred Stair. He'll object to burning Muhai's Remains by reason of her backstory. She intentionally gave misleading directions to members of what used to be a rival Huana tribe, and they became lost. But this act was after all Huana became united under the reign of Queen Onekaza, which effectively makes it murder of a kinsman. Hati views her fate after death as well deserved.
You can try to persuade him with a Diplomacy check of 5 (like Alliria), a Resolve check of 15, an Insight check of 4, or a dialogue option based on the Watcher being a Priest of Magran. But none of them will convince him to change his mind.
You can give him the body so that he'll bury it outside the city walls, but Muhai's spirit will become angry over what she sees as a demeaning fate. Alliria wants to honor her promise instead.
You can convince him to let you burn the body without rites if you have at least 2 points of positive reputation with the Huana. But Alliria doesn't have that pull with the Huana, at least not yet.
She instead threatens him to let her burn the body without interference. It results in a minor loss of reputation with the Huana.
Muhai's spirit will be pleased if her body is burned, and tells Alliria where her stash of gems can be found. They're at #13, along with a Cloak of Deflection. Alliria wears it as an interim cloak.
*Evil* Her Last Request
Zarathos emphasizes Cruel replies, and then uses the Shady option to pitch Muhai's Remains into the flames.
Mirke gets the Cloak of Deflection.
*NOTE* Zarathos is also motivated by a choice to intentionally lose reputation with the Huana. And the reason for the evil party is to spawn a Huana ship on the World Map, from which I can acquire a powerful shield for Mirke. I will gain little bits of reputation approval with the Huana at points where I feel like I can't avoid it, like doing bounties for Barati. But unlike the Principi, the reputation arc seems more 'forgiving' with the Huana. In my experience, I can get little bits of approval with them at a few points, but then undertake actions that will nosedive my reputation with the Huana without the reputation even being mixed. And the ship will then appear on the World Map.
Magran's Blessing
Now I want to steal an item, but it requires significant ranks in Stealth to pull off undetected. Mirke hasn't been building up her Stealth score yet, so she briefly lends her Boots of Stealth to Ydwin, who has been putting skill points into Stealth because it's crucial to her particular build.
Ydwin goes into Stealth mode, and steals a Medium Shield called Magran's Blessing from the rack at #15.
It's a bashing shield, although as I previously indicated it won't keep up during the later parts of the game. It also has a Flame Shield effect at the start of each encounter. But it is Exceptional-quality, so I have Aloth equip it as an interim shield until he gets the one I want for him.
*NOTE* The Flame Shield effect will mean a second Flame Shield in addition to the Wizard spell Flame Shield, and when a Darcozzi Paladini uses a Flame Shield on him or herself. Also, the Flame Shield from this shield is treated as a Weapon Attack instead of a spell. So Monk-tank builds can actually use the Flame Shield to trigger Critical Hits through Swift Flurry and Heartbeat Drumming. And although the Ring of Focused Flame will not improve the Accuracy of direct bashes with the shield, it will increase the Accuracy of the Flame Shield. So it can definitely be a useful shield for some builds. I ultimately couldn't fit it into my long-term plans beyond being a useful interim shield.
I go south to the exit at #14, with the intention of travelling to the Brass Citadel.