-

- Forums
- Chatrooms
- Gallery
- Gameplay Videos
- Upload
- Articles
- Mod Reviews
- Shop SP: Games, Movies, Books
|
|
| Pillars of Eternity 2 Video-Based Walkthrough by David Milward |
Arkemyr's Manor
Tumara and Netehe
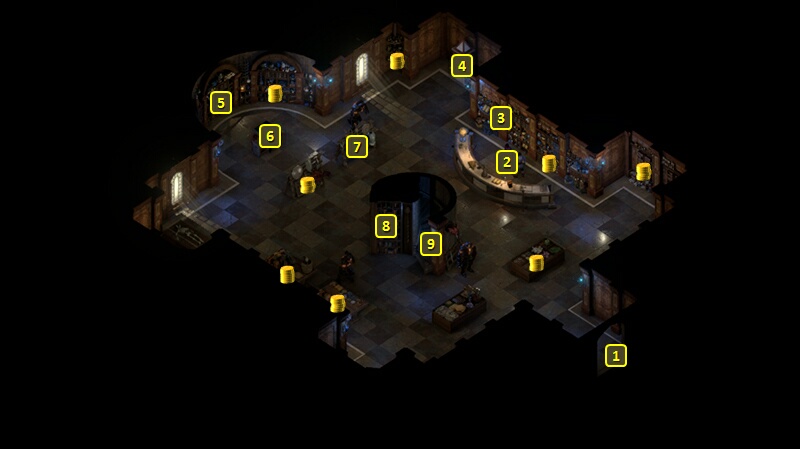
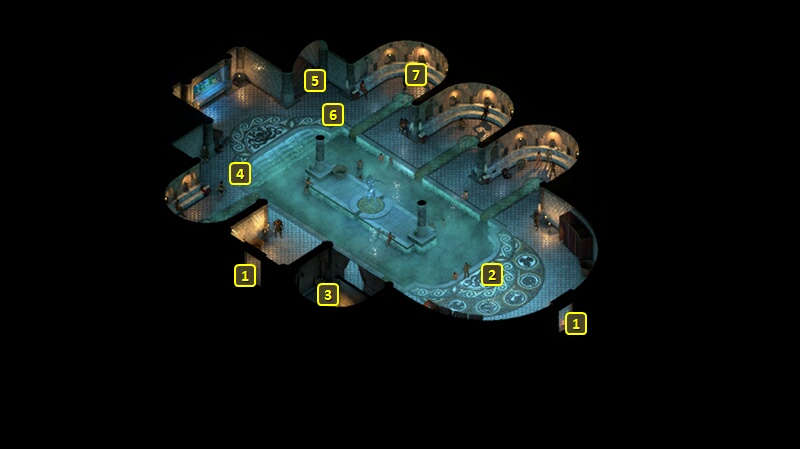
I arrive at #1 on the map of Periki's Overlook. I go ahead to the front door of Arkemyr's Manor at #11, where a Rauataian named Tumara and a Huana named Netehe are bickering with each other. I participate in the dialogue, which starts The Archmage's Vault Quest.
I go south and through the door at #3 to enter The Dark Cupboard.
*Evil* Velvet Glove, Brass Fist
That brings me to #1 on the map of the first floor of The Dark Cupboard. I speak to Fassina at #2.
Zarathos for the evil party gleefully tells Fassina about Bertenno's fate in order to rub salt in the wound. He also insists on extracting maximum value from Fassina for Rokowa's Fingers. Not just 500cp, but insisting on 600cp to earn Clever disposition. An alternative would have been to lie and keep the Gloves to earn Shady reputation, but it's more profitable to up the price and sell them. The party pets 675xp for completing the Velvet Glove, Brass Fist Task.
Some of my characters now have enough experience to reach their 7th level. Maia takes Predator's Sense, which allows Ishi to score an extra 50% damage on targets suffering from a damage over time effect. And it makes a lot of sense for a Ranger / Rogue multi-class, as Rogues have abilities that can directly apply damage over time to their victims.
She also takes Dirty Fighting. A 15% chance to convert Hits to Critical Hits is always welcome as a passive.
Mirke takes Disciplined Strikes. It upgrades Disciplined Barrage so that it adds +1 Concentration, and provides the Intuitive Inspiration instead of Awareness. The Intuitive Inspiration provides a 30% chance of converting Hits to Critical Hits, which in turn enhances other abilities of this build, such as ...
Swift Flurry, which upgrades Swift Strikes so that Melee Critical Hits have a 33% chance of triggering another instant Melee Attack during its duration. It is the preferable choice over Lightning Strikes if you can design the character build in a way that maximizes the probability of Critical Hits, including the aforementioned Disciplined Strikes.
Xoti gets Vile Thorns on her 7th level-up.
She also takes Swift Flurry. The Monk / Priest build I have in mind for her doesn't emphasize physical combat as much as for other characters, but it's still a natural choice when 3rd-tier Monk abilities become available.
She also takes Two Weapon style. It can be useful in some situations, like when I feel the need to switch her over to her secondary weapon set, or when Ydwin may want to use Reaping Knives on her.
Zarathos takes One Stands Alone. It adds +20% Melee Damage when near two or more enemies. And at least 3 enemies are needed to force the Flanked condition on him. It's a pretty standard passive for many if not all Barbarians.
He also takes Swift Flurry, for basically the same reasons as Mirke albeit with differences of detail between their builds.
Velvet Glove, Brass Fist
Alliria informs Fassina of Bertenno being freed of his debt, and gives Rokowa's Fingers to Fassina without asking for anything in return in order to gain Benevolent disposition.
Alliria speaks to Fassina some more for a bit. At one point she asks Fassina for a way into Arkemyr's Manor. Fassina willingly gives Alliria Arkemyr's Manor Key, which is possible when the Velvet Glove, Brass Fist Task has completed in a way that secured Bertenno's freedom. *Note* An alternative would have been to pickpocket her for it.
Alliria takes two abilities on her 7th level-up. One is Shared Flames. It gives everyone +15% Burning Damage with Weapons for at least 8 sec (and more accounting for Alliria's high Intellect). It is usually the preferable choice to Eternal Flames. A possible selling point for Eternal Flames is that, while its bonus Burning Damage only applies to the Paladin who used it, it extends to all of the character's attacks. That includes spells, not just weapons. And for an Arcane Knight, that means that bonus Burning Damage could also apply to her offensive spells as well. But in practice I found it a rare situation where the need to cast offensive spells followed after using White Flames. My use of offensive spells tended to be in situations where I could keep the enemies under crowd-control and rarely needed to use White Flames. Shared Flames therefore works for me.
She also takes Combat Focus. Adds +1 Concentration at the start of combat. It is very often an obligatory passive for spellcasters.
I briefly leave The Dark Cupboard and go to the exit on the south edge of Periki's Overlook. I put together my core party, with the caveat that Ydwin stays in for Pallegina. I could really use Ydwin's thieving skills for the next parts.
Eder takes two abilities on his 7th level-up. One of them is Vigorous Defense. It will be a key buff for him that he'll always seek to maintain in battle, as it raises all of his Defenses by +20.
He also takes Bear's Fortitude. He continues to shore up his Defenses, and this one helps protect against afflictions of the body, a frequent hazard for one who is frequently engaged in melee combat.
I go back to The Dark Cupboard, and go up through the stairs at #9.
*Evil* Fassina's Journal
I go up the stairs at #8, which brings me to the stairs at #9 on the second floor.
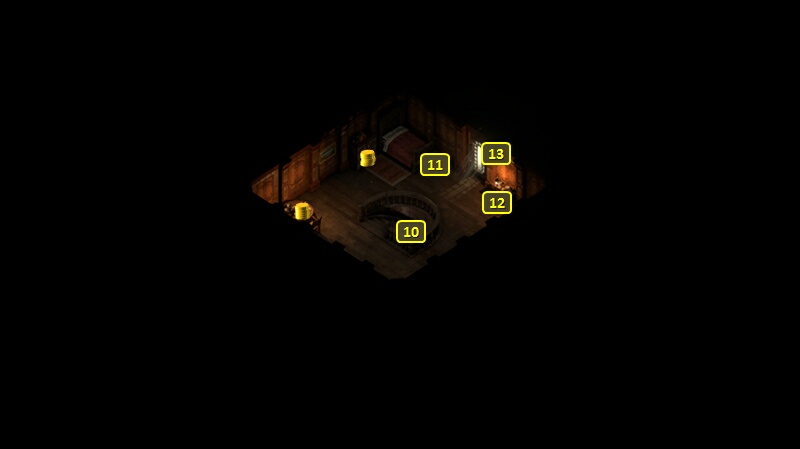
There is a locked and trapped chest at #10. Zarathos wears the Trollhide Belt from it as an interim item.
I also read Fassina's Journal in the drawer at #11.
Mirke makes an Athletics check of 3 and uses a Rope and Grappling Hook to create a shimmy rope. I travel across it to near the door at #5 on the map of Periki's Overlook.
There will be an Ironclad Construct on patrol nearby, and I'm not ready to fight those yet. So I quickly go through the door at #7.
Ydwin advances to her 7th level. She takes Greater Focus, which adds +10 to her maximum Focus.
She also takes Silent Scream. This can be valuable in that it's the rare area-of-effect attack that both inflicts Raw Damage and Interrupts. It also Stuns its initial target. Its one drawback is that its casting range is quite short, so you can't rely on it to disrupt distant spellcasters. It really makes itself felt for enemies that have both closed in around the party and like to use activated powers.
Fassina's Journal
Aloth gains two abilities on his 7th level-up after looting the trapped and locked chest in the room. One of them is Tactical Strikes. It upgrades Disciplined Strikes so that it now provides the Intuitive (+5 Perception, 25% chance to convert Hits to Critical Hits) Inspiration. I didn't get Tactical Barrage because Infuse with Vital Essence will provide an Intellect bonus. The chance to convert Hits to Critical Hits will eventually increase the ability to trigger a specific power from his weapon of choice, the Frostfall Mace.
He also takes Snake's Reflexes. I now start to take passives that help maximize all of his Defenses to the greatest extent possible. I start with the one that helps him avoid Powder Burns from Mirke's Blunderbuss.
It's Eder in the good party who makes the Athletics check and gets the party across with the Rope and Grappling Hook.
Ydwin gains two abilities on her 7th level-up. One of them is Hammering Thoughts, which is a passive that adds +1 to Penetration with her weapons. It's one of those abilities from the Cipher class that helps the Rogue do what she does best, land highly damaging blows on single-targets.
The other is Dirty Fighting, a passive that provides a 15% chance to convert Hits to Critical Hits, which is a logical choice for any Rogue character.
Mirke also gains two abilities on level-up. One of them is Lightning Strikes. It upgrades Swift Strikes so that her attacks have a +15% bonus Shocking Damage. It's the logical choice for a ranged Monk, as the extra attacks from Swift Flurry only trigger from Melee Critical Hits.
She also takes Confounding Blind. It upgrades Blinding Strike so that it applies a penalty to Deflection to its target, and the penalty stacks with each successive target that has been Blinded. I'll often use it as a primer, to set up her targets for subsequent uses of Stunning Surge. The stacking Deflection penalty makes Critical Hits through Stunning Surge more likely, and therefore makes the recovery of Mortification more likely as well.
*Evil* Arkemyr's Bedroom
The evil party is now at the door at #8 on the map of Periki's Overlook. They go onwards and through the door at #9 to enter Arkemyr's Bedroom.
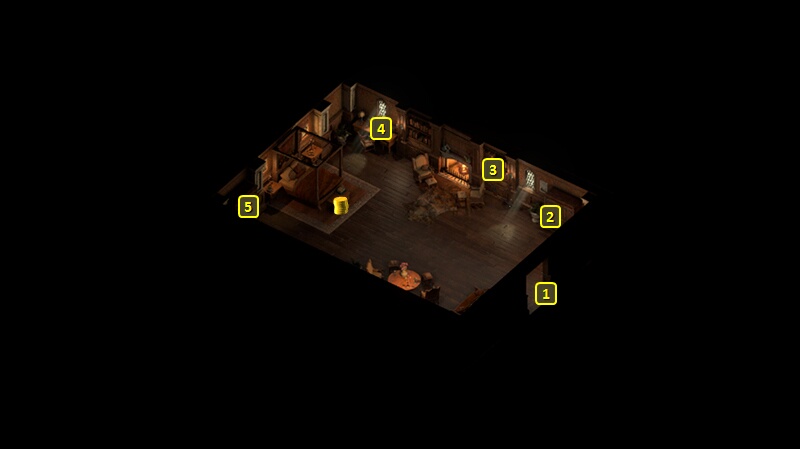
That brings me to #1 on the map of Arkemyr's Bedroom. The armoire at #2 has the Boots of Speed, but nobody has any use for them.
The desk at #4 has two items of note. One is Arkemyr's Notes. They provide a clue that the words "cider" and "cheese" may provide passwords.
The other is a Ring of Overseeing. Xoti wears it for the rest of the game. It's an obvious and logical choice, as it will expand the area-of-effect of her healing spells and her buffs (including Salvation of Time). I save an Exceptional Scepter that I find for Aloth.
*Good* Ydwin wears it in the good party. It will augment the area-of-effect of some of her powers, like Phantom Foes, Amplified Wave and Echoing Horror. I have Mirke equip a Fine Quarterstaff that she finds as part of a secondary weapon set. Alliria will equip the Exceptional Scepter as part of a secondary weapon set.
The armoire at #5 has Arkemyr's Old Robe. The Watcher can wear it to make progress with The Archmage's Vault Quest. It will prevent any Constructs in the Manor from attacking the party. It helps with the Imps, but something a little more besides the Robe will be needed. Zarathos puts it on. *Good* As does Alliria.
The party goes back out the door at #1.
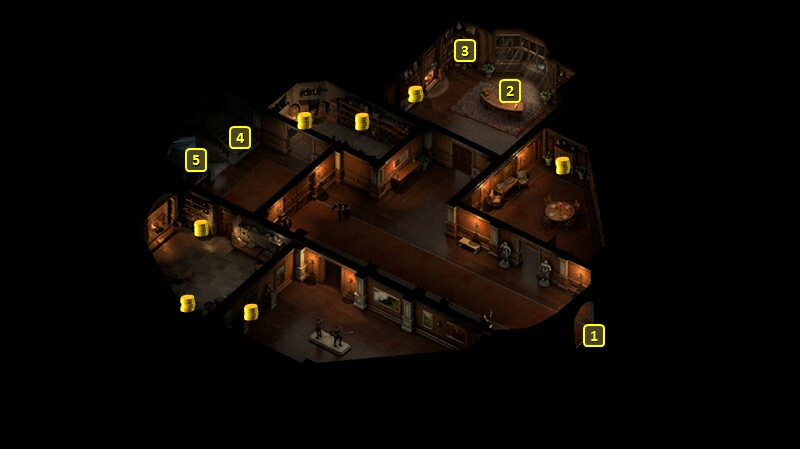
That brings me back through the door at #9. I go west and through the door at #8. And I now go through the door at #7 to enter the Upper Floor of Arkemyr's Manor.
*Evil* Yellow-Eye Three
I start off at #1 on the map of the Upper Floor of Arkemyr's Manor.
An Imp named Yellow-Eye Three is at #2, and it possesses the Translucent Crystal that is needed to make progress. If you can't convince him that you're not an intruder, he'll sound the alarm to turn the whole Manor hostile against you and then attack along with several other Imps.
Zarathos, while wearing Arkemyr's Old Robe, uses the "cider and cheese" password to avoid the sounding of any alarm. It earns Shady disposition. Zarathos then has little trouble convincing Yellow-Eye Three to willingly hand over the Translucent Crystal. It also earns reputation with Maia.
The evil party can now enjoy free run of the Manor, so they go down the stairs at #3.
Yellow-Eye Three
Alliria has to do things differently, because she doesn't want to earn any Shady disposition. She has alternatives that won't require Arkemyr's Old Robe.
She uses an Oil of Allure. She calms down Yellow-Eye Three with a Diplomacy check of 9.
But that needs a follow up. A Bluff check of 2, or a combined Arcana check of 2 and Streetwise check of 3 are possible as follow ups, but they won't convince him. I wish to avoid paying him 500cp. Alliria makes an Intimidate check of 4, and then chooses the Rational dialogue option to avoid the Aggressive option. Yellow-Eye Three is thus coerced into giving up the Translucent Crystal.
The good party does not go down the stairs at #3. Doing so without getting attacked requires using Arkemyr's Old Robe and earning Shady disposition in the process.
So I have to find a different way. I go back the way I came, all the way out the front door to The Dark Cupboard and returning to Periki's Overlook.
Arkemyr's Front Door
The good party is now at #3 on the map of Periki's Overlook. They go to the exit at #1.
I take the opportunity to advance other characters another level. I sub out Eder, Ydwin and Mirke for Serafen, Xoti and Pallegina.
Serafen gains two abilities on his level-up. One is Blood Frenzy. It upgrades Frenzy so that its duration is extended whenever he lands a killing blow.
He also takes Savage Defiance. It provides the Robust (+5 Constitution, +2 Armor, regenerate Health every 3 sec) Inspiration for 30 sec. It's Serafen's active ability for raising his Armor Rating even further.
Pallegina also gains two abilities on level-up. One of them is Ancient Memory. It recoups 1 Health every second. It may not sound like a big deal at first. But that 1 Health per second can become easily as much as 3 or even 4 health per second with enough raises in her Might and bonuses to her Healing. Having her Phrases modal run this constantly, and almost nothing else until the later stages of the game, is one of the foundations for the good party's approach of constantly and passively regenerating itself.
She also gains Greater Lay on Hands. It upgrades Lay on Hands so that it provides the Robust (+5 Constitution, +2 Armor Rating, regenerate Health every 3 sec) Inspiration for 8 seconds as well, subject to increasing through higher Intellect. Lay on Hands will not only provide some initial healing to a single party member, it will also boost that party member's Armor Rating and Constitution. And the regeneration effect of Robust means even more healing in addition. That makes Greater Lay on Hands probably the best single-target heal in the game.
I swap out Serafen and Pallegina for Ydwin and Mirke.
I go north and use Arkemyr's Manor Key to open the door at #12. I go through to enter the main floor of Arkemyr's Manor.
*Evil* Tattered Note
The evil party arrives at the stairs at #4. They have free run of the floor after having used the "cider and cheese" password on Yellow-Eye Three.
They quickly clean out every container of any items they have, including the Tattered Note at #3, and then go down the stairs at #5 to descend to the Laboratories.
Tattered Note
The good party comes in through the door at #1. Mirke lends her Boots of Stealth to Ydwin.
Ydwin sneaks around, keeping her distance from any Imps or Constructs, while she loots all containers for any items she can get her hands on. And that includes the Tattered Note.
She regroups with the party once she's done, and they're out the door.
Boiler Room
I go from #12 to the door at #15 to enter the Luminous Bathhouse.
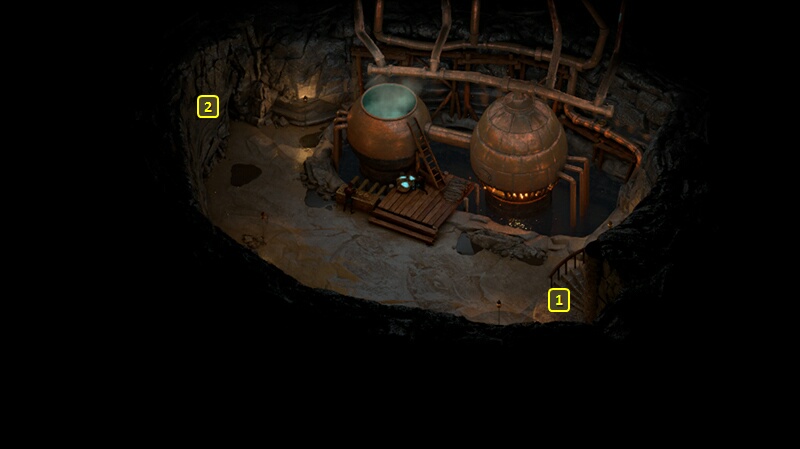
That brings me to #1 on the map of the Luminous Bathhouse. I go down the stairs at #3.
That brings me to #1 on the map of the Boiler Room. I squeeze through the crack at #2.
That brings me to #8 on the map of the Laboratories of Arkemyr's Manor.
There is a wall at #8. I "Examine" it before doing anything. Making a Perception check of 14 reveals hidden wires that trigger an alarm. Mirke makes a Mechanics check of 6 to disable the wires. Forcing the wall open without first disabling the alarm would result in any creatures in the Laboratories attacking on sight, even if I had managed to get run of the Manor through methods used by the evil party. But now I have a chance to make my way around without provoking hostilities, as long as I'm careful.
I use a Hammer and Chisel to force the wall open. Trying to do so with a Might check could have worked, but it would have resulted in an Injury.
Saru-Sichr
I have Ydwin wear Arkemyr's Old Robe. The Constructs and any other monster besides Imps won't attack her while she's wearing it, even when she's close enough to break Stealth in front of them. She stays careful to avoid being seen by any Imps, as taking on Shady disposition would then be the only way to maintain cover.
I send Ydwin on ahead. She finds a Morning Star called Saru-Sichr. I'll hold onto it for when a new companions joins some time later on.
She makes her way to #5, where she finds a soul about to be transferred into a Construct. Xoti, even though she's with the rest of the party near #9, absorbs the soul into her Lantern and makes progress with her personal Quest, The Lantern of Gaun.
Ydwin makes the rounds, grabbing any item from any container she can find without getting too close to any Imps. She eventually regroups with the party.
Xoti now takes two abilities on her 7th level-up. One of them is Duality of Mortal Presence. I will activate the modal that provides +1 Intellect for each Wound. The Intellect bonus may extend the temporal duration of any buffs she uses, and it may expend the area-of-effect of certain powers she will acquire. One of them will be Rooting Pain. The other will be a healing power from a Great Sword she will eventually acquire.
She also gets Thundering Blows. It spends some Wounds in order to temporarily give her the Tenacious (+5 Might, +2 Penetration) Inspiration. The boost to Might will help both her Melee Attack Damage, and her healing powers that she will acquire over time.
*Evil* Saru-Sichr
The evil party arrives at the stairs, and they have a much easier time as they still enjoy free run of the place. And that includes absorbing the soul at #6. No one in the evil party will have any real use for Saru-Sichr.
The Archmage's Vault
First things first, I have Ydwin put her Boots of Evasion back on and give the Boots of Stealth back to Mirke. She also puts her Vailian Breastplate back on.
The whole party goes into Stealth mode and goes to the Vault door at #10. Inserting the Translucent Crystal is part of the solution, although a Mechanics check of 9 would have worked as an alternative.
The other key is to use the combination of rotating gems, provided either by the Tattered Note or by the Watcher absorbing knowledge from the soul at #6.
The Vault itself has a lot of traps on the floor. Ydwin and Mirke carefully go around finding them and disarming them while looting the chests of their treasure.
One chest has two items I want. One of them is a Cloak of Greater Protection, which Aloth wears on an interim basis.
The other is a Grimoire called Ninagauth's Teachings. It becomes one of Alliria's Grimoires for the rest of the game. It provides Fireball, which will be one of her key spells. It also provides a unique spell that is available only through the Grimoire, Ninagauth's Shadowflame. It inflicts Freezing Damage in an area-of-effect that is equal to that of a Fireball, but it also Paralyzes its targets. It's a good alternative when faced with foes who are immune to Freezing Damage, or when I'm having to conduct a battle during night time.
Another chest has the Cabalist's Gambeson, which I'll hold onto for when Fassina joins the party.
Another chest has the Harapo Epic, which is the item I needed to complete The Archmage's Vault Quest.
Other items included an Ivory Wurm Figurine and a Stone of Power, but I'll just sell those.
I go back out the way I came. I realized I made a mistake with Ydwin. I put her passive skill points into Insight instead of Intimidate. So I speak to Ganor the proprietor of the Luminous Bathhouse (at #2 on the Bathhouse map) and pay 875cp to retrain her the same way but with the skill points put into Intimidate instead. Now I make to leave Periki's Overlook.
*Evil* The Archmage's Vault
I hold onto the Cabalist's Gambeson for Tekehu, and the Cloak of Greater Protection for Konstanten, who will use them as interim items.
*Evil* Boiler Room
The evil party now goes on ahead to #8, and breaks down the wall but from the other side. They raise the alarm by breaking it down without making the Perception and Mechanics checks. But their business here is already done.
They leave through the Boiler Room and Luminous Bathhouse, and also make to leave Periki's Overlook.
Both parties Return to Serpent's Crown.