-

- Forums
- Chatrooms
- Gallery
- Gameplay Videos
- Upload
- Articles
- Mod Reviews
- Shop SP: Games, Movies, Books
|
|
| Pillars of Eternity 2 Video-Based Walkthrough by David Milward |
Fort Deadlight Donjon
Blow the Man Down
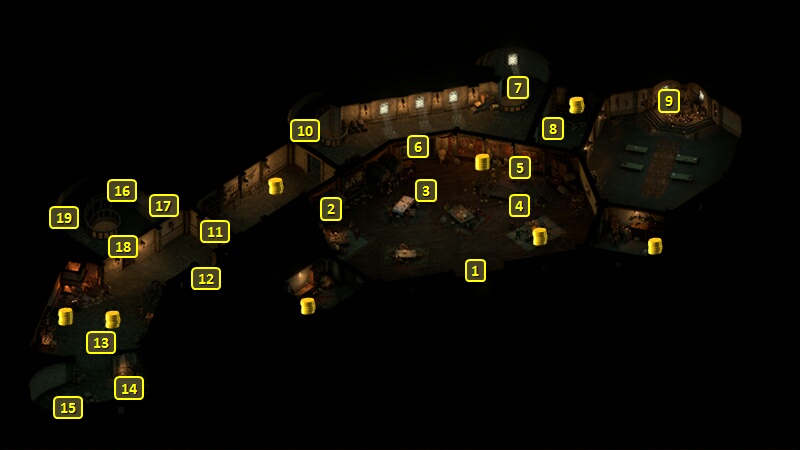
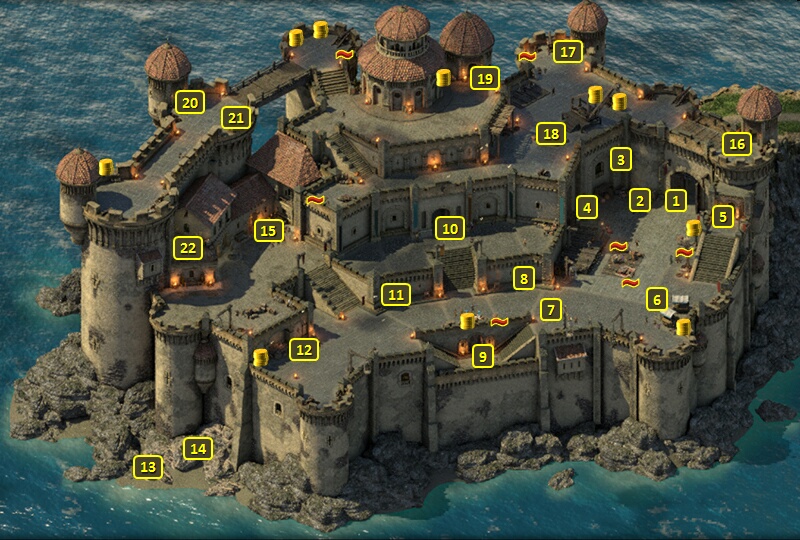
I am now at the stairs at #20 on the map of Fort Deadlight. I have Aloth loan his Entonia Signet Ring to Alliria because it also provides a +2 bonus to Diplomacy, but just for the next encounter.
I ring the bell at #21, which signals Lamond to make off with Benweth's ship.
Benweth comes out and is absolutely furious. I take the opportunity to speak to him. The possibilities and their skill checks are pretty much the same as when he played the Harpsichord in the Court, with the difference that I don't need to make any checks to cause his followers to leave, as none of them are around.
I make a Diplomacy check of 5, and then a Diplomacy check of 7 that gets me 1,000cp. Benweth now gives me full run of Deadlight, and that concludes the Blow the Man Down Quest along with a 7,000+ xp reward.
I give the Entonia Signet Ring back to Aloth. I also equip Serafen with the Plate Armor I found earlier on the balcony.
*Evil* Blow the Man Down
Zarathos and the evil party gang up on and kill Benweth, which opens up different pathways with the Principi in the future.
I was also careful to avoid Zarathos making any replies that would earn a major gain of reputation with the Principi. The reason being that a major gain would mean 1 point of positive reputation with the Principi, which in turn would make it very hard to obtain an armor that I want for Xoti. Avoiding any reputation-gaining dialogue options (usually ones that also give disposition) means only a moderate gain of reputation, which is not quite enough for a full point with the Principi.
I equip Mabel with the Exceptional Pistol, and Serafen with the Fine Sabre. Xoti wears the Miscreant's Leather as an interim armor.
Mabel advances to her 5th level at this point, and will be in the party for a little while longer until I get Ydwin as my dedicated thief-character. So I select Ectopsychic Echo and Secret Horrors, which are offensive powers that can be effective for the lower-level battles I'll be fighting for the next while.
Mirke Joins
I am now back at #19 on the map of the Court. Now I kill off Mabel to get rid of her and make room for my next sidekick.
I speak to Mirke again at #3, and accept her offer to join my party as a Shadowdancer, a multi-class Monk and Rogue. Her Rogue class is the Streetfighter specialization. She'll enjoy a -50% reduction of Recovery Time and +50% Damage against Flanked or Afflicted targets but only when she herself is Flanked or Bloodied. She'll suffer a +20% Recovery Time penalty if she is neither Flanked nor Bloodied.
I have her equip the Blunderbuss called Hand Mortar, that had been part of Serafen's equipment, in her off-hand. The idea behind her using a Blunderbuss is that she fires it with the Powder Burns modal active. That means she accepts the Distracted (-5 Perception, Flanked) Affliction on herself. But the self-inflicted Flanked will activate and sustain her Streetfighter bonuses, and avoid the possible penalties. The Hand Mortar has an additional benefit in that it has an explosive shot that deals Piercing or Slashing Damage in a 1.5m area of effect from the initial target. And that area of effect can be expanded through Intellect.
I also have her equip a Pistol in her main hand. There's a specific reason why. Blunderbusses have a short range, the shortest range of all firearms. Having a Pistol in the main hand and a Blunderbuss in the off-hand can change that dynamic. If you use an activated ability that makes a Full Attack, then both the Pistol and the Blunderbuss will fire at the same range as the Pistol. This dynamic does not apply to standard auto-attacks that do not involve any activated ability. It has to be an activated ability that makes a Full Attack (i.e., attack with both weapons). The key one that Mirke will rely on is Stunning Surge when she gets it. Confounding Blind will be an alternative as well.
I also have her equip the Protective Eothasian Charm. It has a per Rest power that activates on the wearer being 'near death'. The real point is that it provides a +1 bonus to Perception, which will help Mirke in finding traps and hidden items.
I also have her equip the Boots of Stealth that I had found in the Dungeon. The +2 bonus to Stealth will help her avoid detection while in Stealth, and sometimes help her disarm traps that are close to enemies prior to beginning a fight.
She takes Escape on her 2nd level-up. Sometimes she'll have multiple enemies try to pressure her in Melee combat, so this provides a nifty option to both break any Engagement and instantly teleport to a safer location from which she can resume her gunfire.
She takes Swift Strikes on her 3rd level-up. It adds +5 Dexterity and +15% Action Speed for 10 sec. I also keep this one active when I have enough Mortification, as I want to keep my Streetfighter bonuses active by firing quickly enough to avoid my self-inflicted Distracted from elapsing.
She takes two abilities on her 4th level-up. One is Two Weapon Style. It reduces her Recovery Time by -15% when she uses two weapons, and therefore helps her fire her guns as quickly and as often as possible.
She also takes Dirty Fighting. It provides a 15% chance of converting Hits to Critical Hits. Mirke's build will depend in large part on scoring at least one Critical Hit with her explosive gun attacks, so this passive is definitely a must.
She also takes Blinding Strike. The explosive shot of her Blunderbuss will apply Blindness (-5 Perception, +50% Recovery Time, Flanked, -10 Accuracy, distance of Ranged Attacks halved, immune to Gaze attacks and cannot use Gaze attacks), which in itself commends itself. It will also be upgraded to Confounding Blindness.
The good party now goes down the stairs at #7.
*Evil* Mirke Joins
Mirke joins as a Monk / Fighter (Brawler). I equip her with the Gladiator Sword as an interim weapon, as it provides a +5 bonus to Deflection. I also equip her with a Plate Armor and a Large Shield.
She wears the Dragon Pendant for the rest of the game. It's not for the per Rest abilities, but for the bonuses to Burning and Slashing Armor Rating which fits the theme of her Armor to the max tank build.
She also wears the Entonia Signet Ring for the rest of the game. She's in the thick of it every battle, so it can be beneficial to wear a ring that will raise all of her Defenses for each enemy that Engages her.
Knockdown and Force of Anguish are her starting abilities. She takes Swift Strikes on her 2nd level-up. Sometimes even tanks should be given some offensive ability, and this one will be upgraded to Swift Flurry.
She takes Disciplined Barrage on her 3rd level-up. The +5 Perception bonus is definitely worth it. It will also be upgraded to Disciplined Strikes.
She gets two abilities on her 4th level-up. One of them is Weapon and Shield style, which is obligatory for a tank.
Her other selection is Dance of Death. It will be a good way later on to passively recoup Wounds as long as she avoids getting Hit to the maximum extent possible.
She selects Determination on her 5th level-up. It's a good 2nd-tier passive to add, as it adds +20 to all Defenses vs. attacks that inflict Constitution, Intellect or Perception Afflictions.
The evil party also has to keep Mabel around for a while yet, at least until Ydwin joins.
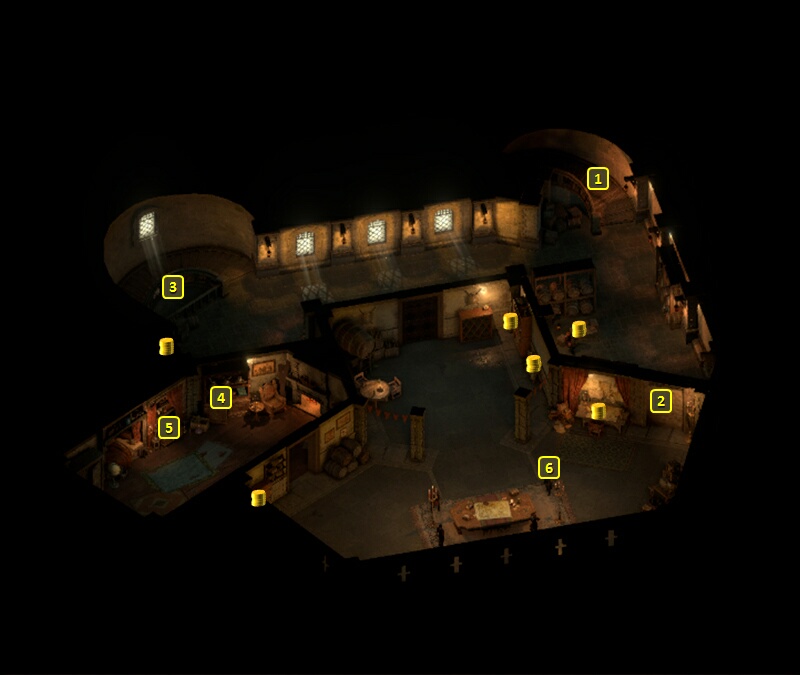
Deadlight Storage
I am now at #11 on the map of the Dungeon. I go to the southeast corner and grab what loot I can find from the table at #8.
I backtrack and loot items from containers in the northeast corner. That includes Gauntlets of Reliability, which I have Mirke equip, and a Fine Brigandine Armor, which I have Eder wear.
*Evil* Zarathos wears the Fine Brigandine Armor as an interim armor. Mirke wears the Gauntlets of Reliability in the interim.
I go back up the stairs at #11.
That brings me to the stairs at #7 on the map of the Court. I go west and up the stairs at #10.
*Evil* Deadlight Donjon
I show this part from the perspective of the evil party, partly because it involves fighting everyone here and partly because the evil party gets an item here that they'll actually need.
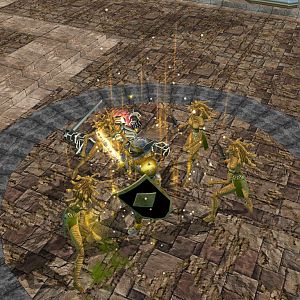
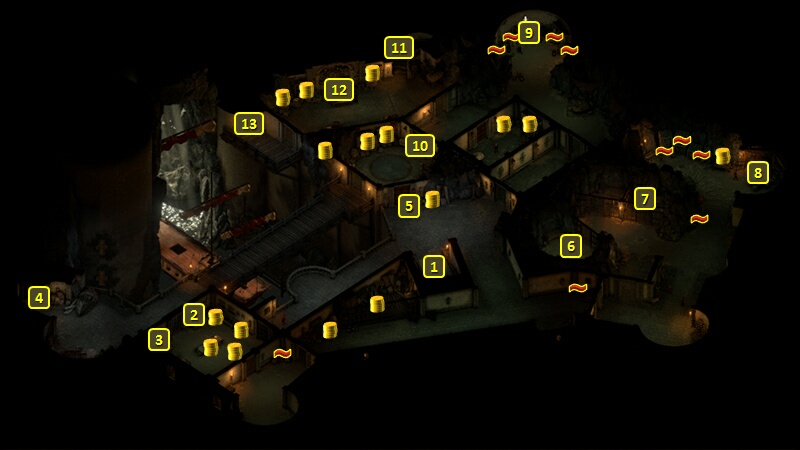
I start off at #3 on the map of the Deadlight Donjon. I kill the three guards that are near the stairs at #1. The reasons are because I can without attracting the attention of the rest of the guards at #6, and because it prevents them from joining in the next fight and thus makes it easier.
Now I have the party sneak into the room with the containers at #4 and #5. I do it one at a time so that my characters won't trip over each other and risk getting spotted. Once in the room, I huddle in a corner. The other characters form a wall in front of Mabel, who's the most vulnerable in the party.
Mirke now goes out a little bit to show herself, but just as quickly regroups. The enemies won't rush in just yet. So I wait and let their buffs expire.
Now she goes out and gets their attention a second time. An enemy Spellblade is first. Zarathos actually holds him at the door and scores significant damage. The rest of the enemies can't enter the room while that's happening. It isn't until the Spellblade uses an Escape that Zarathos has to take his place back in the line.
It is after that the enemies start to pour in. I hold the line fast, and only have a character attack when an enemy comes within melee range. Mabel frequently uses powers like Terror, Phantom Foes and Mind Blades when she builds up enough focus for them. Xoti frequently uses scrolls and spells. She'll cast Restore or use a Scroll of Minor Healing when multiple party members have taken damage. She'll use a Scroll of Nature's Mark every once in a while to improve attack rolls against the enemies. She did use a Scroll of Circle of Protection when several enemies were bearing down on the party. She also had to cast a Withdraw on Zarathos when he was taking a beating.
When I can, I prioritize the Rogues and Spellblades for attacks. They hit the hardest, but they are also squishier as the proverbial glass cannons. Once they're cleared out, I flank and take down the Celebrant, who acts as a buffer for the enemies, and is sort of the mid-point between glass cannon and tank. It is only after they're all gone that I Flank and take out the sturdier Brute and Buccaneer.
The chest at #5 has Bounding Boots, but I have no use for them.
The box at #4 has a Blackwood Log, which the evil party will need for the Blackwood Hull. I then leave through the door at #1.
*Good* The good party just comes in and takes any items they can find without any hostilities, since they made peace with Benweth. They don't even need the Blackwood Log, as I have a different ship build in mind for them. I did get a Fine Pistol in one of the chests, which became an upgrade for Mirke.
Ludde
I am now at #19 on the map of Fort Deadlight. I make my way east along the ramparts. A Pet cat named Ludde is at #17.
I go through the door at #16. I go down the stairs from #5 and then leave Fort Deadlight through the gate at #1.
I briefly switch Xoti back in. I equip her with a Fine Leather Armor that I had found earlier. I thereafter switch Mirke back in.
Now it is time to set sail to Neketaka.