-

- Forums
- Chatrooms
- Gallery
- Gameplay Videos
- Upload
- Articles
- Mod Reviews
- Shop SP: Games, Movies, Books
|
|
| Pillars of Eternity 2 Video-Based Walkthrough by David Milward |
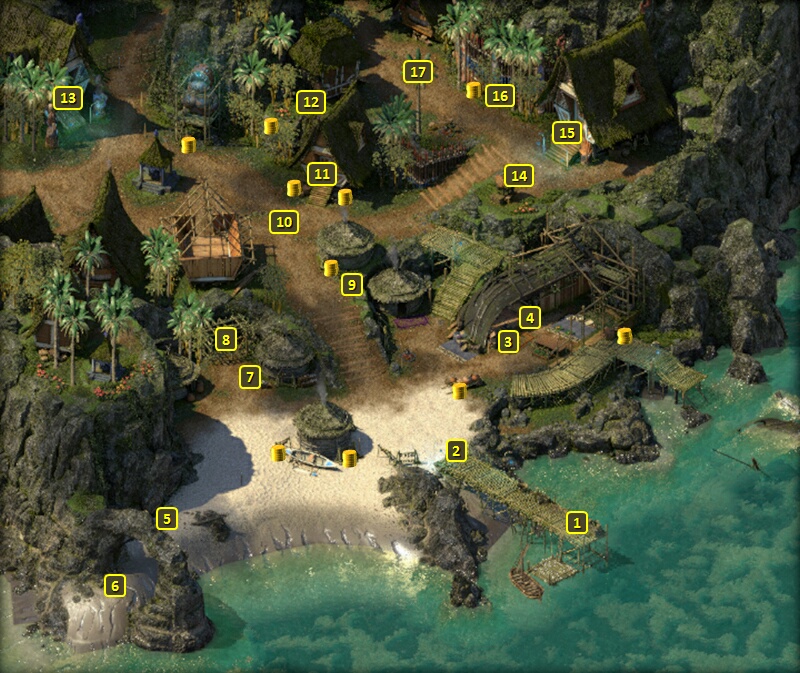
Tikawara
*Evil* Vektor
I arrive at #1 on the map of Tikawara. I temporarily bring in ship combatants so that they can advance to their 10th levels.
Eder takes two abilities. One is Weapon Specialization, which increases his Damage with Amra by 10%.
He also takes Shadow Step. It enhances Escape so that his next attack will cause Paralysis. Shadow Step itself confers temporary Invisibility, as a setup to Backstab. The Paralysis can also act as a set up for either a Critical Hit since the Paralysis Affliction will convert some Hits to Critical Hits, or for Death Blows if the target is suffering from more than one Affliction.
Both Serafen and Konstanten take Tough. More Health is always good for front-line combatants.
Rekke also takes two abilities. One is Blood Frenzy. It upgrades Frenzy so that his attacks cause a little extra Raw Damage over a few seconds. The ultimate reason is that it leads to the upgrade called Blood Storm.
The other is Weapon Specialization, which increases his Damage with Lord Darryn's Voulge by 10%.
I thereafter put my core party back together, with the differences that Konstanten will temporarily replace Mirke and Maia will temporarily replace Ydwin.
I then speak with Vektor at #2. He was left behind by the Vailian expedition that has gone missing. I buy Acina's Tricorn for Maia. The +5 Ranged Accuracy and -10% Reloading Time fit like a glove for her.
Vektor
I sell off my excess goods before docking at Tikawara. I replace Aloth and Eder with Xoti and Serafen.
Xoti takes Rooting Pain on her 10th level-up. It generates a shockwave in a 1.5m radius that inflicts 4-8 Crushing Damage and Interrupts nearby enemies. I would be reluctant to take this ability for a Monk build that wants to keep its Intellect or Constitution bonus maxed out to +10 through Duality of Mortal Presence and that avoids expending Wounds on activated abilities. But it makes sense where the computer AI is going to spam Wound-based activated abilities every chance it gets during ship combats.
I speak at length to Vektor at #2. I buy Acina's Tricorn for Mirke as an interim hat.
I also buy a Stormturner Cloak for Serafen. It provides bonuses to Armor Rating against elemental damage that rises in proportion to lower Health for the wearer. It's consistent with an Armor-based build, like for Serafen.
Himuihi
Now I go to the cage at #8. I have Mirke go into Stealth mode and unlock the cage. That frees several Lagufaeth Hatchlings, who promptly flee for the nearby beach. Unlocking the cage while in Stealth mode avoids any reputation loss with Tikawara. It also makes possible a peaceful resolution for the Broodmother's Fury Quest.
Now I speak to Himuihi at #3. She expresses a desire to rid the island of the local Lagufaeth. The conversation itself will trigger the Broodmother's Fury Quest.
She also offers an Inn. I take the opportunity to retrain Pallegina. I do the level-ups the same, but with one difference. I had earlier taken the Wurms summons when I needed them during the earlier parts of the game. But now that I have the Ogre summons, I can replace the Wurm Summons with Divine Purpose. It will raise all her Defenses against Dexterity, Might and Resolve Attacks by +20. That will be a key benefit, as I often rely on her to use Invocations that will protect the rest of the party against those attacks.
I now also bring in Ydwin, Fassina, Rekke and Konstanten as the party members with the least experience.
*Evil* Zarathos is content to speak with Himuihi to trigger the Quest. He's intent on wiping out the Lagufaeth.
*Evil* Harama
The evil party now goes to #10, where a mob of Huana are accosting a Rauatai operative named Harama. Maia demands that Zarathos intervene. He chooses the Cruel option. How you respond will not affect your reputation with her, but she insists on intervening on her own initiative.
One approach is to talk them down, starting with an Insight check of 3. Followups that will get them to back down include a combined check based on both Coastal Aumaua as your race and Deadfire Archipelago as your background, having 3 points of positive reputation with the Huana, or a combined check of Intimidate 4 and Bluff 3.
Another route is to let the mob kill Harama, which may actually be better for Tikawara itself come the game epilogue itself.
But Zarathos prefers the Aggressive option to start a fight with the mob itself. He'll still be able to interact with the rest of the residents of Tikawara afterwards.
He delivers the Missive to Harama afterwards, and he departs after some conversation that includes flirting with Maia.
Maia will speak to Zarathos afterwards. And he in turn presses a follow-up conversation with her immediately thereafter. How hard you want to press her on the nature of her assignment and the Missives is up to you, and won't affect either your reputation with her or the Quest itself.
However, she will now want to report back to Atsura.
Plucked Fruit
Now I go to #9. A Mataru warrior named Mukumu is interrogating a bound Roparu named Tamau over a missing piece of Koiki fruit that was needed for a local harvest ceremony. Tamau of course maintains his innocence. If you approach them without the fruit in hand, the conversation ends with Mukumu giving you the authority to investigate and find the missing fruit. Either way the conversation triggers the Plucked Fruit Task.
If you had obtained the Dried Koiki Fruit from the niche at #6 beforehand, Muzumu will become that much more convinced that Tamau is guilty. You can remain silent which results in Muzumu cutting Tamau down and letting him go to his punishment voluntarily. That concludes the Task with an xp reward. The other option is to insist on finding out who actually did steal the fruit to continue the Task.
Now I go speak to Pekeho at #7. The possibilities for getting him to admit that he provided false testimony against Tamau include:
*Evil* Plucked Fruit
Zarathos collects the bribe from Rongi, and then betrays Rongi to Mukumu.
*Evil* Nairi
I show this part from the perspective of the evil party. I speak with the Huana Priestess named Nairi in her shrine at #13. Zarathos falls in with her request to destroy the adra pillar of Poko Kohara.
Ranga Ruanu
I enter the building at #15 and speak to Ranga Ruanu. Consistently choosing Benevolent dialogue options is a reliable way to convince him to willingly give me the Copper Muzuma Shell Key. I thereafter leave Tikwara on foot through the north exit.
*Evil* I have Maia pickpocket the Copper Muzuma Shell Key from the Ranga, since I don't want Zarathos to use the Benevolent option to get it. I also switch out Maia for Ydwin as I leave the village.
It is now time to explore Tikawara Island.