-

- Forums
- Chatrooms
- Gallery
- Gameplay Videos
- Upload
- Articles
- Mod Reviews
- Shop SP: Games, Movies, Books
|
|
| Pillars of Eternity 2 Video-Based Walkthrough by David Milward |
Northeast Tehiwai
To Northeast Tehiwai
The good party begins by boarding a Vailian Expert Captain.
After that, I go northeast and begin naval combat with a Principi Expert Captain. I originally intended to sink it at long range with my Haeferic's Nose and Iron Thunderers. But then Haeferic's Nose ended up taking out both one of their Cannoneers and their Surgeon. Having no Surgeon means the Surgeon can't put Injured Crew Members back into action. Noticing that, I switched strategies. I reloaded and then fired a Grapeshot volley, which took out four more Crew Members.
I board after that. The core party initially holds the fort against the oncoming Fighters. But then, once the Principi crowd has thinned out enough, that's when I go around hunting down and killing off the remaining Pistoleers and Warblers as quickly as I can. I then gang up on the few Fighters who are left.
Eld Engrim got Injured during the naval combat. That's why it can be a good thing to keep a spare Surgeon like Big Mouth around for a large ship. He can heal Eld Engrim while the ship sails.
I thereafter sail to the island at #29 on the World Map.
Wapau Jungle
Now I enter the Wapau Jungle on the island, which involves a scripted interaction. A group of Skaenite cultists approach Alliria, wanting to make her an offer but away from the ears of her companions.
I can decline repeatedly while avoiding hostilities. Doing so would end the scripted interaction, and the Jungle disappears from the World Map.
To even listen to their offer earns Shady reputation. They want the Watcher to follow them to their altar and sacrifice one of her companions. You can at this point again decline to end the encounter peacefully, or choose
the Aggressive "counter proposal" to fight and kill them.
You can take them up on their offer and choose a Companion to bring with you. Following them obliges you or your companion to make a Survival check of 12. Making the check means you reach the altar without any trouble. Failing it means both you and your Companion end up with the Fatigued injury (-5 Accuracy, -10 all Defenses, -15% Maximum Health).
You can sacrifice your Companion, which leads to your Companion's permanent death. Doing so earns Cruel disposition and an Effigy Doll. Going back leads to a loss of reputation with Companions (not Sidekicks) who are in your party.
You and your Companion can instead destroy the altar, which earns Benevolent and Aggressive reputation.
You can again simply walk away from the altar, or choose an Aggressive option to fight and kill the Skaenites.
Alliria wants nothing to do with any of that. She declines, and then chooses an Aggressive option to fight them. I don't have much trouble outlasting them.
The Skaenite Priest leaves behind the Pathfinder's Boots. Eder wears them for the rest of the game. The +1 to Dexterity and +5 to Reflexes are certainly welcome benefits. The key point is the +1 to Athletics, which helps Eder take full advantage of a Large Shield he will soon find.
I have thus far avoided Aggressive disposition for Alliria. It's not a disfavored disposition for Kind Wayfarers, and therefore won't result in a Defenses penalty. But avoiding it up until now allowed me to obtain the Nature's Resolve until Rest bonus from the Delemgan Toaku Bihwa Trail. It is afterwards that I don't mind taking on Aggressive disposition in order to obtain the Pathfinder's Boots for Eder.
I thereafter return to my ship.
*Evil* Wapau Jungle
I switch out Ydwin for Konstanten on boarding, as the latter is about to get an item that he'll wear for the rest of the game.
Zarathos chooses the Aggressive / Cruel option to wipe them out. Konstanten gets the Pathfinder's Boots. The +5 to Reflexes and +1 to Dexterity are nice. The real point is that it increases his Athletics score by 1, and that in turn improves the Recovery Time of the armor I have in mind for him. I thereafter return to the ship.
I switch Konstanten back out for Ydwin.
Subterranean Temple
I sail to the island at #30. I replace Eder with Ydwin for the time being. There's a specific reason why.
I enter the Subterranean Temple after docking at the island.
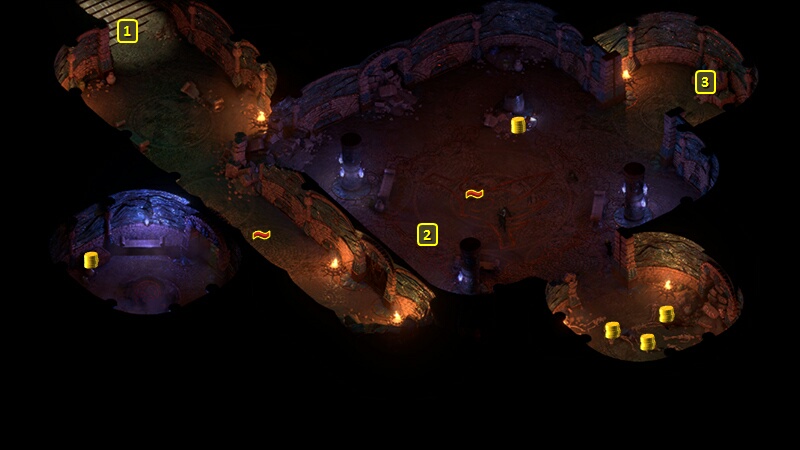
I am now at #1 on the map of the Temple. I disarm the trap to the south and loot the chest to the west.
There are several Cultists devoted to Woedica at #2. The door before them affords me the opportunity to set up crowd-control. Aloth switches to Jernaugh's Careful Calamities. Alliria crafts a few Scrolls of Plague of Insects and equips them in one of her quick-item slots. I also position Aloth and Pallegina to hold the door.
I open the door to start the battle. Aloth starts with Infuse with Vital Essence, and then casts Grease and Pull of Eora so that their western-edges end just at the door. That helps keep the Cultists under firm control. Ydwin also hits them with Phantom Foes.
Alliria also starts with Infuse with Vital Essence followed by Blood Sacrifice. She then uses a Scroll of Plague of Insects, as there are a few spellcasters among the enemy.
It is evening, so she now goes on a cycle of Ninagauth's Shadowflame followed by Blood Sacrifice, rinse and repeat. Recall that the Shadowflame spell both inflicts Freezing Damage and Paralyzes its victims. Mirke meanwhile is blasting away with her guns.
At some point it's just their Paladin leader and a Druid left. The Druid casts a Wall of Thorns spell at the door, so I retreat and lead both enemies out the door. I gang up on the Druid, and finally the Paladin.
I go into the larger room, and disarm a trap and loot several items. There is a statue at #3.
Ydwin temporarily lends her Token of Faith to Alliria. Alliria clicks on the statue and easily makes the Intellect check of 14. Berath's Blessings (+2 Resolve) plus Nature's Resolve (+2 Resolve) plus the Token of Faith (+2 Resolve) allow her to make the following Resolve check of 15. Making both checks obtains a Soulbound Mace from the statue called Magistrate's Cudgel. I have Aloth equip it as an alternative Mace until he gets the Mace I really want for him.
I make to leave back through the stairs at #1.
*Evil* Tyrant's Crown
The evil party emerges from the Subterranean Temple. Zarathos renames the island to "Tyrant's Crown". This was another of the islands I needed to discover for the Mapping the Achipelago: Tikawara Quest. *Good* The good party named it "Libertarius Maximum".
The evil party begins by sailing northeast to confront a Principi Master Captain. I would be outmatched during a boarding battle. The ship also has an Expert Surgeon who can quickly put Injured Crew Members back into action. So my only real hope is to just sink it. A quick look at details reveals that it's a Dhow with three Vailian Hullbreakers on one side, and three Iron Thunderers on the other.
It grabs the initiative and starts coming to me, which signals an intention of an upclose volley with its Vailian Hullbreakers. So I jibe and sail until I reach 500+ range. Its initial volley misses completely due to putting myself past range, and the ship keeping a slimmer profile while sailing away.
I turn portside to use Haeferic's Nose and my Aedyran Channel Guns. I use Cannonball ammunition with the intention of sinking it.
I have three rounds between reloading. I keep sailing at Full Speed until the enemy ship itself fires at me. It still has a hard time hitting me. Being past 500m, and always going full-speed, both impose penalties even with its Iron Thunderers. It is only after it has fired a volley that I "Hold Position" before firing a volley of my own. I gradually start wearing it down.
At some point it sails closer to bring itself within 498m, but that buys me time to wear it down further. Eventually I manage to inflict a Deck Fire on it as it's close to sinking. And then the Fire inflicts the last bit of damage to its hull to sink it.
I myself am now running quite low on ship supplies, so I dock at Tikawara to repair my ship, and refill all my ship supplies.
I then sail to Poko Kohara.