-

- Forums
- Chatrooms
- Gallery
- Gameplay Videos
- Upload
- Articles
- Mod Reviews
- Shop SP: Games, Movies, Books
|
|
| Pillars of Eternity 2 Video-Based Walkthrough by David Milward |
Forgotten Catacomb
*Evil* To Tangaloa's Maw Island
I first take out a Royal Deadfire Company Novice Captain by boarding it.
I next fight a Vailian Master Captain heading towards Neketaka. This time I stopped myself just a little beyond 100+m. It's past the ideal range for Magranite Flamethrowers. But I can still hit with definite probability (albeit a slight penalty), and being a little past 100m can mean the enemy vessel won't try to close in on you. I whittle their crew down to 7 and then close in for a boarding fight.
Goldpact Paladins on a Vailian Master Captain are still a distinct danger even when I outnumber them. Their Sacred Immolation ability, especially if multiple Paladins use it, can wipe out party members real fast. So during this battle I use Interrupt or Knockdown abilities on them when I can. In one instance I ran away out of range when I noticed a Paladin was going to use it. The good news is that if you can survive it or otherwise avoid the damage, the Paladins themselves will be very close to death and just need a hit or two to put them there.
I thereafter make a point of hunting down and boarding a Deadfire Merchant Ship, because it means refilling my ship supplies afterwards.
Now I make my way to Tangaloa's Maw Island, at #23 on the World Map. I board a Crookspur Captain just as I approach it.
*Evil* Tangaloa's Maw
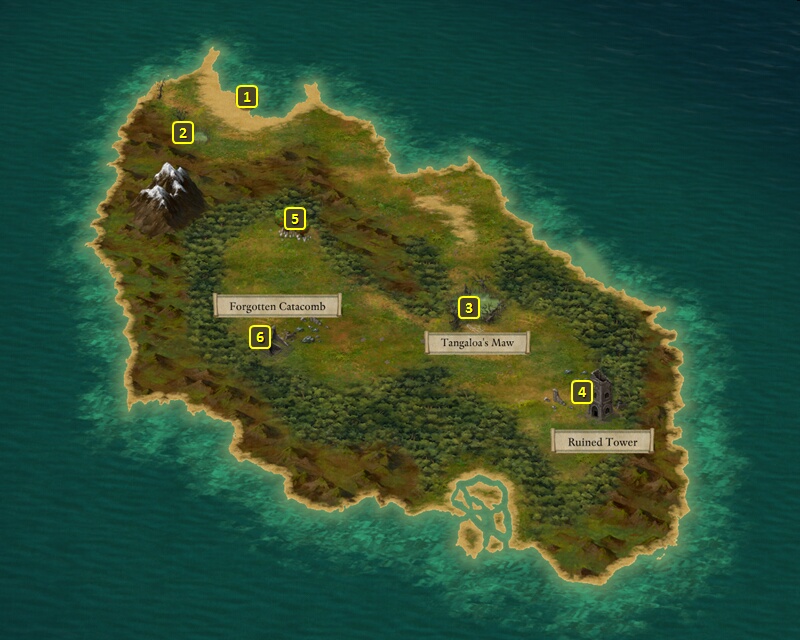
The evil party is now at #1 on the map of Tangaloa's Maw Island. I travel to #3 to enter Tangaloa's Maw.
I initially have to make an Athletics check of 4 for everyone in the party to avoid being turned back. I then stay put. I do NOT make a Survival check of 4 to go down the trail. That means I'll have to fight the undead with the disadvantage of being in a slog zone. But making the Survival check to go down the path would have triggered a Rest, causing me to lose the until Rest bonuses that I've accumulated.
I have Zarathos go around taking out the Skeletons one by one, as they are susceptible to Crushing Damage. I let Mirke and Xoti hold up and fight the Rotghasts. Tekehu summons an Ondra's Whip at the start of the fight. He and Maia then fire away at a distance. One of the undead leaves behind a Sigil of Atrophy Wardstone.
Tekehu now advances to his 10th level. He gets four abilities, two automatically and the other two of my own selection. He gains Ngati's Power Struck the Shore Again, which replicates the Druid spell called Overwhelming Wave but as a Chanter Invocation. It both Stuns and inflicts Crushing Damage, but I don't use it very often if at all since it hits party members too.
The other ability that he learns automatically is Burning Spray. It both inflicts Burning Damage and Pushes back its targets. And again I don't use it very often since it will hit party members too.
The Chanter ability that I select is Aefyllath Ues Mith Fyr. It's a Phrase that adds +15% Burning Damage for allies' weapons. It's one of the staple Chanter buffs that I plan to extend with Salvation of Time.
The Druid ability I select is Moonwell, which adds +10 for all Defenses, and restores +8 Health per 3 sec. It's one of the key Druid buffs that I likewise plan to extend endlessly with Salvation of Time.
I loot the Ruined Tower at #4 for random items, and then enter the Forgotten Catacomb at #5.
Tangaloa's Maw
The good party outlasts the undead with its healing resources. And Mirke is frequently able to one-shot the Skeletons, leaving the rest of the party free to wear down the Rotghasts.
Mirke acquires two abilities on her 10th level-up. One of them is Duality of Mortal Presence. She'll use the modal that will increase Intellect by +10. That will increase the area-of-effect of her Blunderbuss blasts, as well as the duration of Stun when she uses Stunning Surge in the future.
She also takes Adept Evasion. Any attacks that target Reflexes and Graze will get reduced to a Miss. This passive is especially useful for a ranged Rogue, against whom most possible attacks do target Reflexes.
I also now remember to use the Sigil of Pain Wardstone that I found earlier.
It is also at this time that I decide I can actually upgrade what will ultimately be an interim weapon since I have the surplus of cash and crafting ingredients for it. I upgrade Mirke's Fire in the Hole Blunderbuss from Fine to Exceptional and then to Superb. I also add the Blinding Smoke enchantment, which will add Disoriented (-5 Perception, Flanked, +50% Recovery Time) in a cone attack upon scoring a Critical Hit.
I thereafter enter the Forgotten Catacomb.
*Evil* Forgotten Catacomb
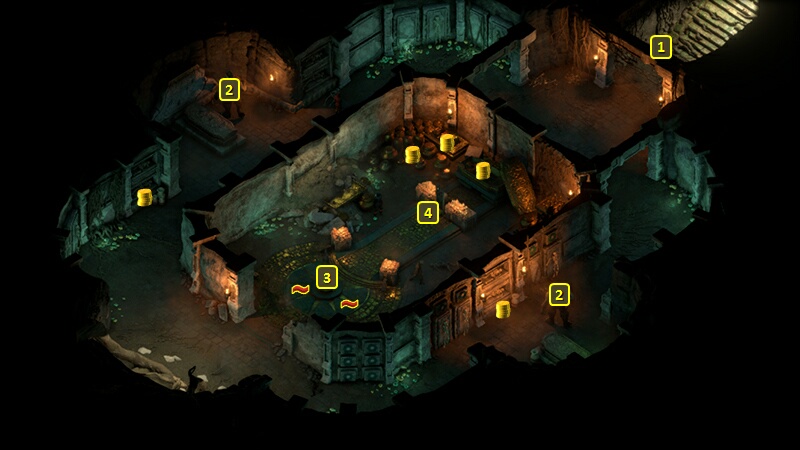
I start off at #1 on the map of the Forgotten Catacomb. I have Zarathos use the Sigil of Atrophy Wardstone, since it will now benefit Maia and her bird as well.
I go to the hall to the east and kill a few undead there. I go to the west hall and begin fighting the undead. The rest of the dead from the room at #4 begin to pour in, led by a Death Guard Fanatic. Xoti casts Devotions of the Faith over everyone, friend and foe alike. Tekehu buffs the party with both Moonwell and Nature's Balm. He also throws a couple of bombs when he can place them to catch several enemies but without hurting the party. I otherwise make the Fampyrs the priority targets, to minimize the use of their Charm gazes.
The Death Guard Fanatic leaves behind the Reckless Brigandine. Zarathos wears it as his armor for the rest of the game. It increases Action Speed by 5% per enemy Engaged by the wearer, and the armor itself adds +1 Engagement. His Thick Skinned passive adds another +1 Engagement. And he'll get another +3 Engagement whenever Ydwin casts Tactical Meld on him. I also add Into the Breach. It increases the wearer's Melee Weapon Damage and Armor Rating as the wearer gets closer and closer to getting knocked unconscious. These powers will awaken alongside Zarathos' increased Power Levels that awaken when he's near death as a Death Godlike. And I can take advantage of skirting the edges of death more and more during the later parts of the game when he'll enjoy a Barring Death's Door from Xoti that is extended endlessly by Salvation of Time, also from Xoti.
*NOTE* The original appearance of the Reckless Brigandine amounts to some small dark green pieces that leaves its wearer half-naked. I admit to totally hating the aesthetic, even though the armor is functionally a perfect fit for Zarathos. So I edited the items.gamedatabundle file so that the Reckless Brigandine instead had the appearance of the Kahako Nihi armor. The black coloration and spikes motif are a much better aesthetic fit for an evil Death Godlike Ravager in my opinion. If you're interested in changing the appearances of items yourself, here's an Obsidian thread that describes the process. Each armor or weapon has a variable called ModelVisualDataPath, and that ModelVisualDataPath has an asset value. What you want to do in the items.gamedatabundle file is copy the asset value from the ModelVisualDataPath of the item whose appearance you want, and then copy it over the asset value of the ModelVisualDataPath of the item your character will be wearing or using. Now, having said that, I'll add two bits of advice. One, absolutely back up the original items.gamedatabundle file before even trying something like this. It's easy to screw up your game if you edit any of the data files in the wrong way. Second, open the items.gamedatabundle in Notepad or Wordpad AND give it PLENTY of time to load. The file contains a LOT of text and info. I do not exaggerate when I say find something to keep yourself occupied for 2 to 3 hours, like go out and have lunch and take care of other errands, or start the load up before you go to work and only start when you've come home. It is only after plenty of time has passed that the file will have completely loaded in your text editor, and thus reaches a state where it's relatively safe to edit and save changes. Even so, the first bit of advice about backing up the file first is still just as important.
Maia disarms a trap near #3, and then I disarm the Sigil of Atrophy. I collect whatever items I can find in the room.
Maia obtains two abilities on her 10th level-up. One of them is Stalker's Link. She now enjoys +10 Accuracy when firing her gun at an enemy threatened by Ishi. And Ishi also gains +1 Engagement.
I also take Adept Evasion. This passive is especially powerful in conjunction with Defensive Bond, which increases Defenses vs. area-of-effect attacks and thereby increases the odds of bringing a Reflexes damaging attack down to a Graze and then a Miss. Enemy spellcasters will be hard put to it to damage her with elemental or raw damage attacks that target Reflexes.
Forgotten Catacomb
The good party relies on its usual methods of outlasting and wearing down the undead. But there's a few new glosses to note. One, the Fampyrs and Shades often go after Mirke, so I sometimes split my party with Eder performing tanking duty while other characters protect Mirke. Mirke herself has to use Escape on occasion.
Mirke now starts using Lightning Strikes, but only once her Duality of Mortal Presence modal raises her Intellect by +10. That's when I can maximize the duration of Lightning Strikes.
Alliria uses Brand Enemy on the Deathguard Fanatic. She also uses Fireball repeatedly when she can catch multiple enemies in a cluster.
The Reckless Brigandine doesn't figure into any of my plans for the good party. But Pallegina acquires two new abilities on her 10th level-up.
One of them is Oh But Knock not on the Door of Urdel and Gurdel. It summons two Ogres. The Ogres hit hard but infrequently. But their real value is as meat shields with lots of Health that can hold up multiple enemies for the duration.
The other is Exalted Endurance. It upgrades Zealous Endurance so that it also heals 3 Health (even more with increased Might and bonuses to Healing) every 3 seconds. It acts in concert with Ancient Memory and some of Pallegina's items to provide a powerful healing aura that allows the party to consistently and quickly regenerate from almost anything that hits them.
*Evil* Mowrghek Ien
Now I remember to upgrade Maia's Sharpshooter's Garb to Exceptional. Yes, there will be another item to upgrade to Superb, so it can wait.
I leave the island and name it "Mowrghek Ien", which sounds like a good name for a swamp that was filled with undead. This was one of the islands I needed to discover for the Mapping the Achipelago: Tikawara Quest. *Good* The good party names the island "Celaria Bree" as a Bard's Tale reference.
I quickly thereafter board and wipe out a Crookspur Captain.
The Black Isles are my next destination.