-

- Forums
- Chatrooms
- Gallery
- Gameplay Videos
- Upload
- Articles
- Mod Reviews
- Shop SP: Games, Movies, Books
|
|
Dyrford Ruins
Old Dungeon Key
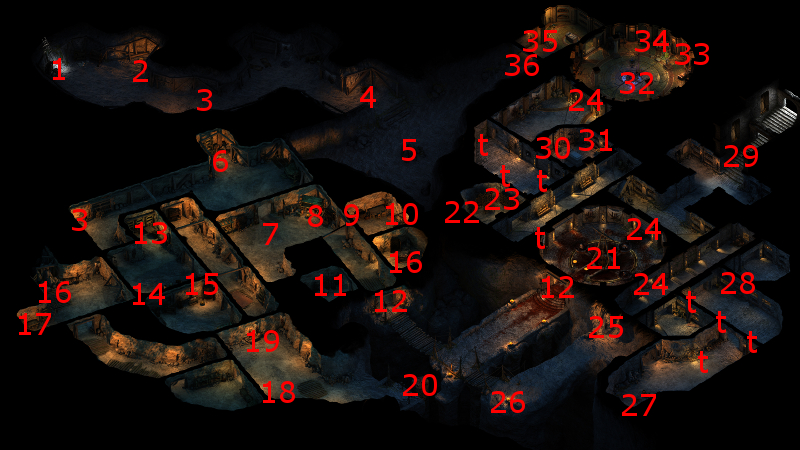
I start off at #29 on the map of the Dyrford Ruins. I battle a lot of Skaen Cultists and Fanatics along the east side of the Ruins, using familiar tactics and looting containers at #28, #27 and #26 along the way.
I go west across the north side of the chasm at #20, and use Mechanics to open the door at #12 west of #20.
There will be quite a large number of Skaenites at #7. I set up a kind of smaller reverse phalanx in the hallway to the south, and have the Orlan Rogue lead them to me. Given the numbers, I have Hiravias let loose with Returning Storm and then Nature's Mark. I have Grieving Mother set up Ectopsychic Echo across a line of foes whenever I can. Kana summons a Phantom whenever he can. I manage to win more or less in good health.
The chest at #9 has the Old Dungeon Key, which can be used to open doors marked #12. Those same doors can be opened with a good enough Mechanics skill though.
'
*Note* There's plenty of xp to go around, and it's actually pretty hard for a party not to reach its maximum level. I am therefore not hung up on losing xp because I used a key instead of the Mechanics skill. Even so, if you're set on maxing out your xp every chance you get (e.g. if you really want to get to the next level as fast as you can), then it may be advisable to leave the keys where you find them.
Beetles
The Orlan Rogue disarms the Gaze of the Adragan trap at #7, and then continues through the door to the north. There will be a few more Skaenites that I kill through the usual tactics.
There will be a few Stone Beetles and an Adra Beetle at #5, and then a couple of Wood Beetles at #3. They aren't particularly tough, but I'm now getting pretty beat up over the long haul.
I therefore rest up and then grab the Camping Supplies from the crate at #4.
Ropes and Grappling Hooks
Now the party fights its way through the Skaenites in the western rooms of the Ruins, using the usual tactics. Containers at locations marked #15, #16 and #18 will each have a Rope and Grappling Hook in it.
The one at #15 also has an item from the "Dyrford Ruins" section of the Random Drop List. The good party has no particular use for any items available from that section. The evil party, however, can make use of it (see just below).
Chasm in the Dyrford Ruins
I use a Rope and Grappling Hook to cross the chasm at #20 during a scripted interaction.
*Evil* Blood Pool
The evil party makes its way straight towards the Blood Pool. First, I have Aloth set up a Concussive Missiles trap at the door marked #12 and near #11. Durance casts a Seal of Warding south of the door. The warriors set themselves up near the door. There will be a group of Cultists in between the doors marked #12, so Eder leads them back to the rest of the party.
Aloth sets up his sequence of Eldritch Aim, Chill Fog, Kalakoth's Minor Blights and Merciless Gaze. Durance initiates his sequence of Blessing, Watchful Presence, Consecrated Ground and Daze. The battle is soon over.
At #21 is the Blood Pool. Zakara has at least one point of Cruel disposition, so the Blood Pool offers her a choice of permanently sacrificing one of her companions in exchange for a Talent. The choices are as follows:
*Evil* Grieving Mother Rejoins
Zakara returns to Caed Nua, and has Grieving Mother rejoin her to fill in for the now very dead Sagani.
The remainder of the video consists of my levelling up Grieving Mother.
*Evil* First Bleakhollow Bandits Attack
The evil party is marking time until it can reach the 17th day of the calendar mark, with a view towards obtaining a specific item in a chest in the ruins. So I rest up in the courtyard of Caed Nua. My Barracks upgrade is complete, and I start the Bailey upgrade.
An attack by Bleakhollow Bandits comes, this time in the courtyard. Aloth blows them away with multiple Fireballs.
*Evil* Forest Lurkers and Shades Attack
I continue to mark time until an announcement that Forest Lurkers and Shades will attack Caed Nua. Durance begins the battle with Blessing followed by Consecrated Ground. Aloth begins with Llengrath's Displaced Image to account for the fact that the Shades may teleport near and attack him. He then goes on the offensive with multiple Fireballs followed by blasts of his wand. The warriors attack any enemies nearest to them. I eventually wear the opposition down.
*Evil* Bleakhollow Bandits Attack
I continue to mark time and build my upgrades. Another attack comes, this time by Bleakhollow Bandits. Aloth again blows them away with multiple Fireballs.
*Evil* Dyrford Ruins Chest
The evil party rests up until day 17 on the calendar month, and next returned to the Dyrford Ruins. At #15 on the map of the Ruins will be a chest that has an item from the "Dyrford Ruins" section of the Random Drop List.
It is day 18 on the Calendar month by the time I had travelled back to the Ruins, so the chest now has a pair of Bracers of Deflection +9, which I stow away and save for Maneha once she joins the party.
Crypt Master's Key
The good party disarms a trap just west of the blood pool. A table at #22 has the Crypt Master's Key.
I next kill off a couple of Skaenites in the small room at #30. After that, I use the Crypt Master's Key to open the doors at spots marked #24.
Now I return to the crate at #25. Once there, I rest up and grab the Camping Supplies from the crate.
I am warned that Leaden Key agents will soon attack Caed Nua. Construction of the South Curtain Wall has also been completed, so I select the Towers as the next upgrade.
The video concludes with the good party returning west of the blood pool room.
Wymund
I continue west along the hallway in between the points labelled #23 and #31 while in stealth mode. The Orlan Rogue takes care of the traps in the hallway.
I kill a few more Skaenites at the end of the hallway. There will be another door that can be opened with the Crypt Master's Key.
Going through the door leads to an encounter with the leader of the cult of Skaen, Wymund, along with elite members of the Cult. Also present in the room is Aelys. Wymund will eventually reveal that Aelys is actually Lord Harond's niece, and has been impregnated by her own uncle.
There is more than one way to handle this encounter:
*Evil* Wymund
The key difference here is that Zakara falls in with Wymund's plan, and allows Aelys to go free and eventually murder Lord Harond.
I also save Aattuuk for when Zahua joins.
Blood Legacy
I'm at the Trygil Curriery, but promptly leave out the front door.
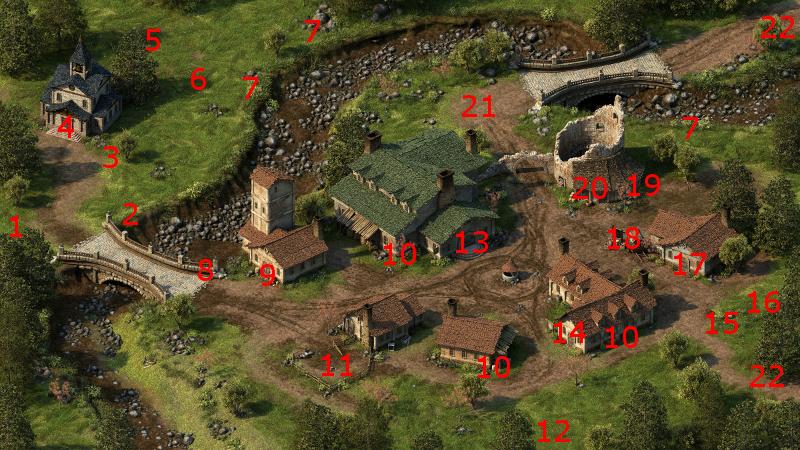
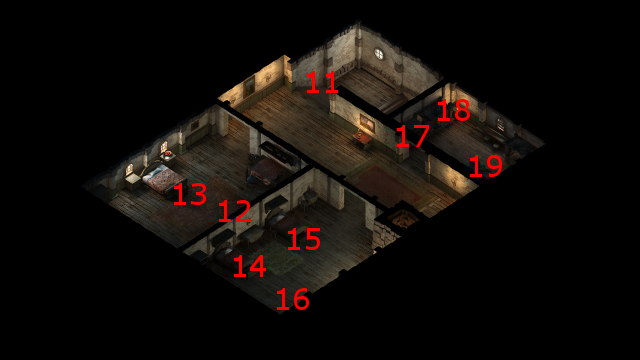
The entrance to the Dracogen Inn is at #13 on the map of Dyrford Village.
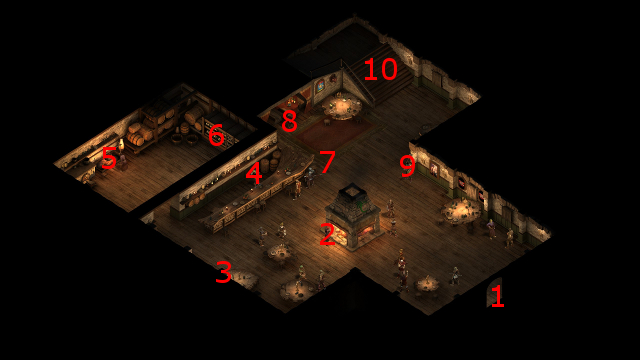
The entrance to the top floor of the Inn is at #10 of the map of the main floor.
I end up at #11 on the map of the second floor. A hidden niche at #19 has the Guildmaster's Staff, which I'll just sell.
Lord Harond will now be at #16 on the map of the second floor. The possibilities depend in large part on what choice you made with respect to Aelys:
Leaden Key Attack
Now I deal with the Leaden Key attack, which is fairly easy despite their Wizards getting off Confusion spells. The theme of Sagani and Ituumak taking out the Wizards is shown again.
Wyrwood Ring
Now it's time for Alliria to check her special chest just east of the throne room. She now has the Wyrwood Ring. I have Hiravias equip it on an interim basis.
The video concludes with the good party selling off its excess loot and then leaving Caed Nua.
*Evil* Things play out differently for the evil party after their encounter with Wymund (see below).
*Evil* Blood Legacy
Zakara first chooses a Deceptive option that keeps Lord Harond in the dark about what Wymund has done to Lady Aelys. After that, she chooses an Aggressive option to extract an even larger reward to conclude the quest.
*Evil* Solmar the Shackler
It is at this point during the evil playthrough that Solmar the Shackler has arrived as a visitor in my stronghold. Zakara feels no compassion for the slaves he's holding, so she simply helps him along by making a Lore check of 4 to give him advice on how to reach his destination without any hassle.
*Evil* Mourning Gloves
Likewise it iss time for Zakara to check the special chest and collect the Mourning Gloves, which she saves for Zahua.
I also happened to get a Primal Wind in the chest. Now I have the last ingredient I need to add the Shocking Lash enchantment to Eder's Measured Restraint rapier.
The next destination is Copperlane in the city of Defiance Bay.