-

- Forums
- Chatrooms
- Gallery
- Gameplay Videos
- Upload
- Articles
- Mod Reviews
- Shop SP: Games, Movies, Books
|
|
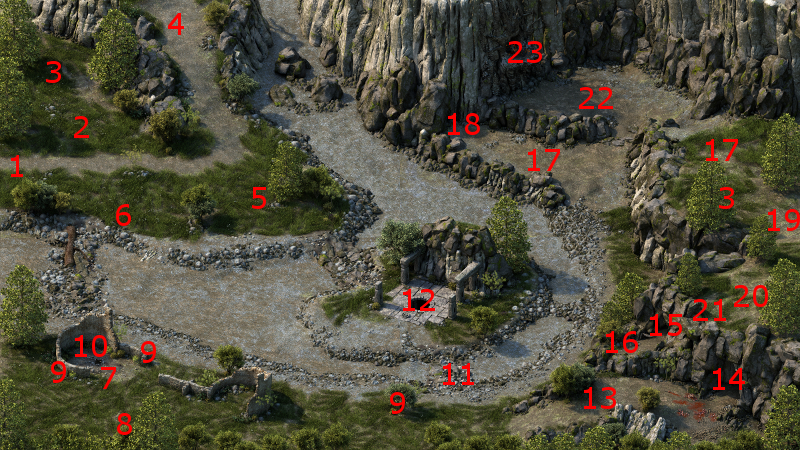
Dyrford Crossing
Wood Beetles
I start off at #1 on the map of the Crossing. There will be Wood Beetles, and the odd Sporeling as well, just on either side of the road. They're easy enough to kill by now.
Wolves
There will be a Wolf pack or two near the tower in the southwest corner of the area, led by the odd Elder Wolf. They're pretty easy to kill by now.
Widowmaker Spiders
There will be a few Widowmakers and Widowmaker Spiderlings at #13. They're not much trouble either.
The entrance to the Grisly Cave is at #14.
Widowmaker Spiders and Ivory Spinners in the Grisly Cave
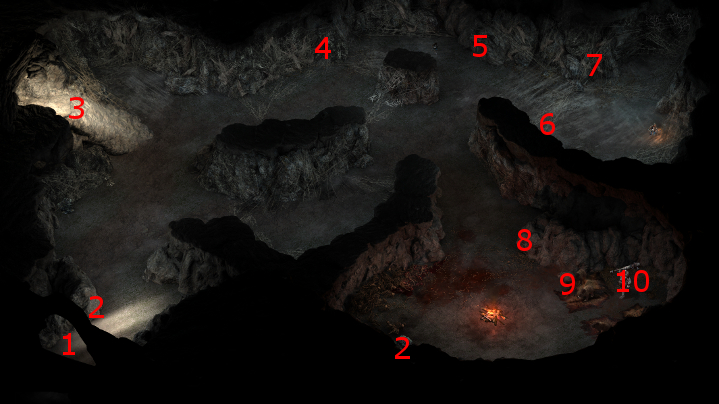
I start off at #1 on the map of the Grisly Cave. There will be Ivory Spiders and Widowmaker Spiders throughout the west and north parts of the cave. A theme that shows up in these battles is that I tend to stick Kana out ahead of the others, Alliria and Hiravias a little behind, and the others further back still. The idea is to let the combat positions settle first, and then have the Orlan Rogue, Grieving Mother, Sagani and Ituumak hit the flanks hard.
Grieving Mother also leads off with Phantom Foes, gets in a hit or two to build up her Focus to 30, and then uses Ectopsychic Echo to inflict damage over a line of foes.
The group near the northwest corner is especially numerous, so I have Hiravias lead off with Returning Storm, and use a well placed Nature's Mark spell.
Spider Queen
A large horde of Spiders led by the Spider Queen will be at #6. I position everyone except Sagani so that they form a solid line, all of them ready to jump into the attack. I keep Sagani behind the line.
Kana gets their attention and then regroups, putting himself just a little ahead of the rest of the party.
Hiravias leads off with a Returning Storm, and then casts Nature's Mark.
Grieving Mother leads off with Phantom Foes. Once she gets back to 30 Focus, I have Kana summon a Phantom behind as many foes as I can. Grieving Mother connects an Ectopsychic Echo to the Phantom.
Soon only the Queen is left. Alliria tags her with Sworn Enemy, and lays into her with Flames of Devotion. The rest of the party gangs up on her, and she soon falls.
Korgrak
At #9 will be the Ogre named Korgrak, who is the subject of the quest called A Farmer's Plight. He is accompanied by two Elder Bears.
It is definitely easier to goad him into a fight than not. Aggressive and Passionate replies at the outset will accomplish that, as will making a Perception check of 16, a Survival check of 9, or an Intellect check of 18. You can, however, branch the conversation into asking him why he doesn't leave the cave, and that opens up alternative ways to resolve the quest. Be advised that choosing Aggressive, Deceptive, Diplomatic or Passionate responses thereafter will provoke him into attacking you, and the resolution of the quest will be the same as if you killed him. It is the Rational response that opens up three different possibilities:
*Evil* Korgrak
Zakara instead convinces Korgrak to kill Rumbald, so as to earn Cruel disposition.
*Evil* A Farmer's Plight
The evil party leaves the cave. Aloth detects a hidden skeleton just outside the south entrance to the Grisly Cave, which has a Ring of Deflection. Eder equips it, as it is perfectly consistent with his tank role.
Zakara returns to find Rumbald's widow where Rumbald once stood. The widow informs Zakara that the Ogre came by and carried Rumbald off. She also gives Zakara the Piglet as a possible pet, but I'm not interested.
The completion of this quest leads to a random Companion Adventure becoming available. I keep reloading and redoing the dialogue with the widow until I get the one that I want, the The Mourning Circle adventure. The idea is to score the Mourning Gloves, which I will save for Zahua. In the meantime, I assign the adventure itself to Hiravias.
A Farmer's Plight
Hiravias gets the Ring of Deflection from the hidden skeleton. Hiravias equips it, as it is perfectly consistent with his secondary-tank role.
Alliria returns to Dyrford Village, and sells off any excess loot at Winfrith's Arms and Armory. She also gives Korgrak's Head to Rumbald to conclude the quest.
One my rewards is a Blunderbuss called Lead Spitter, but I have no use for it.
He also offers me 600cp. I could accept it along with a minor boost to positive reputation with Dyrford Village. However, I turn it down to gain both Benevolent disposition and a major boost to positive reputation with Dyrford Village.
The completion of this quest leads to a minor random Companion Adventure. None of the reward items from the minor adventures will figure into my long-term plans, so I treat any item I receive as an interim item. I keep reloading I get an adventure that will provide a useful interim item. In this instance, it turns out to be the adventure called A Forgotten Hollow. It will provide the Wyrwood Ring as a reward. I assign Aloth to the adventure. I'll decide who wears the ring once I get it.
The video concludes with the good party returning to Caed Nua.
*Evil* Durance on the Saint's War
Now I head back to the Dracogen Inn and rest up. Zakara speaks at length again with Durance, with subject matters including a little more about Ashfall Cathedral, the War of Black Trees, and the Saint's War.
*Evil* Durance on the Godhammer
I rest again. Zakara now asks Durance questions about the Godhammer. I have pretty much exhausted all of my dialogue options with Durance by now.
*Evil* Skull Key
The evil party rests up with the intention of reaching day 1 on the monthly calendar. I choose the Dragon's Lair resting option on the last rest up. The intention is to enjoy a +2 Constitution resting bonus so that I can complete the Nest Egg task without expending any items.
I return to where Korgrak and his two Elder Bears are in the Grisly Cave. A hidden cache near the Bears will have an item from "Ogre Cave Hidden, near the Ogre" section of the Random Drop List. On day 1 of the calendar month it now has the Girdle of Eoten Constitution, which becomes Eder's belt for the rest of the game. More Health and Endurance always benefits a dedicated tank.
I leave the cave through the northwest entrance at #3. A corpse on the other side has the Skull Key, which may come in handy.
The video concludes with me going back in the cave, and coming back out through the entrance in the southwest corner at #1.
Skull Key
One difference for the good party is that it heads back to Caed Nua to rest up, with a view towards obtaining the Woodland Trails resting bonus that provides +3 Constitution.
It will be about 10 days before I get to the 1st day of the month, so I rest up several times and build up stronghold upgrades at the same time. I first select the Botanical Gardens, which will give me +1 Prestige and random plants in my rewards chest. Next is the Curio Shop which will provide +1 Prestige and random creature parts in my rewards chest. Next is the Craft Hall, which provides +1 to both Prestige and Security, as well as the Dexterity bonus resting option. After that comes the Western Barbican construction, which provides +4 Security.
It is about Day 20 at some point, so I travel back to the Crossing. Upon arrival, I am informed of a pending Skeleton attack on Caed Nua which I will deal with, as well the completion of the Western Barbican. I next order construction of the Southern Barbican.
Now I go back into the Grisly Cave. It is Alliria who gets the Girdle of Eoten Constitution. It will be an interim item for her, but there is still the same intention to complete the Nest Egg task without expending any items.
The video concludes with the good party obtaining the Skull Key and then leaving the cave through the entrance in the southwest corner at #1.
Wurms in Dyrford Crossing
Groups of Wurms will be at spots marked #17, but they are by now quite easy to kill.
*Evil* Boots of the Long March
There will be a group of Forest Lurkers, Menpwgras and Pwgras at around #20. There will also be a bottle neck north of them. Initial preparations include Aloth setting up a Hail of Darts trap, and Durance setting up a Seal of Warding, so that both will hit the enemies while they're oncoming. Once I'm set, Eder goes south a little and regroups to lead the enemies onwards.
Zakara, Eder, Kana and Sagani's pet fox hold the front line. Sagani fires away with her bow. Durance begins his sequence of Blessing, Watchful Presence, Consecrated Ground and then Interdiction. Aloth begins his sequence of Eldritch Aim, Chill Fog in front of the tanks, Kalakoth's Minor Blights, followed by Merciless Gaze. He then blasts away. The battle is won, although I do have to keep a careful eye on my health since the Menpwgras and Pwgras can cast Druid spells.
A corpse at #21 has the Boots of the Long March, which I'll hold onto for Maneha once she joins. Extra Endurance is always helpful for a tank, and the bonus to Athletics can come in handy during scripted interactions.
Boots of the Long March
I have to conduct the battle differently as the good party. I form a reverse phalanx north of the bottle neck, with Kana being ahead of the others. I have the Orlan Rogue place a Poison Dart trap at the bottle neck, get their attention, and lead them back to the party.
Kana uses a Scroll of Insect Swarm as they're oncoming, with the hope of catching some of the Pwgras and Manpwgras with it.
Hiravias casts Returning Storm as they're oncoming, and then Nature's Mark to catch as many of them as he can.
Alliria, the Orlan Rogue, Sagani and Ituumak hit at the Pwgras and Menpwgras whenever they can, since they'll go down easier than the Lurkers and with a view towards taking their spellcasting out of the picture. Alliria also holds her Flames of Devotion in reserve, with the ideal time for using them being both when a target is low on Endurance and may be killed outright AND when the party has taken some damage.
Kana holds his position, and summons a Phantom as soon as he can behind as many enemies as he can. Grieving Mother then connects an Ectopsychic Echo to the Phantom and runs it over the enemies multiple times. I repeat this process whenever I can. I eventually win a tough battle.
Kana gets the Boots of the Long March as an interim item.
The Orlan Rogue now advances to his 6th level of experience. I select the Deflecting Assault talent for him, which minimizes the Deflection penalty for using the Reckless Assault mode. Of course, Mechanics is the priority for skill pumping.
Iron Brand Mercenaries
The Iron Brand mercenaries, led by Sevis, are at #22. There's more than one way to approach the initial encounter:
Nest Egg
The Dragon Egg itself is at #23. In what condition you can retrieve it depends on your particular approach to getting to the precipice and trying to bring the egg down from it during a scripted interaction. The following possibilities lead to a Broken Dragon Egg:
Skeletons Attack
I now deal with an attack by Skeletons, which takes place inside the Great Hall. I win easily enough. Note how Sagani and Ituumak team up to take out their Wizard quickly.
The video concludes with the party leaving Caed Nua and returning to Dyrford Crossing.
To the Dyrford Ruins
I make my way towards the ford at #11. There will be several Xaurips and a couple of Stone Beetles on the other side that I dispatch rather easily.
The portcullis at #12 is locked. There's four ways to open the entrance: