-

- Forums
- Chatrooms
- Gallery
- Gameplay Videos
- Upload
- Articles
- Mod Reviews
- Shop SP: Games, Movies, Books
|
|
| Pillars of Eternity 2 Video-Based Walkthrough by David Milward |
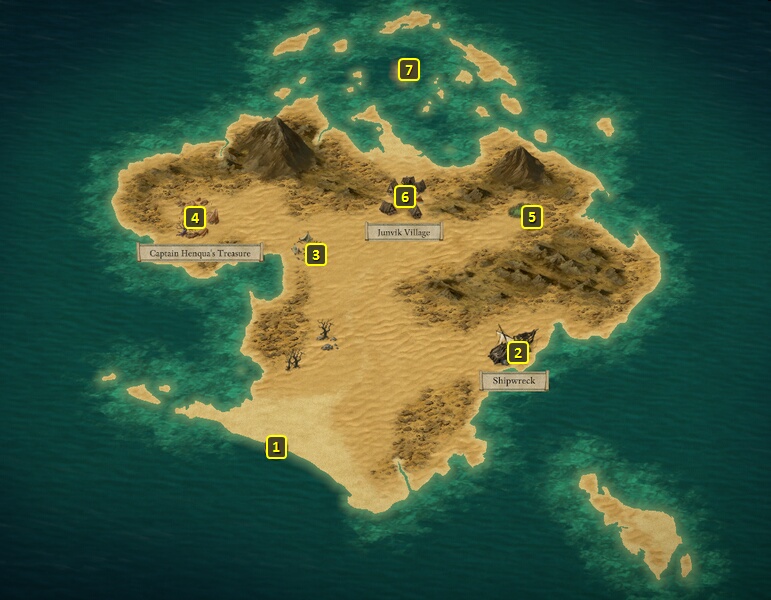
Drowned Barrows
Note on the Forge
I am now north of #6 on the map of the North Island. I go north to #7, which is the entrance to the Drowned Barrows.
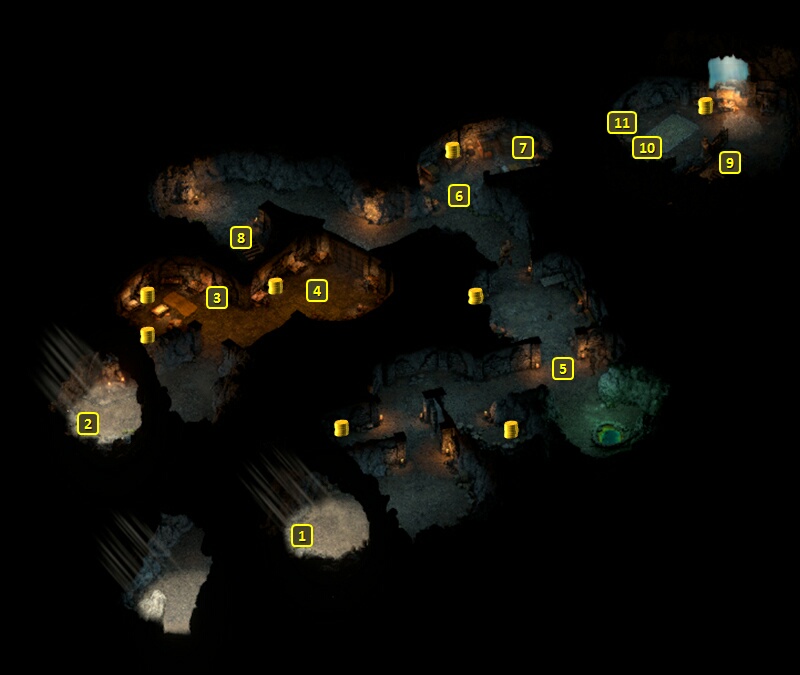
Going through the mouth would bring me to the Base Floor. Going through the left eye would bring me to a different part of the Crown. I prefer to go through the right eye.
I am now at #1 on the map of the Crown. Pallegina takes Quick Summoning on her 20th level-up. It helps her summons her Ogres a little quicker when I need it.
I send Mirke on ahead in Stealth mode to disarm some tripwire traps without getting noticed by any enemies. She also finds an Adra Ban in one of the barrels. She regroups with the party when she's done.
It is evening, so it's high time to switch to a crowd-control strategy. Alliria switches to Ninagauth's Teachings and Aloth switches to Jernaugh's Careful Calamities.
I go near where Mirke had disarmed her traps, and wait just a little west of #5 until an enemy sights me. A massive horde of Barrows Guards, Eotens and Scriveners now attack.
The hallway is narrow enough that I can use it as a bottle-neck. Aloth starts with Infuse with Vital Essence, and then sets up crowd-control with Grease and Pull of Eora. He can now add offensive spells like Malignant Cloud and Ninagauth's Freezing Pillar into the mix. These spells tick damage on multiple enemies over a period of time, and therefore present multiple chances of inflicting the Freeze from his Frostfall Mace. Should those spells end up landing the killing Damage, it will trigger an increase of hostile effects on nearby enemies by 20% and again through Frostfall.
Alliria starts with Infuse with Vital Essence, and then spams Ninagauth's Shadowflame non-stop. Mirke likewise spans Stunning Surges with her primary gun set.
I continue north and defeat a couple more Barrow Guards and a Scrivener.
A bookcase at #7 has A Note on the Forge.
Acolyte Kinnuq
I go to the room at #4, where Acolyte Kinnuq speaks to me in hostile fashion. Alliria asks about Kaali and then makes a Diplomacy check of 16 to avoid a fight. A Bluff check of 20, or asking about Kaali and then making an Intimidate check of 13 would have worked too.
A shelf at #3 has Kinnuq's Memo, which alludes to Nemnok's favorite cloak.
Nothing else in the room is worth stealing, so I go down the stairs at #8.
*Evil* Acolyte Kinnuq
Zarathos prefers to just straight up slaughter Kinnuq and his minions.
Ydwin has enough xp to advance to her 20th level after the party descends to the Base Floor of the Barrows. She takes Prestige, which means all her Cipher powers will be augmented by a +1 bonus to Power Levels.
Eotens and Scriveners
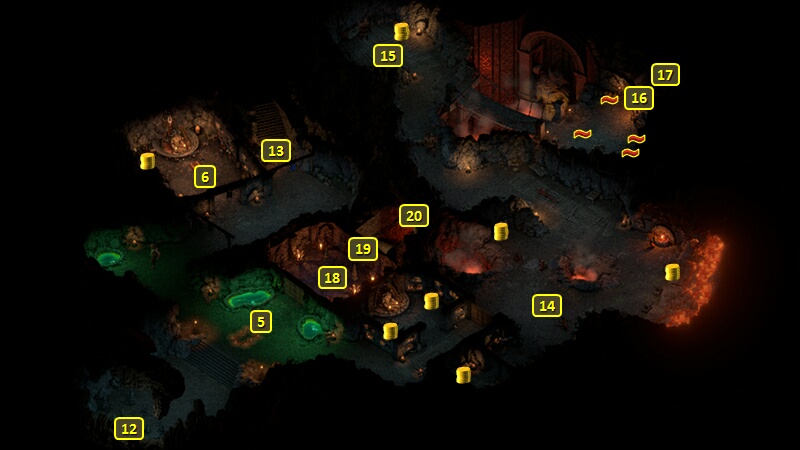
I am now at #13 on the map of the Base Floor of the Drowned Barrows. The entrance is the perfect spot to set up crowd-control. I back Mirke against the stairs, and the rest of the party forms a shield wall in front of her. Eder goes on ahead to get their attention. All of the hordes, including ones at the nearby rooms marked #5 and #6 advance upon me. So the crowd-control plus bombardment strategy works here as well.
I make my way to the eastern side of the Base Floor.
*Evil* The evil party relies on the Salvation of Time-Ancestor's Memory loop. But I frequently have them go into Stealth and sneak up on Acolytes who I figure are Wizards, and kill them quickly to prevent them from using Arcane Dampener.
Forgemaster Tythus
A large number of Flame Nagas and Magma Oozes led by Forgemaster Tythus will be at #14. I keep myself further back down the hallway, send Eder ahead to get their attention and regroup, and then use crowd-control plus bombardment.
Deathwarden Latuc
I go northwest to #15, where I fight several Eotens and Fire Bats, plus a Scrivener Acolyte, and all led by an Eoten named Deathwarden Latuc. Crowd-control plus bombardment works here too.
Latuc leaves behind a Sigil of Death Wardstone, which can help for reaching the last part of the Barrows.
*Evil* Nemnok's Cloak
I show this part from the perspective of the evil party. I go across the bridge and towards the northeast corner of the level. Ydwin disarms numerous traps. She then destroys a couple of lamp barrels to reveal a hidden button that opens the door at #17. The stairs on the other side lead to #9 on the map of the Crown.
The crate at #10 has Nemnok's Cloak in it. This is the kind of item that a party that rests regularly could use. It triggers defensive benefits the more Health the wearer loses, but only once per Rest. But it is of limited use to a party on a No Rest run. *Good* The good party found another Adra Ban in one of the containers near the door.
The crate at #11 has another Blackwood Log in it. I'm that much closer to the Blackwood Hull that I need for my ship. I go back down the stairs at #9.
I go to the room at #18 on the map of the Base Floor. I disarm numerous traps there and destroy the Sigils of Deaths.
The door at #19 is opened by a switch to its left. I go down the stairs at #20.
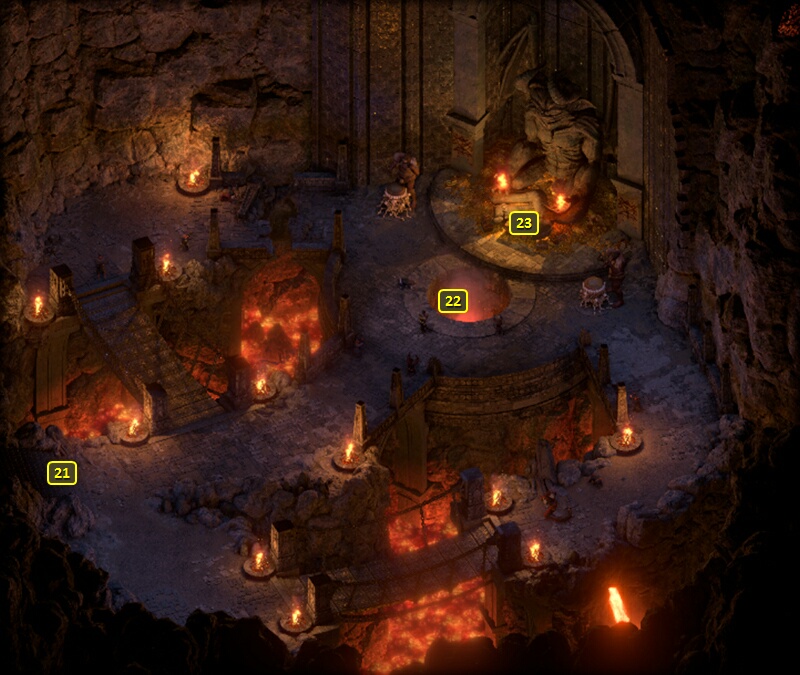
Nemnok the Devourer
I am now at #21 on the map of the Sanctum. I now have two Adra Ban, so I use them to raise Modwyr from Superb to Legendary.
The Sanctum itself is filled with Barrow Guards, Scriveners and Eotens throughout.
Nemnok's pit is at #22, with Kaali as one of the supplicants in worship beside it. Kaali will at some point notice the party, but the dialogue inevitably leads to Nemnok appearing out of the Pit.
It is quite easy for the encounter to end with hostilities. Keep in mind that should Kaali die without being freed from Nemnok, you can still complete the Quest but without all of its possible rewards.
One way to secure Kaali's freedom is to question Nemnok directly about being an Imp, following that up with a Diplomacy check of 16, and then agreeing to Nemnok's request to acquire Grimoires from especially powerful Wizards for him. Agreeing to "surrender" to Nemnok lowers the Diplomacy check to 8. Either way triggers The Lost Grimoires Task. Nemnok then releases Kaali, who promptly departs. Nemnok also gives you Nemnok's Decree, which vaguely describes the locations where the Grimoires can be found.
Completing that Quest makes it possible to acquire the items from the chests at #23 through willing exchanges. Those items are:
*Evil* Nemnok the Devourer
Zarathos consumes an Oil of Allure once he's descended to the Sanctum. He goes on ahead and makes an Intimidate check of 18 (which he needed that Oil of Allure for) in order to convince Kaali to leave Nemnok willingly. I wait until Kaali has left the Sanctum altogether before closing the dialogue. If I close the dialogue while Kaali is still in the Sanctum, he'll go hostile and I'll be forced to kill him. I thereafter start the fight with Nemnok.
Nemnok himself has a LOT of Health, aside from having a lot of minions in the sanctum to help him out. Keep in mind that he also likes having Arcane Reflection on himself, so trying for example Disintegration on him can backfire badly. The herd around him is decidedly easier to thin out, so wipe them out and save him for last when he's by himself.
The Salvation of Time-Ancestor's Memory loop works here as well, with the slight adjustment that Tekehu adds Within Ngati's Embrace, Nothing Could Touch Her to the buffs that get extended. The reason being that Nemnok can cast powerful damaging spells, including Meteor Swarm. I don't spare Nemnok to keep him as a Pet. I kill him then and there.
Tekehu takes Many Lives Pass By, Each Leaving Footprints with his 20th level-up. I make this part of a separate Chanter Phrase Modal, apart from my usual Phrase-buffs. The Phrase-buffs like Aefyllath Ues Mith Fyr and Blessed Was Wengridh and so on will end up getting extended endlessly by the Salvation of Time-Ancestor's Memory loop. There will be no benefit to recycling the Phrase-buffs modal at that point during long fights. And at that point I can switch over to a different Phrase Modal that uses Many Lives Pass By exclusively, which sends a new Skeleton into battle with each utterance of a Phrase.
I collect the Chromoprismatic Quarterstaff, the Mundane Shell and the Veilpiercer from the chests at #23, and then leave through the stairs at #21.
I then leave the Drowned Barrows altogether through the entrance at #12.
*Evil* Hearth Defender's Scale
I go south and return to Junvik Village.
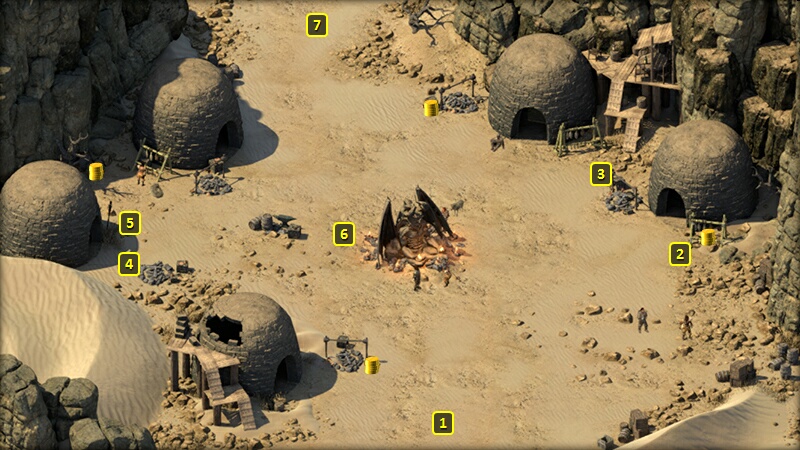
I arrive at #7 on the map of Junvik Village. I speak to Tatok, who's just a little to the southwest. He gives me 5,000+ xp, 500cp and the Hearth Defender's Scale as rewards for completing the Nemnok the Devourer Quest.
Now I return to my ship. I temporarily bring in Serafen. I got a Sapphire as a random item while I was slaughtering everything inside the Drowned Barrows. So now I use it to add Magnera's Commitment (+10 Fortitude, +10 Will) to Magnera's Chain. I switch Ydwin back in after that.
The Razai Passage is my next destination.