-

- Forums
- Chatrooms
- Gallery
- Gameplay Videos
- Upload
- Articles
- Mod Reviews
- Shop SP: Games, Movies, Books
|
|
| Pillars of Eternity 2 Video-Based Walkthrough by David Milward |
Hasongo
To Hasongo
I board a Vailian Expert Captain almost immediately upon leaving Neketaka. I then board a Huana Master Captain and a Huana Expert Captain while sailing westward.
I sail northwest and engage a Royal Deadfire Company Master Captain in Naval Company. I have little trouble in sinking it. But Vanizzi got Injured during return fire. But it's of little consequence as Emeini takes his place without skipping a beat. Fights like these serve as reminders of the value of having spare crew.
I sail to Huana at #48 on the World Map. I replace Aloth with Fassina for the time being.
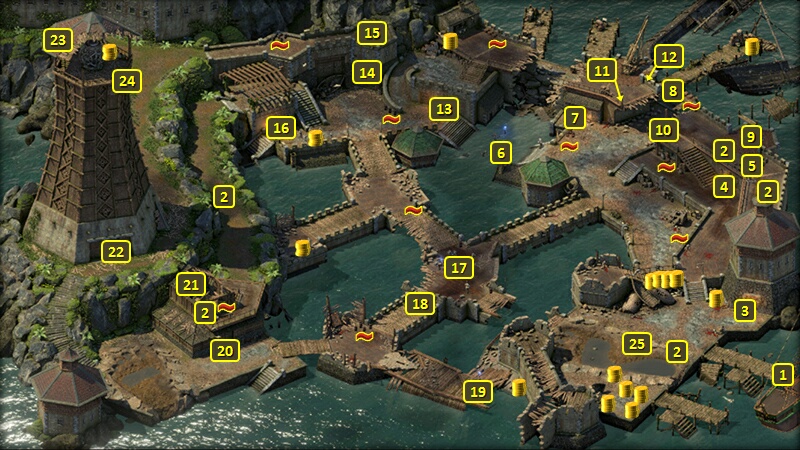
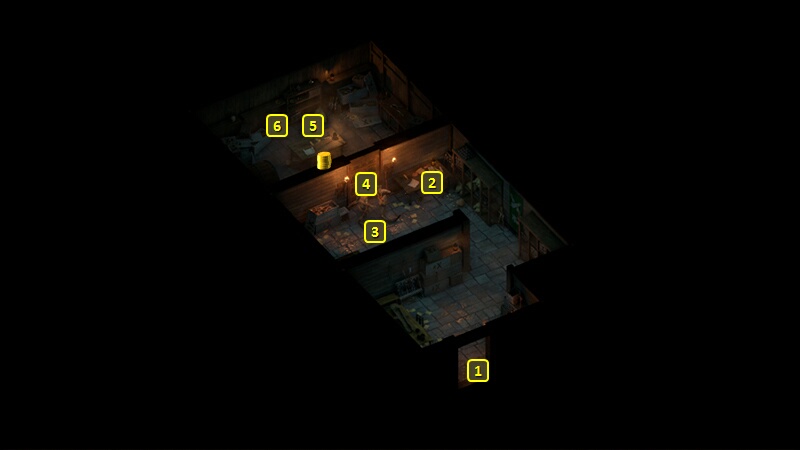
Storage Tower
I arrive at #1 on the map of Hasongo. Eder takes two abilities on his 19th level-up.
One of them is Take the Hit. It briefly gives multiple party members the status of Take the Hit, which means that any attack on them only scores half Damage, and the other half is absorbed by Eder as Raw Damage. It's not a big deal for most party members, as it won't last long. But Alliria and Aloth can prolong it exponentially with Wall of Draining. And in Alliria's case the Health losses from using Blood Sacrifice now get passed off onto Eder. But Eder in the meantime has the Raw Damage he takes reduced by some of his Damage Reduction bonuses, including his use of Guardian Stance, his Cadhu Scalth, and his Forgetful Night food bonus. And the Raw Damage now gets reduced even further when Alliria now hands over the Voidward Ring to Eder. And very often the Damage will be so minimal that Pallegina's healing auras will usually suffice. Eder's single-class Fighter build is a worthwhile tank build in its own right, able to absorb enemy onslaughts through both high Defenses and stacked Damage Reductions. But it is also optimized to take a lot of the edge off of Alliria's use of Blood Sacrifice.
The other is Sundering Blow. It makes a Primary Attack against a single-target with +3 Penetration. It will temporarily reduced the target's Armor Rating by -4 if it connects. It's a possible option that costs 2 Discipline, especially against boss monsters.
I go west and easily kill a few Coral Nagas.
I next go through the door at #3. I speak with a couple of Rauataian soldiers, one of them named Zuhira. She provides an account of what led to Hasongo being in its current state, including the present occupation by the Coral Nages. I could have asked her about using ammunition and gotten the Storeroom Key, but I don't really need it.
I also stand up for the Dawnstars against the soldiers, which wins reputation with Eder. He and Alliria have a conversation with each other now that her reputation with him has reached 2 points. She broaches the subject of a relationship with him, but he's not ready for anything like that. I leave back out the door.
Artillerist's Manual
I go north. There will be a door at #4, and some Coral Naga Archers gathered at the rampart above at #5.
I have my characters go into Stealth mode and sneak past them one by one so as to climb up the stairs to the ramparts. The point is that I can start hitting them right away with my offensive spells instead of climbing up the stairs while they're firing away.
Fassina takes Spell Resistance on her 18th level-up. It provides a 10% chance of avoid the effects of any spell.
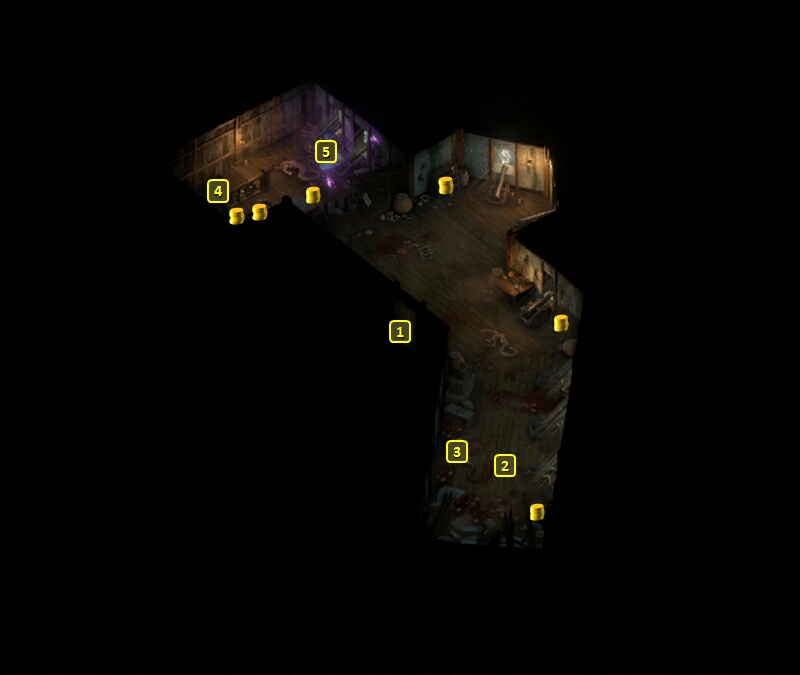
I come back down the stairs and through the door at #4.
I arrive at #1 on the map of the Cannon Rampart. There's a few Coral Nagas at #2. But there's also piles of gunpowder lying on the floor, so a Fireball from Alliria pretty much blows them away then and there.
I leave after taking the Artillerist's Manual from a dead body at #3.
Cooking Fat
I am back at the door at #4. I go to #8 and fight some Looters, who aren't very difficult.
I go into Stealth mode and sneak towards the Coral Nagas at #6. Alliria uses her Zandethus sequence. Eder times his activation of Take the Hit just as she's about to complete her casting of a well-placed Wall of Draining.
Fassina starts by buffing the party with Nature's Balm and a shrunken Moonwell. She then lets loose with offensive spells like Plague of Insects, Relentless Storm, Deathring and Ghost Blades. Mirke spams Stunning Surge once the Nagas bunch up around the party. It becomes a slaughter.
I go through the door at #7.
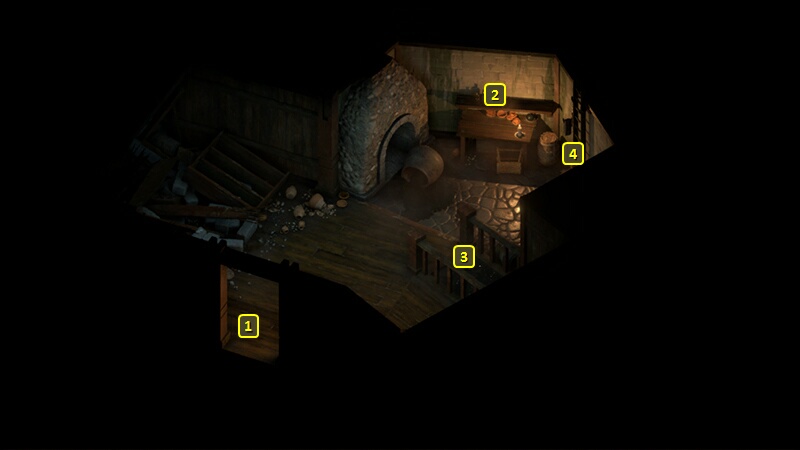
That brings me to the door at #1 on the map of the Kitchen. I grab the Cooking Fat from the counter at #2.
Yanass
Clicking on the flooded hallway at #3 begins a scripted interaction. You can make a Survival check of 4 to get a sense of direction.
The passage to the right will lead to the Dining Hall at #2, although party members with lower Athletics scores may end up with the Fatigued (-5 Accuracy, -10 all Defenses, -15% Maximum Health) Injury. Fassina would get Fatigued, so I don't bother.
I take the passage to the left, which leads to a door. I open the door with a Prybar. A Might check of 14 would have worked as well.
That brings me to #4 on the map of the Cannon Rampart. Alliria speaks with the spirit of a Naga named Yanass at #5, and has the Naga soul join her trail of souls. *Evil* Zarathos leaves her behind.
I swim back to the Kitchen through the tunnel, and then leave the Kitchen itself the way I came in.
Explosive Shell
I am now at the door at #7. I go west and cross the flooded part of Hasongo, and then enter the door at #13. It leads to the Dining Hall, where I loot some random items and then leave.
I continue west and go through the door at #16.
That brings me to the door at #1 on the map of the Engineering Workshop. I kill a couple of Naga at #3.
A table at #3 has a Hasongo Work Order, which indicates massive orders for gunpowder and thus drops hints about the Royal Deadfire Company's intentions for the deadfire.
I could have used the Storeroom Key to open the door at #4 if I had gotten it. But Mirke only needs to make a Mechanics check of 10 to pick the lock.
I speak to Aimuro at #5 about what happened. The chest at #6 has the Explosive Shell. I leave back out the door at #1 after grabbing it.
Bombard
That brings me back to the door at #16. I east and to the Bombard at #8. Clicking on it begins a scripted interaction, and using it has certain requirements.
One requirement is to load it with the Explosive Shell from the Engineering Workshop.
Another requirement is to rotate it so that it's facing in the general direction of the Coral Naga at #17. A character making a Might check of 18 will work. I use the Cooking Fat from the Kitchen to loosen the gears.
Now I need to aim it at the Nagas. A character can make an unassisted Mechanics check of 18, or Maia if she had been in the party could do it. I use the Artillerist's Manual that I found in the Cannon Rampart.
Now I fire it to wipe out the Nagas at #17, and at the same time blow away the pile of rubble at #18 that was acting as an obstacle.
I then go to #17 itself to loot the dead bodies. I continue south and wipe out another band of Coral Nagas at #19 in combat.
Fleet Master's Office
I could now directly approach the door at #20, but it's actually easier to take the long away around. I make my way to the Engineering Workshop at #16, but now I go up the stairs a little to its right. I follow the trail and kill a lone Coral Naga along the way.
I continue south along the trail until I reach its end. I kill off another group of Coral Naga Archers. They would have been firing at me from the top had I directly approached the door at #20. But now I can go down the trap door at #21 after having wiped them out.
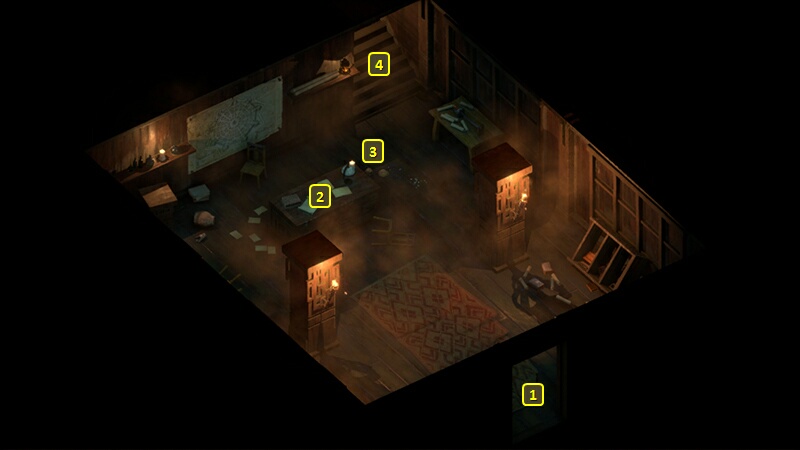
That brings me to the stairs at #4 on the map of the Fleet Master's Office.
A table at #2 has the Letter from Laetharn. A Pet dog named Kaz will be at #3.
I go out the door at #1.
That brings me to the door at #20 in Hasongo. I follow the trail going west until I reach the door at #22, which is the entrance to the Lighthouse.