-

- Forums
- Chatrooms
- Gallery
- Gameplay Videos
- Upload
- Articles
- Mod Reviews
- Shop SP: Games, Movies, Books
|
|
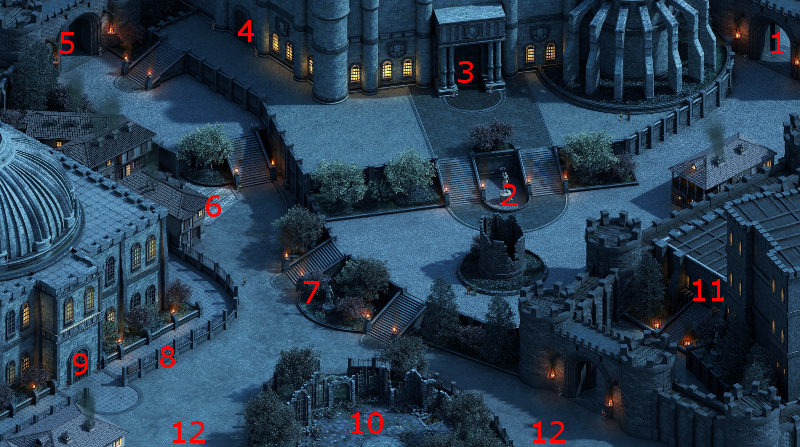
Copperlane Catacombs
Ghost of Lord Adwellen Rugfald
I travel to First Fires. The Ghost of Lord Adwellen Rugfald will be #10 on the southside. He is apparently convinced that he is still physically alive, and that the Temple of Woedica is still flourishing.
The conversation drops the hint that what's left of the Temple is underground, and progresses the Never Far From The Queen quest.
The video concludes with the party returning to Copperlane.
Dalton
I speak to Dalton at #15, who is troubled by the voice of his past love, Rowyna. This conversation triggers the quest called A Voice From the Past.
The entrance to the Catacombs is at #13.
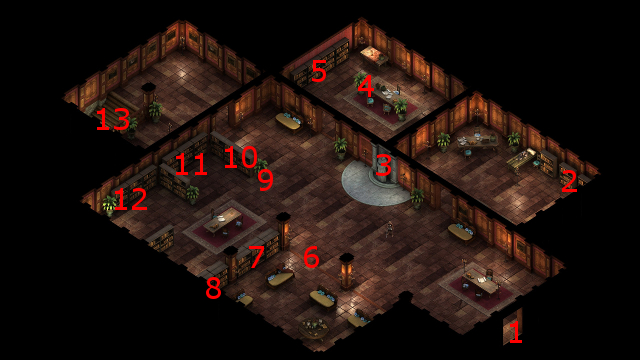
Dead Initiate
I start off at #1 on the map of the Catacombs. At #2 is the body of a Dead Initiate. Alliria uses her Watcher abilities to communicate with his soul, and learns that it may be possible to wear hoods and infiltrate the nearby Temple of Woedica.
Black Oozes in the Catacombs
I easily kill off a few Black Oozes led by a Greater Black Ooze at #3. I likewise go the length of the tunnelway leading westwards, killing off the odd Black Ooze or two that I find.
I next loot the trapped sarcophagus and the niches near #13.
The trapped sarcophagus at #27 has an item from the "Copperlane - Catacombs" section of the random drop list. At this point, though, it doesn't matter to me which one I get.
Trolls and Spores in the Catacombs
There will be several Trolls and Sporelings protecting a few Dank Spores in the area around #4. The Dank Spores can be dangerous if they inflict Confused or Dominated effects on party members while they're surrounded by other monsters. They are, however, immobile. So it's always best to lead the rest of the monsters away from the Dank Spores, finish those other monsters off first, and then kill off the now much less dangerous Dank Spores.
A hidden niche at #5 will have random gems and coins and such.
A dead body at #6 has a Woedica Hood, which may be useful for infiltrating the nearby Temple of Woedica, although I will ultimately prefer to straight up slaughter the residents of the Temple.
Skeletons in the Catacombs
I kill off several Skeletons gathered in the room at #7. They are by now very easy to kill.
I travel westwards until I reach the alcove at #14, where I slaughter several more Skeletons.
Helig of Thein
There will be two tunnels leading north of the alcove, and both are filled with traps. I have the Orlan Rogue clean them out first.
Helig of Thein will be at #17. I could attack him now, but for now I agree to his request to take out somebody named Moedred for him. He gives me Moedred's Trunk Key to that end.
The video concludes with the party leaving the Catacombs and returning to Copperlane above.
Grieving Mother's Chimes
The good party leaves Copperlane and heads for Brackenbury.
They start off at #1 on the map of Brackenbury. The entrance to the Charred Barrel is at #2, and I go inside with the intention of selling off excess loot and resting up.
Resting up prompts another vision of Grieving Mother acting as a midwife, but this time concealing her adra wrist charms from the mother she's helping. What follows is an extended conversation whereby Grieving Mother is herself seeking a solution to the Hollowborn crisis, but is otherwise less than forthcoming with Alliria. This conversation progresses the Dream and Memory quest.
Moedred
The entrance to the Sanitarium is at #16 on the map of Brackenbury.
The party will now be at #1 on the map of the first floor of the Sanitarium. The stairs to the basement are at #14.
The party will next be at #13 on the map of the Sanitarium basement. Moedred will be at #18. There's multiple ways to handle this encounter.
You can get Moedred to explain why he murdered Helig with either a Clever dialogue option, and a Clever option combined with a Might check of 13, followed by Aggressive or Clever dialogue options. His reason is that Helig was apparently evil incarnate, so he felt completely justified. Pursuing this dialogue branches out into other possibilities.
An Honest reply that follows an explanation on his part will surrender Moedred's Trunk Key to him. Doing so may commit you to killing Helig if you go back to him without opening the trunk, although you can always change your mind and kill Moedred to loot the Key back from his body.
Moedred at some point will ask you to kill Helig instead of him. A Rational reply will decline the offer, while a Stoic reply will fall in with the request. Alliria chose the Stoic reply.
The video concludes with the party leaving the Sanitarium. There's an alternative route for the evil party described just below.
*Evil* Moedred
Zakara stops off at the Charred Barrel and selects the Criminal's Getaway resting option (+2 Perception and +1 Stealth). She also purchases a Stew from the innkeep. It is afterwards that she makes her way to Moedred in the Sanitarium.
Once there, she immediately clicks on the trunk. A Perception check of 18 reveals that the trunk has claw marks on it. She opens the trunk, which releases a Wicht that immediately kills Moedred. She and her companions immediately finish off the Wicht itself. *Note* Killing Moedred first and then opening the trunk would have resulted in the Wicht attacking the evil party straightaway.
A minor companion adventure now becomes available. I insist (reloading to before opening the trunk if I have to) on it becoming The Ivory Horn adventure. The reason being that the reward will be an item that can summon a Rain Blight once per item, which I figure will have more lasting value than other items that ultimately will not be part of my long-term plans.
Soulward Amulet
I travel back to Helig in the Catacombs. Alliria chooses a dialogue option that picks a fight with him. He and his undead minions at this point are very easy to defeat.
He leaves behind the Soulward Amulet, among a few other items. Picking it up causes an average companion adventure to become available. I insist (through reloading if I need to) on it being The Mourning Circle adventure. The reason is to obtain the Mourning Gloves for Alliria. I assign Eder to the adventure.
The video concludes with the party leaving the Catacombs.
*Evil* Soulward Amulet
Zakara obtains the Soulward Amulet from Helig willingly, since Helig cannot help but feel tremendous glee at Moedred's demise.
A Voice from the Past
Now I bring the Soulward Amulet to Dalton. There are multiple ways at this point to resolve the quest called A Voice From the Past:
*Evil* A Voice from the Past
Zakara at the outset informs Dalton that she's going to keep the Soulward Amulet so as to earn Cruel disposition. She also takes a hit on her reputation with Defiance Bay along the way.
The next destination is the Temple of Woedica.