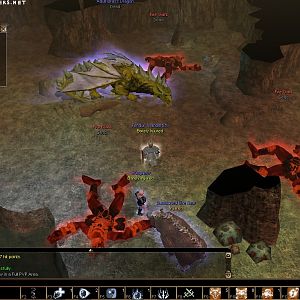
Baldur's Gate 2 Online Walkthrough by Montresor


CREATING A CHARACTER  |  GENERAL TIPS AND TRICKS  |  NPCs  |  ITEM LISTS  |   SHOPS   
Shadows of Amn: Chapter 1  |  Chapter 2  |  Chapter 3  |  Chapter 4  |  Chapter 5  |  Chapter 6  |  Chapter 7  
Throne of Bhaal  |  Watcher's Keep  
About the Walkthrough  |  Organization of the Walkthrough  |  About the Maps  |  About the Author  |  Where to Begin
Disable all ads!

Overview of Chapter 2  |  Quests in Chapter 2 
Areas in Chapter 2: Athkatla
Waukeen's Promenade  |  The Bridge District  |  The City Gate District  |  The Docks District  |  The Government District  |  The Graveyard District  |  The Slums  |  The Planar Sphere  |  The Temple District  |  The Temple District Sewers  
Areas Outside Athkatla
De'Arnise Keep  |  Trademeet  |  The Druid Grove  |  The Umar Hills  |  The Temple Ruins  |  The Windspear Hills

The Bridge District
Five Flagons Inn  |  Delosar's Inn  |  The Tanner Shop  |  The Horn House  |  Saerk Farrahd's Estate  |  The Elemental Lich's House  |  The Twisted Rune  |  The Planar Prison  

SAERK FARRAHD'S ESTATE

There are the rich, and then there are the filthy rich. The latter are those who got rich in a filthy way. They enjoy showing off their wealth by living in a mansion the size of a small city district with enough guards to form a private army guarding themselves and their belongings.

But not enough to guard them from a tenacious adventurer with a grudge.

And if you're coming here, it is because somebody holds a grudge. You will be coming here in connection with the Anomen is Called Home quest – either to seek revenge for Anomen's dead sister, whom you suspect was murdered at the order of Saerk Farrahd, or to stop Anomen from murdering Saerk.
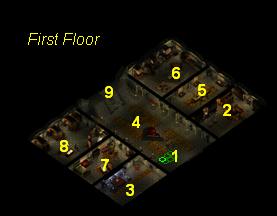
  1. Here is the entrance from the Bridge District. This is where you arrive if you picked the evil path in the Anomen is Called Home quest. If you picked the good path and later come here to stop Anomen from murdering Saerk, you will arrive at 17 on the second floor.

    When you enter, you will immediately be attacked by several guards. Most of them drop only mundane items but you may find a few Arrows +1 among the loot.

  2. Most of the bookshelves hold only books but the one at (x=2260, y=630) also has Scrolls of Dispel Magic and Charm Person.

  3. The table at (x=960, y=1540) is trapped and contains an Emerald.

  4. When you approach this end of the room, there will be more guards for you to fight.

  5. There will be a Commoner in this room. Don't kill him, or the party will lose a substantial amount of reputation.

    To this end, it is recommended that you don't bring any party members into the room wielding ranged weapons while Party AI is turned on. Otherwise, the party members will automatically attack the hostile commoner.

  6. Same thing in here – don't kill the Cook, or you will lose a lot of reputation.

  7. The chest at (x=630, y=1490) contains a Scroll of Fireshield (Red).
    The other containers hold only minor treasure.

  8. There are six chests in this room. From left to right:

    The chest at (x=150, y=1210) contains a Scroll of Summon Djinni.
    The chest at (x=220, y=1150) contains minor treasure.
    The chest at (x=310, y=1090) contains minor treasure.
    The next two chests are empty.
    The chest at (x=530, y=950) contains minor treasure.

  9. Here are the stairs up to the second floor.

  1. Here are the stairs down to the first floor. When you arrive here, you will be attacked by more guards.

  2. However, soon a short cutscene plays out where Saerk Farrahd himself meets the party here. His daughter Surayah also appears on the scene. After a short dialogue, Anomen kills Surayah for revenge, costing the party 2 Reputation points.

    Of course, battle ensues! Saerk, his son Yusuf, and several guards attack the party. Once he gets beaten up badly enough, Yusuf teleports away from the scene.

    Surayah's body can be looted for four items of minor treasure.

    Most of the guards drop only mundane stuff and random treasure; however you will also find a Bastard Sword +1.

    Finally, Saerk drops Full Plate Mail, 10 Bullets +1, 2 Potions of Extra Healing, a Potion of Fire Giant Strength, minor treasure, a Sling +1, and a Morning Star +1.

    Note: If you are romancing Anomen and you choose the Good Path, this is also where you'll eventually meet Saerk Farrahd. However, in this case the point is to stop Anomen from killing the man and instead leave him to the authorities!

  3. There is nothing but minor treasure in here.

  4. The safe at (x=1670, y=570) contains 1,250 GP, a Star Sapphire, and a Ruby Ring.

    The table at (x=1850, y=440) contains a Flail +1. Other than that, the tables only contain mundane weapons.

  5. The little table at (x=1800, y=710) contains three Elixirs of Health and four Antidotes.

    The bookshelf at (x=2390, y=740) contains two Potions of Master Thievery and a Potion of Invisibility.

  6. The two cupboards in this room contain minor treasure.

  7. The chests and cupboards in this room contain minor treasure.

  8. Here is an exit back out to the Bridge District. If you are romancing Anomen and have convinced him NOT to seek revenge, this is where you will enter Saerk Farrahd's estate when Anomen later goes back to kill Saerk.


Amazon.com
Amazon.ca
Amazon.co.uk
Sorcerer's Place is a project run entirely by fans and for fans. Maintaining Sorcerer's Place and a stable environment for all our hosted sites requires a substantial amount of our time and funds on a regular basis, so please consider supporting us to keep the site up & running smoothly. Thank you!

Disable all ads!