-

- Forums
- Chatrooms
- Gallery
- Gameplay Videos
- Upload
- Articles
- Mod Reviews
- Shop SP: Games, Movies, Books
|
|
| Pillars of Eternity 2 Video-Based Walkthrough by David Milward |
Amira's Island
Blighted Bog
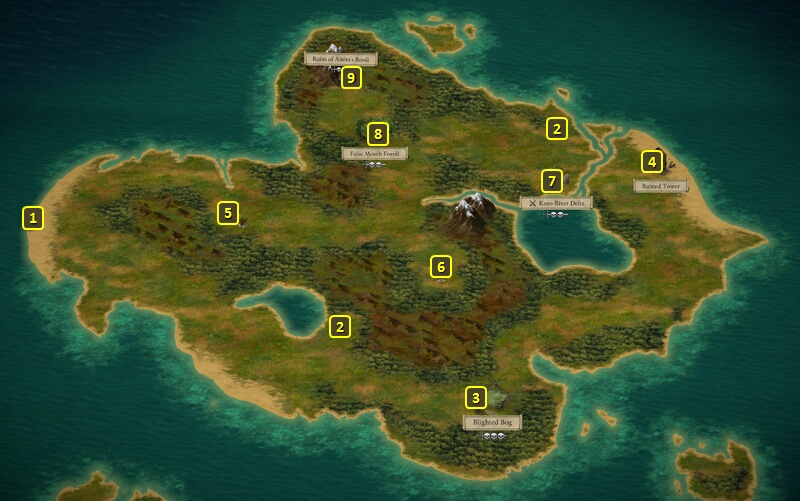
I sail north and dock at Amira's Island at #7 on the World Map.
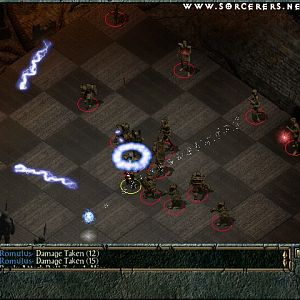
I start off at #1 on the map of the Blighted Bog. It typically involves fighting a Menpwgra, a Delemgan, a few Bog Oozes and a few Bog Lurkers. The fight can be out of reach for lower-level parties, especially if the Menpwgra and Delemgan get off Plague of Insects spells. You can make a Stealth check of 10 to try and sneak closer to them to start the fight. Sneaking closer also allows the option of trying to use an elemental damage spell (e.g., Fireball) to try and drive them off. As far as I can tell, it prevents a Dank Spore from also participating in the battle.
Alternatively you can make an Intimidation check of 15 after choosing the attack option, which will convince the Menpwgra to give you the Newly-formed Wisp as a Pet. You can then either let them go without a fight, or attack them.
Asking and accepting a mushroom after having previously accepted a Mushroom from the Delemgan on Tikawara Island won't result in any boon this time around. It instead results in an Injury for the Watcher, and a fight starting anyway.
The good party doesn't have much trouble with the fight. Pallegina summons her Ogres. The Delemgan and Menpwgra come to me ahead of their minions, so I gladly start by cutting them down as fast as possible. Pallegina thereafter periodically switches to using The Prisoners Turned On Their Captors after the Lurkers have closed in. It will immunize the party against the Immobilizing attacks of the Lurkers. It then becomes a matter of outlasting the Lurkers, then the Bog Oozes, and then finishing off the Dank Spore.
Also notice how Mirke is frequently able to use Stunning Surge over and over and over again. So long as she lands one Critical Hit among the cluster of enemies hit by her attacks, she'll recoup her Mortification.
I collect random items from the Ruined Tower at #4, and backtrack to the western shore of the island.
*Evil* Koro River Delta
The evil party hasn't done this part yet, unlike the good party. Zarathos chooses the Aggressive option to attack them outright.
I start off with the usual methods of buffing up, sticking together, and having Tekehu and Ydwin unleash their offensive powers. I manage to take out the squishier glass cannons among them, like their Rogue leader. At some point it's just the Ogre, the Orlan Wizard and his Imp who are left. I send Zarathos and Xoti ahead to take out the Wizard as quickly as possible, while Mirke tanks the Ogre. The Writhing Tentacles also disappear once the Wizard is killed, which makes the rest a mop up.
I unlock and loot the chest for the Pukestabber Dagger, although it doesn't fit into the plans for the evil party.
*Evil* False Mouth Forest
The False Mouth Forest is at #8. It involves a fight against a Lagufaeth party, which by now is very easy to win.
Ruins of Amira's Roost
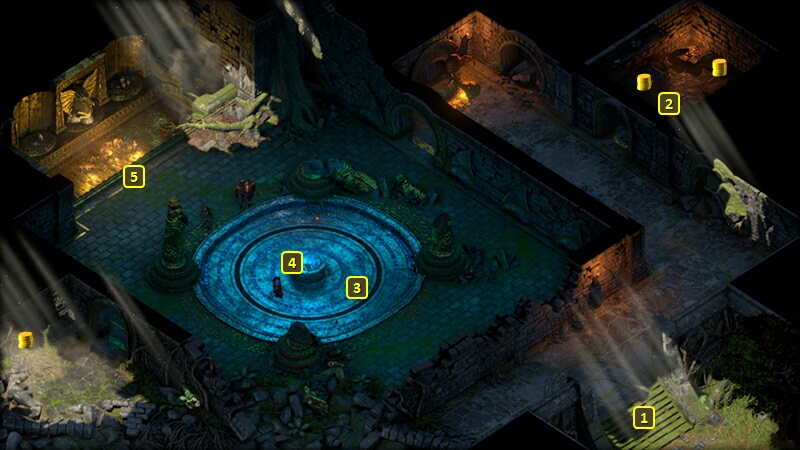
I go through the entrance at #9 to enter the Ruins of Amira's Roost.
I start off at #1. I kill off a couple of Desert Imps at #2.
I go a little north, and then send Alliria through the door and to a room to the west. A Wizard named Leofwyn will be standing at #3, and will attack no matter what. She'll be helped by Void Seers, Steelspine Warriors and an Ironclad Construct.
Alliria regroups with the party, and lets the enemies come to them through the door. That means Leofwyn is within close view when she arrives, and Mirke takes her out with just a couple of volleys. That makes wearing down her minions that much easier.
She leaves behind a Grimoire called the Book of Storms, but I have no use for it. My Wizard characters have Grimoires that work better for them.
I find a hidden ring named Harmony at #5, but I have no use for it. Its powers are per Rest.
The Altar at #4 has a Rod called Amira's Wing, but I have better weapons in mind.
I leave the Ruins. The good renames the island to "Stairway to Heaven", while the evil party renames it "Pandemonium". I thereafter return to the ship.
*Evil* Galawain's Bounty
Zarathos sails towards the southwest corner of the World Map, and confronts a Crookspur Galleon called Galawain's Bounty. I board it and have little trouble slaughtering the Slaver crew.
*Evil* The Ironclad
I sail north and board and defeat a Crookspur Captain near Dunnage at #9 on the World Map.
I sail north some more and board a Galleon called The Ironclad. It is captained by a Wizard named Myrlefsen the Utterly Insane, and its crew include several Ironclad Constructs. I board it. I make a point of wiping out the Kith crew members first, including Myrlefsen himself, and then wearing down the Constructs. *Good* The good party also defeats this ship during a boarding battle, and while sailing north.
I continue north, and board another Crookspur Captain.
I continue to sail north until I reach Dunnage at #9 on the World Map.