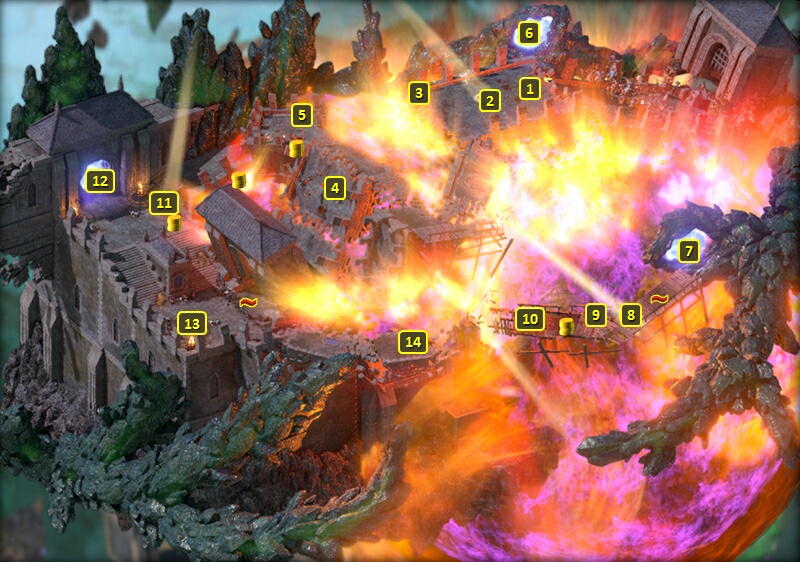
Go to #3, where you'll witness
St. Waiden marching with his forces across the bridge. Clicking on him
means the Godhammer goes off. That event teleports the party to #1 on
the map of The
Bridge Ablaze, Moment After.
*Note* Coming back after that first time means Waidwen will stay frozen,
but shows an awareness that his soul is trapped in the memories of his
death.
The party will have to fight several Burning spirits on arrival the
first time around. You'll also get two items with are helpful for the
Quest. One is a Trinket called Waidwen's
Sundial, which you get directly from Waidwen on your arrival at
#1. This item can also be helpful in other areas of the game, like The
Shattered Passage and The
Endless Queries.
The other is the Evon Dewr
Tower Key, which you can get from the dead body at #3.
Eothas will speak to you afterwards, and advise that you can use the
Sundial to transport through different moments surrounding the explosion
of the Godhammer and then piece Waidwen's soul back together.
There's a very narrow pathway just to the southwest. It continues
southwest and then bends northwest.
There will be a soldier falling down at #4. You can click on him from
the pathway, and then obtain a Plate Armor called One
Dozen Stood.
You will find one of the soul fragments that you'll need at #5.
A natural way to progress the Quest is to go through the Void Gate at
#6 to arrive at the Void Gate at #7. Use Waidwen's
Sundial at the beam of light portal at #8 and choose "Noon" to
arrive in The
Bridge Ablaze, Moment Of at #1.
Click on #2 of the map of The
Bridge Ablaze, Moment Of to obtain one of the fragments of
Waidwen's soul that you will need.
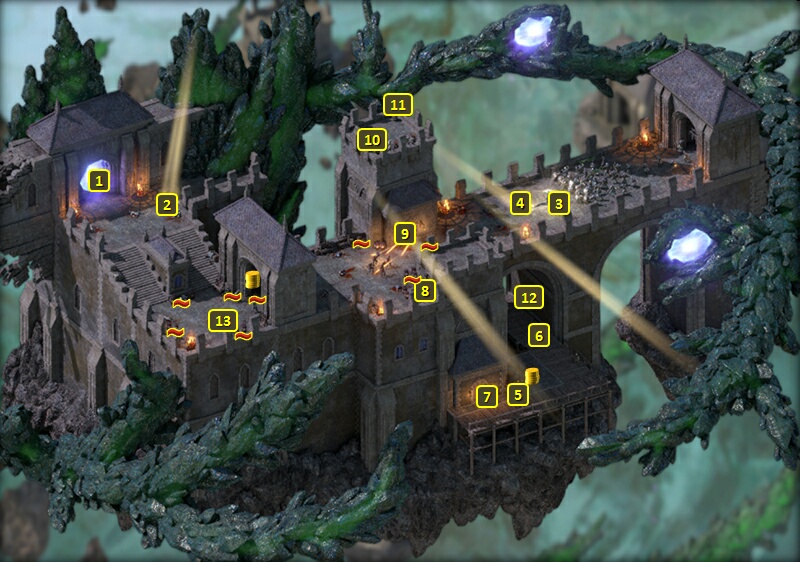
There will be a Magranite Priestess at #6. You can learn a few things
from her, like for example that the Godhammer contains a piece of
Waidwen's soul. She has also forgotten the spell needed to conceal the
Godhammer, and you won't be able to help her remember it, at least for
now.
This door at #7 leads to the door that now appears at #8.
There will now be a door at #9, which you can open with the Evon
Dewr Tower Key. It leads to #10.
Now return to the Priestess at #6, and give her the Memory
of Magranite Incantations. The Godhammer itself will now be
revealed at #12.
There are a few options for disarming the
Godhammer if that's what you want to do.
A Priest of Magran can disarm it, as can a Sleight of Hand check of 15.
If you obtained Betrayal from
the The Endless Queries,
you can pretend to be Durance to the Priestess and convince her to
reveal the schematics of the Godhammer.
Disarming the bomb means obtaining another fragment of Waidwen's soul
that you will need, as well as a Trinket called the Detonator
Shard.
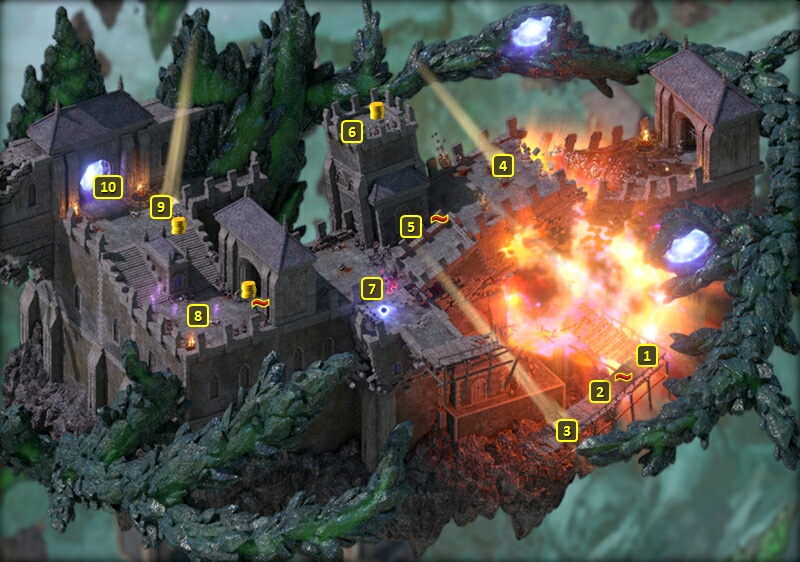
Alternatively, you can simply detonate the Godhammer. Doing so will mean
you can still obtain the piece of Waidwen's soul but not right away, and
you won't get the Detonator Shard.
What happens is you will be brought to the beam of light portal at #8 in
The Bridge
Ablaze, Moment After. You can then get the Soul Fragment at #9.
Go east and click on Waidwen at #3 to restore him. Note that there are
other versions of Waidwen at similar points in the Moment
Of (at #4) and the Moment
After, but Waidwen's body will be too broken in those areas to be
of any help.
It is only the Waidwen here at #3 in the Moment
Before that you can use your fragments to restore him.
Speaking to him completes the Quest, along with an 8,000xp bonus. You
have the options of having him joining you as an ally against
Neriscyrlas, having him join your trail of souls following you, or
letting him dissolve in the White Void.
Head west. You'll have to fight several Burning spirits, along with a
Warden of Decay and a pair of Scourges, at #13.
Sorcerer's
Place is a project run entirely by fans and for fans. Maintaining
Sorcerer's Place and a stable environment for all our hosted sites requires a substantial amount of our time and funds on a regular basis, so please consider supporting us to keep the site up & running smoothly. Thank you!
Supporting Sorcerer's Place
Has Sorcerer's Place been useful? If you'd like to show your appreciation
for our hard work on the site, and help us pay the bills the site generates
every month, please consider helping support SP.
Thank you!

 Go to #3, where you'll witness
St. Waiden marching with his forces across the bridge. Clicking on him
means the Godhammer goes off. That event teleports the party to #1 on
the map of The
Bridge Ablaze, Moment After.
Go to #3, where you'll witness
St. Waiden marching with his forces across the bridge. Clicking on him
means the Godhammer goes off. That event teleports the party to #1 on
the map of The
Bridge Ablaze, Moment After. There are a few options for disarming the
Godhammer if that's what you want to do.
There are a few options for disarming the
Godhammer if that's what you want to do.