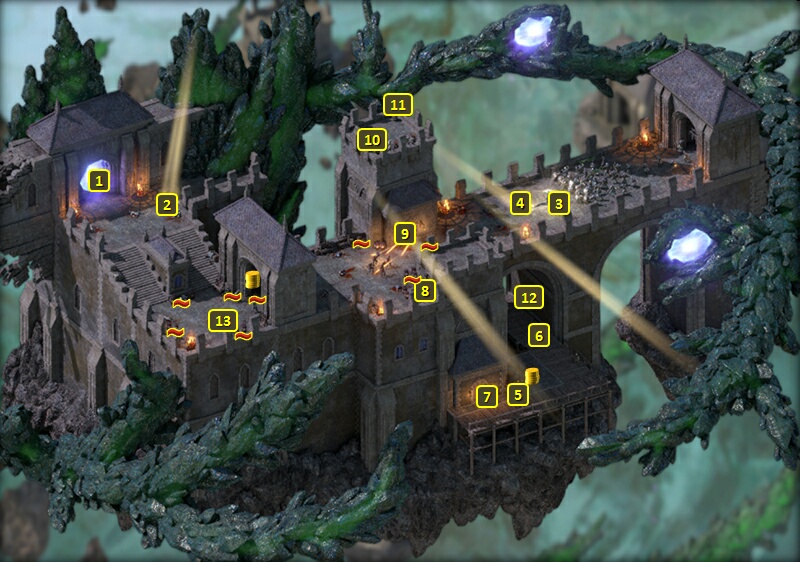
You can use Waidwen's Sundial
at this beam of light so that it acts as a portal between different
points in time for the detonation of the Godhammer. You can choose to
remain where you are and come back later.
Coming here for the first time leads to witnessing St. Waidwen
marching with his forces across the bridge. Clicking on him for the
first time precipitates the explosion of the Godhammerf. That
event teleports the party to #1 on the map of The
Bridge Ablaze, Moment After.
Coming back and clicking on him after that first time means Waidwen will
stay frozen, but showing an awareness that his soul is trapped in the
memories of his death.
Clicking on him here after you have obtained all four fragments of his
soul will mean the completion of The
Bridge Ablaze Quest.
You can use Waidwen's Sundial
at this beam of light so that it acts as a portal between different
points in time for the detonation of the Godhammer. You can choose to
remain where you are and come back later.
Sorcerer's
Place is a project run entirely by fans and for fans. Maintaining
Sorcerer's Place and a stable environment for all our hosted sites requires a substantial amount of our time and funds on a regular basis, so please consider supporting us to keep the site up & running smoothly. Thank you!
Supporting Sorcerer's Place
Has Sorcerer's Place been useful? If you'd like to show your appreciation
for our hard work on the site, and help us pay the bills the site generates
every month, please consider helping support SP.
Thank you!