-

- Forums
- Chatrooms
- Gallery
- Gameplay Videos
- Upload
- Articles
- Mod Reviews
- Shop SP: Games, Movies, Books
|
|
Burial Isle
Dorvahl
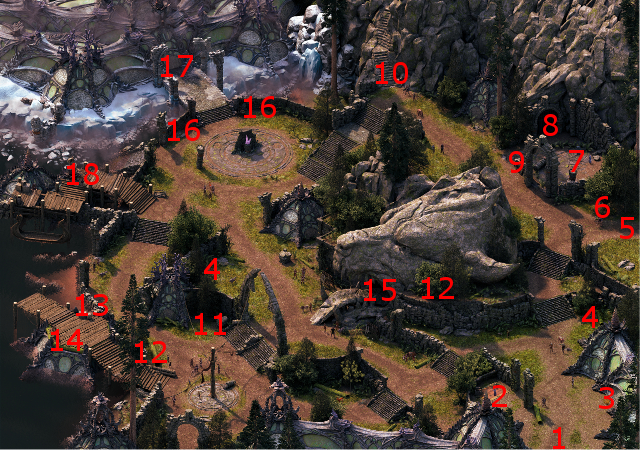
I speak to Dorvahl, who's on the west side of Oldsong at #18. He'll readily agree to take me to the Burial Isle, and he's also willing to bring me back if I want that as well.
Trap for Iovarra
I go west ahead a little to #2, where I receive another vision of Iovarra, the moment where in her past life Alliria lured Iovarra to Ossionius.
Blocked Passage
I defeat a few Pwgras and Menpwgras at #3. At #5 is a blocked passageway, which can offer a shortcut to the door at #18. It's not strictly necessary, but I'm showing it for the sake of completeness.
Clearing it through a scripted interaction requires the Watcher to either make a Might check of 17 or use a Prybar. Furthermore, to avoid characters sustaining injuries from a rockslide, the Watcher also has to make either a Perception check of 17 beforehand, or make a Constitution check of 17 once the slide begins. Alliria makes the Perception check, and then expends a Prybar.
Zakara is able to make the Constitution check on her own, since she is wearing the Iron Circle as it is.
Last Blade of the White Forge
I continue westwards, easily killing off any spirits I come across. The corpse at #8 has a Sword called Last Blade of the White Forge, but I have no use for it.
Scathden
I continue west to #10, where I find a Druid named Scathden surrounded by several Stelgaers. He is also the final part of Hiravias' personal quest, True to Form.
Alliria could push Hiravias into a fight with Scathden, and the battle would be easy enough to win. Doing so would resolve the quest, and in a way that Hiravias' epilogue will become quite violent.
However, Alliria makes a Resolve check, followed by another Resolve check of 14 (alternatively a Might check of 14 also works here) to convince Hiravias to avoid a fight and choose Wael instead of Galawain. That also resolves the quest, and his epilogue will end up with him becoming a wandering wise man.
Engwithan Adra Ban Amulet
I continue to battle through more spirits in the northwest corner. A corpse at #13 has an Engwithan Adra Ban Amulet, but I have no use for it.
Burial Isle Spirits
The good party continues eastwards, and defeats several Shades, Spectres and Cean Gwlas at #17.
The Court of the Penitent
I go ahead to #20, where I have a vision of Thaos ix Arkannon having Iovarra ix Ensios tortured.
I click on the pit at #21. There's three ways to safely reach the bottom without suffering injuries: