-

- Forums
- Chatrooms
- Gallery
- Gameplay Videos
- Upload
- Articles
- Mod Reviews
- Shop SP: Games, Movies, Books
|
|
Black Meadow
Tuatanu
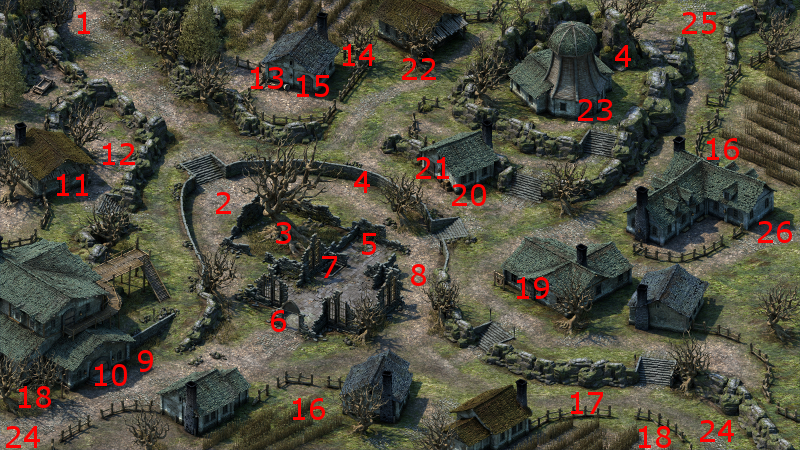
The entrance to the Black Hammer Smithy is at #19 on the map of Gilded Vale.
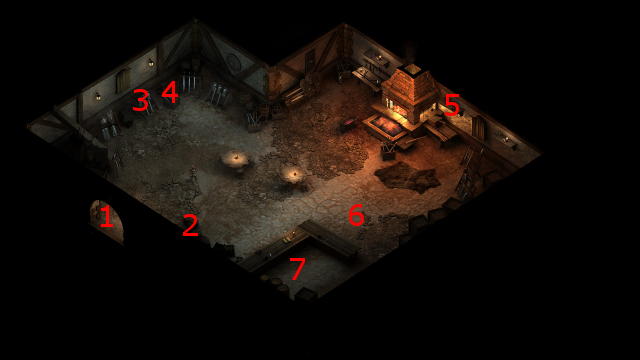
I speak to Tuatanu, who's at #7 on the map of the Black Hammer Smithy. He asks me to look into his missing shipment, which triggers The Smith's Shipment quest. He has some items for sale, but I'm not interested in any of it.
The video concludes with the party hitting one of the World Map Exits on the east side of Gilded Vale, and then travelling to the Black Meadow.
Wichts and Trolls
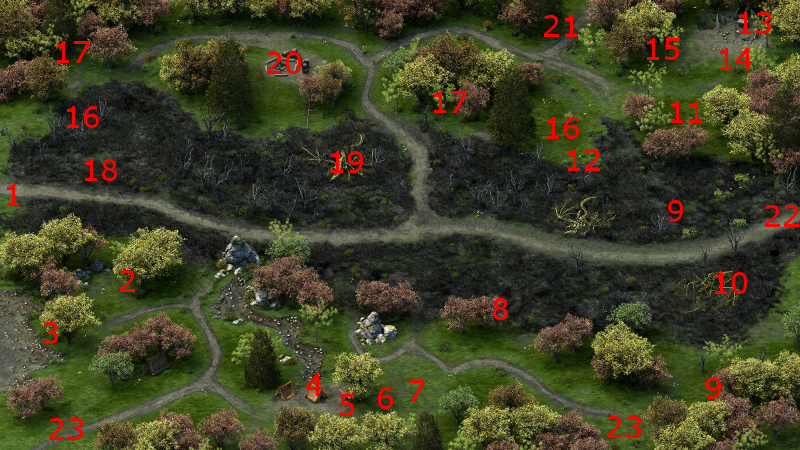
The party arrives at #1 on the map of the Black Meadow. There will be a pack of Wichts at #2, who can cause extra poison damage with their claws. I let Eder stick his neck out so that they gather around him, and then have the rest of the party wipe them after hitting them from the sides like pincers.
I next touch a World Map Exit on the south side, in order to reveal Madhmr Bridge.
There will also be a trio of Forest Trolls towards the northwest corner, and I defeat them with the same strategy.
4th Level
The good party now has enough experience to advance to their 4th levels. Alliria selects Strange Mercy. It recoups Endurance for all party members within a large radius upon her landing the killing blow on her target. There's no limit (aside from the number of enemies themselves) on how often this will trigger during each encounter. That makes it one of the key features of a Kind Wayfarer. Many of her other talents or abilities are selected with a view towards either maximizing the probability of her landing a killing blow, or adding other benefits in addition to Strange Mercy once she lands the killing blow.
As for Aloth, Durance and Eder, I make the same selections for them as I did for the evil party.
Bandit Camp
The Bandit Camp is at #20. I edge towards it and then send Eder ahead to absorb the initial onslaught of Bandits and Outlaws.
Durance initiates a sequence of Blessing, Consecrated Ground and then Interdiction. Aloth casts Chill Fog once the position appears to settle. He also casts a Ghost Blades spell to catch as many enemies as he can. That makes it significantly easier to wear the enemies down.
Two of the crates will have various random items. One of them has the Shipment Crate that Tuatanu wants, as well as a Tattered Note. Reading the latter reveals the following text: "Yc Nybean Eyldfeon". It is a password that will grant access to a particular merchant in Defiance Bay, but that won't be until later on.
The video concludes with going into scouting mode and discovering the hidden cache in the drake skull at #19. I loot it for several miscellaneous gems.
Fulvano's Boots
I continue south and slaughter a few Spear Spiders and Spear Spiderlings around #7. I collect the loot from nearby dead bodies.
Now I rest up and collect the Camping Supplies and other items from the hidden cache at #4.
I continue east and a little north, where I slaughter another pack of Wichts.
A dead body has Fulvano's Boots. Alliria wears them for now on an interim basis, for the +1 bonus to Constitution. *Evil* Zakara wears them in the interim in the evil party.
Forest Trolls and Forest Lurkers in Black Meadow
I continue southeast and kill off another Forest Troll towards the southeast corner. Afterwards, I touch the World Map Exit on the east side of the map in order to reveal Caed Nua.
Next I kill another trio of Trolls at #16, just north of #12. I use the same Eder as tank theme again. But now I start to show a different strategy. Alliria will wait until a monster is 'near death', and that's when she hits it with a Flames of Devotion. The hope is to get in the killing blow, and thereby trigger both Strange Mercy and The Sword of the Shepherd at the same time.
There will be a pair of Forest Lurkers at #11. They can be tough for lower level parties. Their ability to render characters Stuck can be dangerous in more than one way. The victim may be unable to reach the Lurker unless he or she has a weapon like a Quarterstaff or a Pike. The victim will also be subject to a debuff that allows the Lurker to score increased damage on subsequent hits. Nonetheless, Eder puts himself out there as the initial tank, while the rest of the party hits from the sides. Durance helps matters with a sequence of Blessing, Consecrated Ground and Interdiction.
The video concludes with the party leaving for Caed Nua.
Kana Joins
I speak to Kana at #2 and get him to join me. I equip him with a spare Hatchet and Small Shield that I've been saving up for him.
Now I level him up. He takes the But Reny Daret's Ghost, He would not Rest invocation on his second level up. It is very useful during the early parts of the game, since the Phantom that is summoned frequently stuns its targets.
He also takes the Weapon and Shield Style talent on his second level up, which is a must for any character that is built to play the tank role.
I take the Come, Come Soft Winds of Death chant on his third level up. I make it a part of any phrases where I want to accumulate chants quickly enough to use Invocations. Besides the damage over time effect, it will also expose enemies to extra damage inflicted by Sagani's pet fox through the Predator's Sense ability.
I take the White Worms Writhed in the Bellies of the Dead on his 4th level up. It can be powerful in some situations. Let's say you've slain a bunch of enemies and their corpses are now piled up in proximity to each other. Send someone besides Kana to go ahead and get the attention of another group of monsters, while Kana builds up Chants. Once the enemies get close to both the party and the previously slain enemies, Kana can unleash this to cause hefty damage on the enemies but not on any party members.
I also take the Cautious Attack talent on his fourth level up. Kana's role is to take up a defensive wall position while chanting, and maybe doing something else at the same time like using a scroll. I don't care about how often he attacks since his efficacy does not depend on melee attacks. The +8 bonus to Deflection is easily worth the penalty to Attack speed in this instance.
The Smith's Shipment
I return to Tuatanu and give him the Shipment Crate for an xp reward as well as 100cp. This event marks the conclusion of The Smith's Shipment quest.
I also get a Large Shield called the Larder Door. Kana equips it on an interim basis.
Now I rest up in the Common Room of the Black Hound Inn and head for Madhmr Bridge.