-

- Forums
- Chatrooms
- Gallery
- Gameplay Videos
- Upload
- Articles
- Mod Reviews
- Shop SP: Games, Movies, Books
|
|
Anslog's Compass
A Mother's Plea
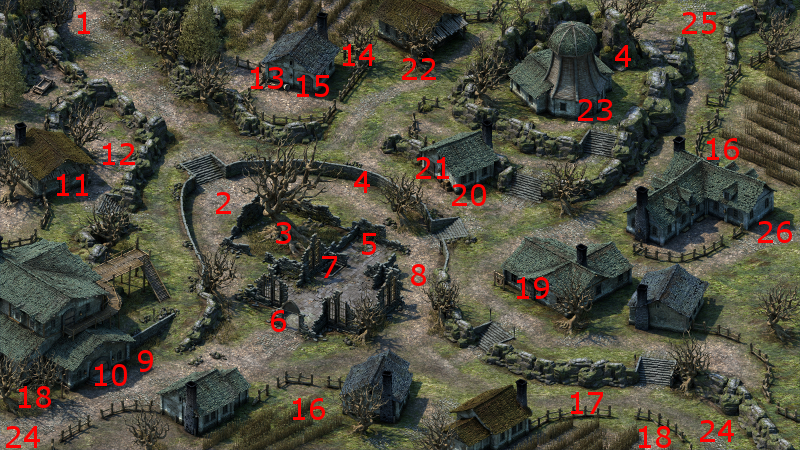
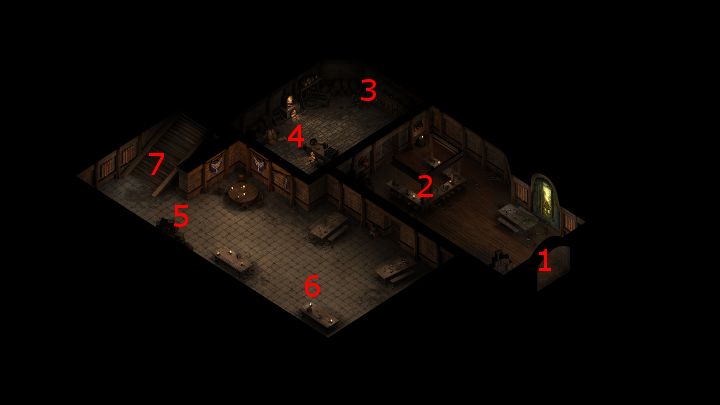
Alliria heads over to the house at #11 on the map of Gilded Vale. A pregnant woman named Aufra will be inside. She'll want me to retrieve a potion from a midwife named Ranga, hoping for the assurance that her child won't be born Hollowborn. Alliria agrees to the request.
This dialogue triggers the quest called A Mother's Plea. The good party now makes its way to Anslog's Compass.
Egdrang and Tilly
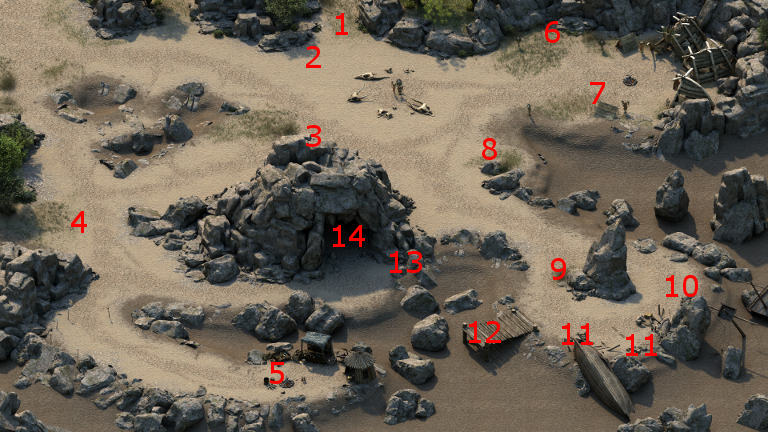
The party starts off at #1 on the map of Anslog's Compass. Egdrang and Tily will be at #3. I converse with them for a bit. A band of Xuarips attacks from the west afterwards. I easily slaughter them, and manage to keep both Egdrang and Tily alive. Note that there's no in-game consequence attached to whether they live or die.
Ranga
The party heads southwest and then kills off another group of Xuarips at #4 led by a Xuarip Champion. Alliria makes sure to save one of her Flames of Devotion for him.
They continue on to #5, where Alliria speaks with the Aumaua midwife named Ranga. Ranga is willing to supply a treatment for Aufra, but only if a Xuarip tribe in the northeast part of the Compass is wiped out first.
Fulvano's Travels
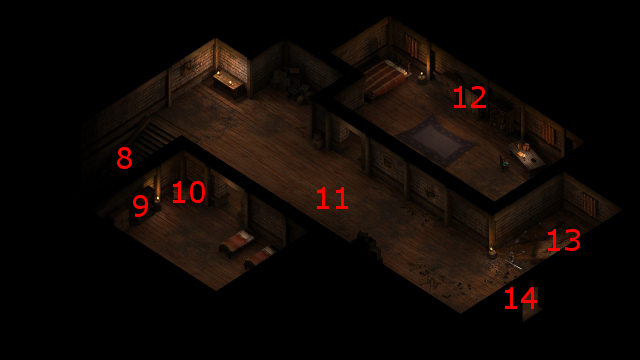
The party now travels towards #8, fighting a Xuarip and an undead creature known as a Gul along the way. At #8 is a dead body that has Fulvano's Letter on it.
I continue on towards the southeast part of the Compass, where I fight two hordes of Guls, one at a time. Alliria saves her Flames of Devotion for the larger-sized Guls. The sand dune at #10 has Fulvano's Travels.
The video concludes with looting the crates at points marked #11, and then heading north for a bit.
Xuarip Tribe in Anslog's Compass
The Xuarip Tribe will be at #7. I initially let them come to me, with Eder and the Orlan Rogue holding them up as tanks. Durance casts Blessing and Consecrated Ground at the start.
Once the position settles, I send Alliria to the Xuarip Priest to take it out as quickly as possible, so that it doesn't recoup the Endurance of the other Xuarips.
Once the Priest falls, its a matter of cutting down the others. Durance at one point has to use a Withdraw spell on the Rogue since he's taking a beating. Aloth helps matters along with a couple of Ghost Blade spells. A nearby tent has a few random items.
The party returns to Ranga and informs her of the good news. She rewards me with a Potion of Minor Endurance, a Potion of Minor Recovery and a Potion of Minor Regeneration.
However, she also wants me to recover spores from a nearby cave.
Dank Spores
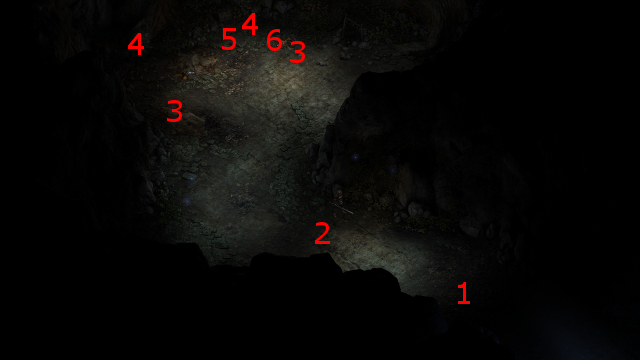
Now I head towards the cave entrance at #14. There will be a couple of Xuarips at the entrance, but I kill them off easily enough.
There will be a few Sporelings, and a couple of Dank Spores, in the middle of the cave. The Dank Spores are capable of using single-target projectile attacks that can cause victims to become Confused. However, they are also incapable of movement. So it is better and safer to pull the Sporelings away from the Spores, kill them off, and then deal with the Dank Spores by themselves in a separate battle.
The Orlan Rogue advances to his 3rd level of experience, and I select the Dirty Fighting ability for him. It is a passive ability that converts 10% of Hits into Critical Hits.
I loot my now dead enemies for Dank Spores and Sporelings. I also loot the Cave Corals, as well as dead adventurers, the chest at #5, as well as the secret stash at #6 for any items that I can find and leave.
I bring the Dank Spores to Ranga. She in turn provides me with the Stoppered Vial, but warns me that it can only enhance Aufra's physical health. It ultimately cannot prevent her child from being born Hollowborn.
The video concludes with the good party making its way back to Gilded Vale.
Black Hound Inn Second Floor Chest
The entrance to the Black Hound Inn is at #10 on the map of Gilded Vale.
I go to Pasca at #2 and sell off most of my excess loot, except for some that I want to save up for my future companions. It is now day 4 of the month, so I rest up with the Common Room resting option until it becomes day 9 of the month.
The stairs up to the next level is at #7 on the map of the first floor.
The chest at #10 will have one item from the "Gilded Vale - Inn Second Floor" section of the random drop list. As it's the 9th day of the month, the chest will now have a Ring of Overseeing. I save it for Grieving Mother when she joins.
The video concludes with the good party taking another rest in the Common Room on the way out, before leaving the Inn.
Stoppered Vial
I return to Aufra in her house at #11. It's now a matter of what to say to her after giving her the Stoppered Vial. Your choices are:
*Evil* 4th Level
The evil party at this point now has enough experience to advance everyone to their fourth level. Aloth selects the Blast talent to augment his long-distance attacks, especially once he gets the Kalakoth's Minor Blights spell.
He also learns the Merciless Gaze spell. It is a long-lasting spell that converts 15% of Hits into Critical Hits. Can be useful in battles against enemies with high Endurance. It will also be his 2nd-level per Encounter spell power.
Durance gets the Interdiction talent, which he can use once per Encounter to Daze enemies over a very large area. This can be a useful power, especially during the early parts of the game.
Eder gets the Wary Defender talent, which adds a +5 bonus to all Defenses besides Deflection when he uses his Defender modal.
Zakara gets the Remember Rakhan Fields talent, which augments her Flames of Devotion power by adding a +25% Corrosive Damage bonus.
Kolsc Approaches
If your reputation with Gilded Vale is high enough, as is now the case with Alliria, Kolsc will now approach to enlist your aid against Lord Raedric. Alliria readily agrees with a Diplomatic reply along the way. This conversation triggers the Lord of a Barren Land quest.
*Evil* Zakara chooses Cruel and Deceptive dialogue options whenever possible.
The Black Meadow is my next destination.