Baldur's Gate 2 Online Walkthrough by Montresor


CREATING A CHARACTER  |  GENERAL TIPS AND TRICKS  |  NPCs  |  ITEM LISTS  |   SHOPS   
Shadows of Amn: Chapter 1  |  Chapter 2  |  Chapter 3  |  Chapter 4  |  Chapter 5  |  Chapter 6  |  Chapter 7  
Throne of Bhaal  |  Watcher's Keep  
About the Walkthrough  |  Organization of the Walkthrough  |  About the Maps  |  About the Author  |  Where to Begin
Disable all ads!

Overview of Chapter 2  |  Quests in Chapter 2 
Areas in Chapter 2: Athkatla
Waukeen's Promenade  |  The Bridge District  |  The City Gate District  |  The Docks District  |  The Government District  |  The Graveyard District  |  The Slums  |  The Planar Sphere  |  The Temple District  |  The Temple District Sewers  
Areas Outside Athkatla
De'Arnise Keep  |  Trademeet  |  The Druid Grove  |  The Umar Hills  |  The Temple Ruins  |  The Windspear Hills

The Docks District
Shadow Thief Guildhall  |  Mae'Var's Guildhall  |  Sea's Bounty Tavern  |  The Galvarey Estate (Harper Hold)  |  Rayic Gethras' Home  |  Kangaxx's House  

THE GALVAREY ESTATE

This imposing structure in the lower left corner of the Docks District is the Athkatla headquarters of the Harpers and the center of the Harper Hold quests. These quests begin with a random encounter when you travel between different districts in Athkatla or to one of the outlying areas. You will be spending a lot of time on these quests if you have Jaheira, who is a member of the Harpers, in your party.
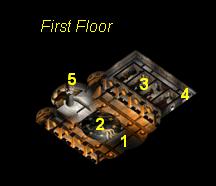
  1. Here is the exit to the Docks District.

    After Jaheira has been summoned to the Harper Hold and has returned, when you return here, this is where you will have a confrontation with Galvarey which ends in bloodshed.

    If you later return here after Jaheira has left to face the Harpers on her own in connection with the Harper Hold quests, you will also be assailed by a (rather weak) war party here.

  2. In this general area, you will find Meronia, Pace, and Berinvar; three not very communicative Harpers. Berinvar will warn you not to visit the second floor, as this will cost you your life. Both he and Pace seem very preoccupied with the amulets they wear around their necks, and which they say identify them as Harpers. Jaheira will wonder about this, since Harpers normally avoid being identified as such.

  3. These four small rooms contain a number of items. From top to bottom:

    The table in the topmost room at (x=1000, y=300) contains a Harper Amulet. It will allow the party to go to the second floor without being attacked.

    In the next room, the table at (x=1100, y=400) contains a Potion of Insight and a book.

    In the third room, the table at (x=1230, y=500) contains a book, a Potion of Mind Focusing, and a Scroll of Conjure Lesser Air Elemental.

    The trapped painting at (x=1410, y=430) contains a Helm of Charm Protection.

    Finally, the table at (x=1370, y=580) in the lowermost room contains 110 GP and two Potions of Extra Healing.

  4. These stairs lead up to the roof of the estate. No point in going up there, though.

  5. Here are the stairs to the second floor. Make sure one of your characters is wearing the Harper Amulet or has it in their inventory before going up.

    On a later visit, when Jaheira leaves to face the Harpers, it is safe to venture upstairs. However, at that time, when you come back down, you'll be facing yet another war party.


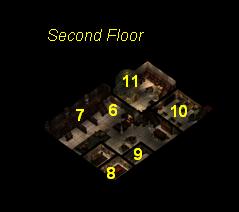
  1. Here are the stairs down to the first floor. You will immediately be greeted by a group of Spectral Harpists. If the party comes up here without a Harper Amulet, the Spectral Harpists attack.

    I have read in other walkthroughs that the Spectral Harpists attack anyone who comes up here without a Harper Amulet; however I have found that the entire party can come up here, so long as any member has the amulet in their inventory or is wearing it around the neck.

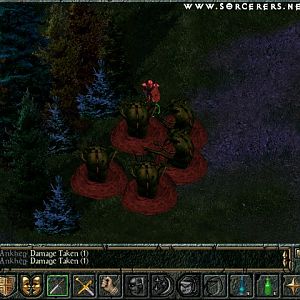
    If Jaheira leaves to face the Harpers in connection with the Harper Hold quests, this is where you will find her again.

  2. Of the bookshelves below the stairs, most just contain books but the one at (x=380, y=740) also holds five Potions of Extra Healing. The bookshelves on top contain (from left to right):

    - A Scroll of Phantom Blade.
    - A book and 40 Bolts of Biting.
    - A book.
    - A book and 30 Throwing Daggers.
    - A book and 20 Throwing Daggers.
    - A book and 40 Throwing Axes.
    - A book.

  3. The small table at (x=700, y=1210) contains some cash and a note that indicates that Montaron, the thief you are looking for, was polymorphed into a bird.

  4. The table and one of the baskets in this room contain a small amount of cash.

  5. There are six chests in this room:
    The chest at (x=1350, y=590) is trapped. It contains a Jade Ring and 20 Acid Arrows.
    The chest at (x=1430, y=650) contains a Flamedance Ring, 107 GP, and 40 Bullets +1.
    The chest at (x=1500, y=700) contains only a bit of cash.
    The chest at (x=1650, y=620) contains a Flamedance Ring.
    The chest at (x=1570, y=560) contains Scrolls of Detect Evil and Mirror Image.
    The chest at (x=1490, y=500) contains 1 GP and 40 Darts +1.

  6. If you step up close to the aviary here, you can reach in and catch one of the birds. It seems quite tame, so judging from the note you found at 8, it just might be Montaron! Catching the bird is worth 20,000 XP.

    (Of course you will learn in due course that the bird isn't Montaron. Please see the Harper Hold quests.)


Amazon.com
Amazon.ca
Amazon.co.uk
Sorcerer's Place is a project run entirely by fans and for fans. Maintaining Sorcerer's Place and a stable environment for all our hosted sites requires a substantial amount of our time and funds on a regular basis, so please consider supporting us to keep the site up & running smoothly. Thank you!

Disable all ads!