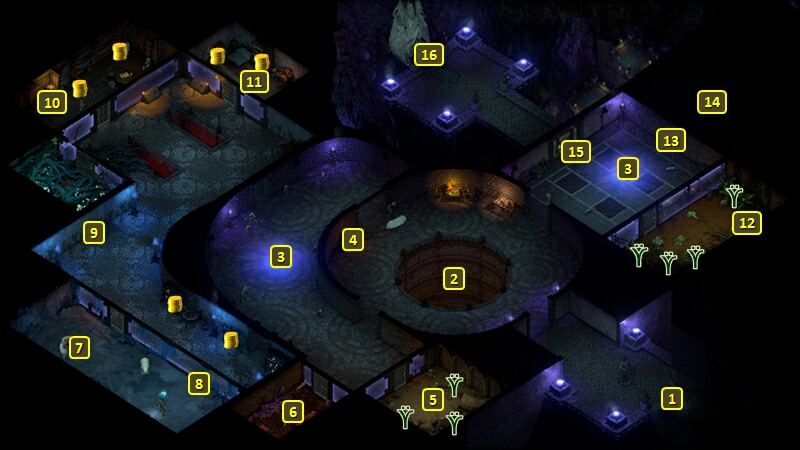
There is a screaming pit here. The prisoners occasionally try to hurl themselves into it, only to be repulsed away from it.
There is a Mouth of the Organ at each of these points. Each will be guarded by several Vithracks.
Each Mouth imposes a -50 Will penalty on the party, which can make you more vulnerable to the Vithracks' powers. You can destroy a Mouth, but doing so causes the nearby Prisoners to go hostile.
There will be some Xaurips and a Grub in this cell. They'll be in a constant state of Frightened, and won't fight back even when you attack them. They don't have anything of value either.
There will be a Shimmering Dreambeast in this cell, which attacks on sight. It has a Shimmerstep power that resembles the Monk's Whispers in the Wind. It can also split itself into clones when it's Near Death.
The cell also has Slender Jim, who you can take as a Pet.
This cell will have several Snow Bears and Rimebound Rathun led by Auntie. They will attack once you open the door.
This chest has a Sharply Written Note, which suggests Citzal the Archmage was taken prisoner here, as well as a few other items.
Bekarna is being held prisoner in this cell. Just speaking to her starts the Wasting Minds Quest.
A dead body here has the Carefully Scribed Note. The cell has Bog Oozes and Bog Lurkers led by a Vicious Menpwgra, who all attack on sight.
This hidden door can be opened in one of three ways:
A Mechanics check of 17 subsequently allows you to use either a Hammer and Chisel or a Prybar to tear it down.
An Athletics check of 22 can push the wall down. Failing the check can result in the Wrenched Shoulder (-3 Might) Injury.
Use an Implosion Charge to blow it down. Failing an Explosives check can result in everyone getting the Gaping Wound (-25% Healing received, -15% Maximum Health) Injury.
There will be a dragon-like skeleton here that has a humanoid skull. It can be looted for a Sea Dragon Scale and a Magma Dragon Gizzard Stone, in addition to other crafting ingredients.
Sorcerer's
Place is a project run entirely by fans and for fans. Maintaining
Sorcerer's Place and a stable environment for all our hosted sites requires a substantial amount of our time and funds on a regular basis, so please consider supporting us to keep the site up & running smoothly. Thank you!
Supporting Sorcerer's Place
Has Sorcerer's Place been useful? If you'd like to show your appreciation
for our hard work on the site, and help us pay the bills the site generates
every month, please consider helping support SP.
Thank you!