Pillars of Eternity logo


Pillars of Eternity Online Walkthrough by David Milward


INTRODUCTION & ABOUT  |  WORLD MAP  |  WHITE MARCH MAP
General:  
Quests  |  Tasks  |  Bounties  |  Items  |  Characters
Areas:  
Act 1 Areas  |  Act 2 Areas  |  Act 3 Areas  |  Act 4 Areas  |  Caed Nua  |  White March - Part 1  |  White March - Part 2  | 
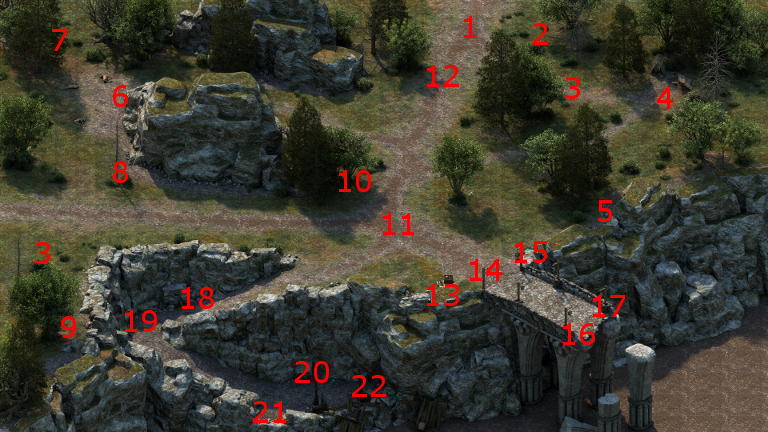
Disable all ads!

Act I Areas:   Encampment  |  Ruins of Cilant Lis  |  Cilant Lis  |  Valewood  |  Gilded-Vale  |  Temple of Eothas  |  Esternwood  |  Raedric's Hold  |  Magran's Fork  |  Anslog's Compass  |  Black Meadow  |  Madhmr Bridge  |  Caed Nua  |  Dyrford Village  |  Dyrford Crossing  |  Dyrford Ruins  |  Woodend Plains  |  Aedelwan Bridge

Madhmr Bridge

Madhmr Bridge

  1. This point provides access to travel by the World Map. It will also be the point of arrival if the party got here from the Black Meadow.

  2. There will be a Springberry here.

  3. You will find a few Xuarips at these points. As usual, they will typically leave behind Xuarip Spears and Medium Shields, while any Priests will have leave behind a Xuarip Quarterstaff.

  4. There's a bucket here that will have a random weapon and Camping Supplies.

  5. You will find a Skaenbone here.

  6. You'll find a few Xuarips here, who are led by a Xuarip High Priest who can cast mid-level spells.

  7. There will be a pair of Trolls here, who are actually quite tough. If any battle in this area merits expenditure of your spells before resting, it's this one. They'll leave behind Troll Skins.

  8. There will be a St. Gyran's Horn here.

  9. There will be an Admeth's Wyrt here.

  10. You will find a Dyrcap here.

  11. Peregund is here, who provides the Ferry Flotsam task.

  12. Here is where you'll encounter the Paladin named Galen Dalgard and the rest of his Aedyran slavers while pursuing the bounty on him.

  13. A crate here has random food items, but you need to make a Mechanics and Stealth check to get them without provoking nearby persons into attacking you.

  14. A Fire Godlike named Sidi Exa is here, whose soul can be read by your Watcher abilities.

  15. Vanessa Smedley and Lars Nilsson here can also have their souls read by your Watcher abilities.

  16. Aerthus is here, and can have his soul read by your Watcher abilities.

  17. There will be a hidden stash here that can only be discovered while in scouting mode. It will have a random scroll, a few random gems, and some coins.

  18. There will be a couple of Looters here, who are easy to take down. Looters in this area leave behind Clothing when killed. Looters who fight up close typically leave behind Fine Wands, Clubs, and Troll Skins, while Looters who rely on missile fire from a distance typically leave behind Hunting Bows or Crossbows.

  19. You'll find a Blood Moss here.

  20. Hanwen
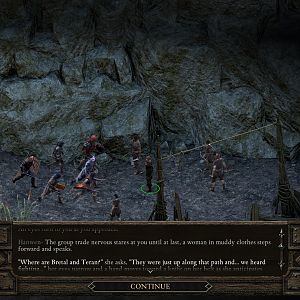
Here is a large group of Looters led by Hanwen. Dealing with her, one way or another, is necessary for the sake of completing the Ferry Flotsam task. If you do decide to wipe them out, the rank and file Looters will leave behind their usual items, while Hanwen herself will leave behind a Spear, Dyrwoodan Clothing, and the Hermit's Hat.

  21. You'll find a River Reed here.

  22. A crate here has the Ferry Cargo, which is what Peregund wants. Trying to take it while Hanwen and the Looters are still alive will result in them attacking you, unless you can make a combined Stealth and Mechanics check.

  23. Here is where you can now access the World Map so as to reach Black Meadow.

  24. Here is where you can now access the World Map so as to reach Anslog's Compass.


Amazon.com
Amazon.ca
Amazon.co.uk
Sorcerer's Place is a project run entirely by fans and for fans. Maintaining Sorcerer's Place and a stable environment for all our hosted sites requires a substantial amount of our time and funds on a regular basis, so please consider supporting us to keep the site up & running smoothly. Thank you!

Disable all ads!