Baldur's Gate 2 Online Walkthrough by Montresor


CREATING A CHARACTER  |  GENERAL TIPS AND TRICKS  |  NPCs  |  ITEM LISTS  |   SHOPS   
Throne of Bhaal: Chapter 8  |  Chapter 9  |  Chapter 10
Shadows of Amn  |  Watcher's Keep  
About the Walkthrough  |  Organization of the Walkthrough  |  About the Maps  |  About the Author  |  Where to Begin
Disable all ads!

Overview of Chapter 8  |  Quests in Chapter 8 
Areas in Chapter 8
Grove of the Ancients  |  The Hellish Pocket Plane  |  Saradush  |  The North Forest  |  The Forest of Mir  |  The Marching Mountains  |  Yaga-Shura's Stronghold, Level 1  |  Yaga-Shura's Stronghold, Level 2  |  The Siege Camp  |  The Oasis  

Saradush
The Tankard Tree  |  The Militia Headquarters  |  Kiser Jhaeri's Home  |  The Temple of Waukeen  |  The Barracks  |  The Arcana Archives  |  The Prison, Level 1  |  The Prison, Level 2  |  The Sewers  |  Gromnir's Castle, Level 1  |  Gromnir's Castle, Level 2  

SARADUSH SEWERS

These sewers under Saradush are one of the ways you can enter Gromnir Il-Khan's castle in your quest to Speak to Gromnir. Of course the area is crawling with enemies, both living and undead.

You will meet an assortion of enemies here. They drop:
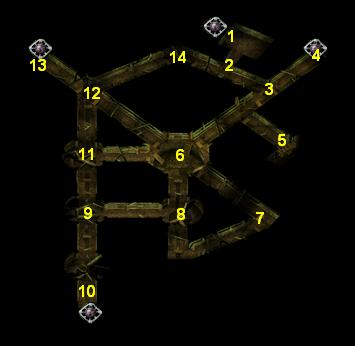
  1. Here is the entrance to Level 2 of the Saradush Prison. This is the way you need to go to find Gromnir.

  2. Here is a locked and hidden door.

  3. Here are several Shadow Fiends and Devil Shades. When killed, the Devil Shades split into two Shadow Fiends, so try to take on a few at a time, or eliminate them all with a well-placed Sunray or two. Otherwise you could easily find yourself overwhelmed.

  4. Here is one of the exits to Saradush where you will find yourself at 1.

  5. Here you will have to fight a Yaga-Shura Mage, an Elite Orog, and a Duergar Sapper. The mage should take priority, or he will cast Abi-Dalzim's Horrid Wilting.

  6. Here will be an assortment of Yaga-Shura soldiers along with Shadow Fiends digging a breach under Saradush. Of course they are not too pleased to spot you, so battle ensues.

    After they are dead, you will be attacked by two or three waves of Shadows and Shadow Fiends, so try to get your weaker characters down into the center where you can protect them.

    Besides the usual loot (please see the top of this page), you should also find a couple of Short Swords +2.

  7. Here is an Umber Hulk.

  8. Here you will meet an Umber Hulk, a Duergar Sapper, and an Orc Archer.

  9. Here is another Elite Orog, Orc Archer, and Duergar Sapper.

  10. Here is another exit to Saradush; this one takes you to 10 on that map.

  11. Here is another Yaga-Shura Mage capable of casting 9th level spells. With him is an Orc Archer, an Elite Orog, and a Duergar Sapper. The Mage should take priority.

  12. Here you will meet an Umber Hulk, a Duergar Sapper, and an Orc Archer.

  13. Here is another exit to Saradush, leading out to 12 on that map.

  14. Here is another party of an Umber Hulk, a Duergar Sapper, and an Orc Archer.


Amazon.com
Amazon.ca
Amazon.co.uk
Sorcerer's Place is a project run entirely by fans and for fans. Maintaining Sorcerer's Place and a stable environment for all our hosted sites requires a substantial amount of our time and funds on a regular basis, so please consider supporting us to keep the site up & running smoothly. Thank you!

Disable all ads!