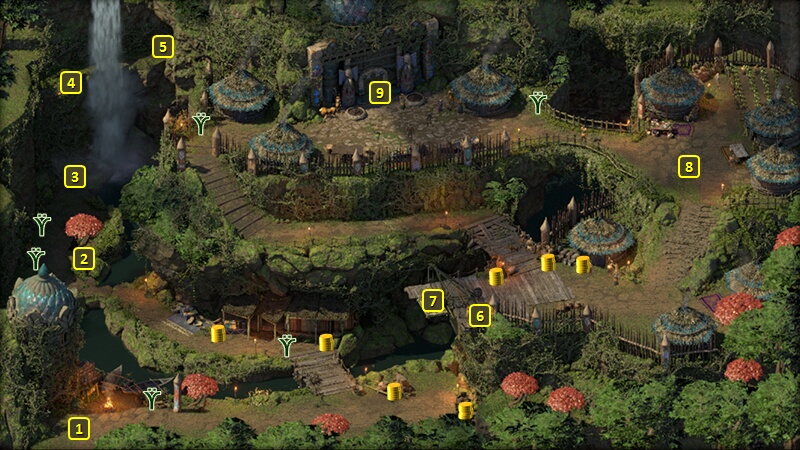
The cliff here can lead to #4. A Survival check of 3 will alert you to
a wasp nest that needs to be avoided. Trying to climb without the check
results in the Fatigued (-5 Accuracy, -10 all Defenses, -15% Maximum
Health) Injury for all party members.
Next, you'll need to send someone to scout ahead for the best path. The
party member you select needs to make a combined Athletics check of 5
and Survival check of 4.
Making both checks brings the party to #4. Making the first check but
not the second results in the party reaching #4 but with the Fatigued
Injury. Failing both checks means remaining at the bottom and with the
Fatigued Injury.
Here is Kipeha. She acts as the gatekeeper for whether you can enter
the village as a welcome visitor, and can grant permission to use the
lift at #7 to enter the village.
You can convince her to let you use the lift and enter the village by:
Paying 1,500cp as an entry fee, after the intial offer of 1,000cp
gets refused.
Making either a Diplomacy or Insight check of 8. Any subsequent
checks won't matter.
Making a Bluff check of 9.
If you started the Fruitful
Alliance Quest, mention that you come on behalf of Queen
Onekaza and follow up with the words "Over crumbling mountains,
across blighted seas". If you mention the Queen, but don't use the
passphrase, Kipeha will fire an arrow at you and turn the village
hostile. An Athletics check of 7 dodges the arrow.
If you started the Tip
of the Spear Quest, mention that the Crookspur Slavers seek
revenge. Any subsequent checks won't matter.
This lift can be used to enter the village proper. You'll need
Kipeha's permission to enter the village if you hope to use the lift
without turning the entire village hostile against you.
If you want to use the lift to enter the village without Kipeha's
permission and turn the whole village hostile, click on it to begin the
scripted interaction. Start by using a Rope
and Grappling Hook and an Athletics check of 4.
The Huana locals will fire arrows at you. An Athletics check of 4 or a
Sleight of Hand check of 4 will allow you to avoid the arrows while
making the climb. You begin your battle with the villagers once you get
to the top.
Kipeha will be here afterwards if she allowed you entry into the
village, at least during the daytime. She now sells several items, most
of them being crafting ingredients. The one distinctive item that she
does sell is a Ring called Kuara's
Prize.
The entrance to the Ori O Koiki
Sanctum will be here. A couple of locals, Aparo and Auta, will
have an argument about how welcome you are in the village (if you came
as a welcome visitor). Aparo is also willing to answer questions to
provide background information.
Sorcerer's
Place is a project run entirely by fans and for fans. Maintaining
Sorcerer's Place and a stable environment for all our hosted sites requires a substantial amount of our time and funds on a regular basis, so please consider supporting us to keep the site up & running smoothly. Thank you!
Supporting Sorcerer's Place
Has Sorcerer's Place been useful? If you'd like to show your appreciation
for our hard work on the site, and help us pay the bills the site generates
every month, please consider helping support SP.
Thank you!