Neverwinter Nights 2 logo

Obsidian Entertainment


Neverwinter Nights 2 Online Walkthrough by David Milward


INTRODUCTION  |  CHARACTER BUILD  |  EQUIPPING PARTY & MORE  |  NPCs  |  ITEMS   
PROLOGUE  |  ACT I  |  ACT II  |  ACT III  |||  MotB  |  SoZ
About the Walkthrough  |  About the Maps  |  About the Author  |  Where to Begin
Disable all ads!

Act I:   West Harbor  |  Swamp Ruins  |  Weeping Willow Inn  |  Fort Locke  |  Toll Road  |  Graveyard  |  Bandit Camp  |  Maiden's Glade  |  Highcliff  |  Docks District  |  Skymirror  |  Merchant Quarter  |  Back Alley  |  Warehouse  |  Old Owl Well  |  Ironfist Hold  |  Bonegnasher Clan  |  Eyegouger Clan  |  Neverwinter Continued  |  Githyanki

West Harbor: Farlong Upstairs  |  Farlong Downstairs  |  West Harbor  |  Tarmas House  |  Starling House  |  West Harbor After Battle

West Harbor Under Attack
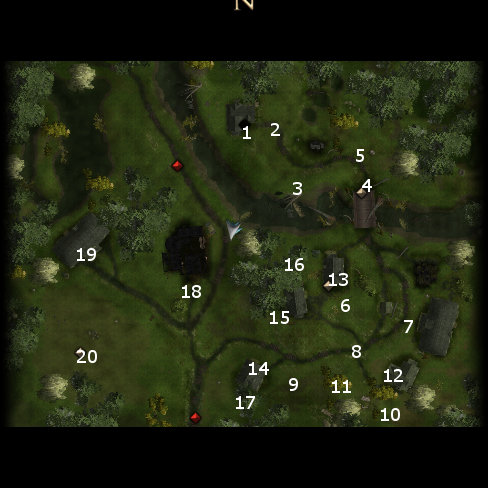
West Harbor map

  1. Entrance to Farlong Upstairs.

  2. Brother Merring fills you in on the situation and implores you to touch base with Georg, who will be at the bridge.

  3. Here you’ll fight 3 more Gray Dwarves, 2 of whom can cast minor spells.

  4. Bridge BattleHere is where you’ll help Georg and a couple of Militiamen fight off a rather large wave of Gray Dwarves. Once the battle is over, Georg sets you to the task of gathering as many scattered Militiamen as possible and then meeting up in the field at #20 afterwards. You have to recruit at least 5 of them to progress the story, although you can find more than that.

  5. Here’s your first Militiaman to recruit, Ward Mossfeld. He’s badly hurt though. Go back and talk to Brother Merring at #2, who will give you some Swamp Moss that serves as a healing herb. Talk to Ward again, and select the dialogue option that involves applying the Swamp Moss to his wounds. Doing this will shift your alignment 3 points towards good. He’ll then meet you in the field. Killing him will shift your alignment towards evil.

  6. Here you'll find Lazlo Buckman defending himself against Gray Dwarves, at least a couple of whom can cast minor spells. Help him out and he’ll rendezvous at the field.

  7. Here you’ll find Ian Harman cowering from the assault. A high enough Diplomacy or Intimidate skill can convince him to join up at the field. You can also reduce his hitpoints to 0 in combat with the idea of beating him into submission.

  8. TarmasHere you’ll get treated to a cinematic where Tarmas confronts a Githyanki Mage. Amie insists on joining the fray and pays with her life. The Githyanki Mage summons three Giant Spiders before teleporting away. Tarmas hints that some helpful items may be found in his house located at #13.

  9. Here you’ll find Lewy Jon and his hog now lying dead. If you’re interested, you can loot his body for an Ale.

  10. A Wagon where you can find a Spear.

  11. Here you’ll find Wyl Mossfeld, who presents the same option of healing with Swamp Moss, getting good points, and recruiting him or killing him and earning evil point.

  12. Here is where you’ll find Pierson who has locked himself inside his house and won’t come out. Pick the lock or bash this door down. Then speak to him to have him join the others. There are three containers here with random items, including a locked chest.

  13. Here is the entrance to Tarmas’ House.

  14. Here you’ll find Pitney Lannon. Give him some Swamp Moss, getting good points, and recruiting him.

  15. Here you’ll find Web Mossfeld, who presents the same option of healing with Swamp Moss, getting good points, and recruiting him or killing him and earning evil points.

  16. Here you’ll find a female Militiaman who needs help against Gray Dwarves and Bladelings. Once the fight is over, she’ll head to the field.

  17. Here is a wagon where you can pick up a couple torches.

  18. Here is where you’ll find a dying Gray Dwarf. Talking to him will reveal that your enemies are searching for something ‘silver’. Offer to heal him and he will refuse but you earn good points. Kill him and earn evil points. There is also a nearby barrel with random items.

  19. Here is the Starling farmhouse.

  20. Meeting In The FieldHere is where you’ll meet with Georg and the other Militiamen that you’ve recruited. You’ll now end up having to fight off two separate waves of Gray Dwarves and Bladelings.

    Once that is finished, you’ll notice some Gray Dwarves sneaking into the Starling farmhouse at #19. You’re presented with a choice between going in and rescuing the children, which will earn you good points, or staying with the Militia and waiting for the next wave.

    If you choose the former option, you’ll get taken straight into the Starling farmhouse. Once you’ve finished your work here, leave and the invasion sequence continues.

    If you choose the latter option, Bevil goes in on his own and apparently won’t hold a grudge over it. You’ll ride out another wave without him.

    After this there are two more waves. During the last and final wave, Daeghun shows up with a couple scouts to lend a helping hand.

  21. This is where more or less everybody gathers after the battles. Daeghun sets you to the task of retrieving a silver shard from the nearby Swamp Ruins.

    Tarmas is now available as a merchant, and he sells the following wares.

    Dagger +1
    Bullets +1
    Amulet of Will +1
    Bone Wand
    Ring of Fortitude +1
    Ring of Protection +1
    Wand of Frost
    Wand of Missiles
    Fife of Blasting

  22. Here is where the World Map Transitions are, enabling you to reach the nearby Swamp Ruins.


Amazon.com
Amazon.ca
Amazon.co.uk
Sorcerer's Place is a project run entirely by fans and for fans. Maintaining Sorcerer's Place and a stable environment for all our hosted sites requires a substantial amount of our time and funds on a regular basis, so please consider supporting us to keep the site up & running smoothly. Thank you!

Disable all ads!