Baldur's Gate 2 Online Walkthrough by Montresor


CREATING A CHARACTER  |  GENERAL TIPS AND TRICKS  |  NPCs  |  ITEM LISTS  |   SHOPS   
Shadows of Amn: Chapter 1  |  Chapter 2  |  Chapter 3  |  Chapter 4  |  Chapter 5  |  Chapter 6  |  Chapter 7  
Throne of Bhaal  |  Watcher's Keep  
About the Walkthrough  |  Organization of the Walkthrough  |  About the Maps  |  About the Author  |  Where to Begin
Disable all ads!

Overview of Chapter 4  |  Quests in Chapter 4 
Areas in Chapter 4
Brynnlaw  |  The Asylum  |  The City of Caverns

The Asylum
Outside Area  |  First Floor  |  Irenicus' Laboratory  |  Candlekeep - The Dream  |  The Dungeon, First Level  |  The Dungeon, Second Level  |  The Dungeon, Third Level  |  The Dungeon, the Tests  

ASYLUM DUNGEON, LEVEL 2

This is the second level of the Asylum Dungeon. Your primary goal here is to find the Kurtulmak's Crystal Shard and the Hand of Dace that will allow you to progress to Level 3 of the Dungeon. However, you may as well clear out the entire area for the items and the experience!
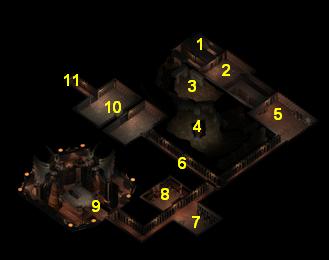
  1. Here is an entrance from Level 1 of the dungeon.

  2. In the left corner of this room (x=2040, y=520) is a secret door.

    In the middle of the room is a tome. Click on it to unleash progressively harder monsters:

    - The first monster is a Kobold Captain.

    - Next is a Sword Spider.

    - The third monster is an Umber Hulk. Watch out for its confusing gazes.

    - Fourth is a Mind Flayer. Watch out for Domination and Holding spells. Mind Flayers can be a real pain; if they manage to paralyze a party member, they will go directly for that NPC and try to suck out their brains.

    - The final monster is a Beholder. Their rays can also waste a party faster than you can blink. Suggested strategy if you don't have the Shield of Balduran (aka. the Shield of Cheese;-)) is to beef up one or two characters with Protection from Petrification, Protection from Fear, etc. and let them handle the Beholder while everybody else stays out of sight.

    Once all monsters have been killed, click the tome again to get a Ring of Free Action and Scrolls of Simulacrum and Summon Fiend.

  3. Here you will have to fight a few Kobolds and Mephits.

  4. Here you will run into a larger group of Kobolds and Mephits, possibly with a Yuan-Ti Mage thrown in for good measure. Once all enemies have been killed, three more Kobolds, including a Kobold Mage, teleport in and summon some extra monsters.

    When all enemies have been killed, Kurtulmak's Crystal Shard breaks off the crystal in the middle of the room and is automatically added to your inventory. Hang on to it; it is needed to open the passage to Level 3 of the Asylum Dungeon which is at 13 on Level 1.

    You can loot the Kobold bodies for some Arrows of Fire. One of them also drops a Wooden Stake, which you will need elsewhere on this level.

  5. In here you will have to fight a Wandering Horror.

    There are three vases with treasure in the room. The one at (x=2920, y=900) contains 200 GP, a Scroll of Spirit Armor, 40 Bullets +1, 80 Bullets, and minor treasure.

    The vase at (x=3000, y=1020) contains 80 Bullets +2, 40 Darts of Wounding, 80 Darts, and a Scroll of Simulacrum.

    The vase at (x=3110, y=1090) contains 80 Bolts, 40 Bolts of Lightning, a Scroll of Monster Summoning III, and minor treasure.

  6. Here is a Yuan-Ti war party.

  7. Here you will have to fight a few Mummies and Skeleton Warriors.

    Once done, loot the three vases. The one at (x=1960, y=2010) contains a Scroll of Resist Fear, 40 Bullets, 152 GP, and minor treasure.

    The vase at (x=2040, y=2070) contains an Emerald, 39 GP, a Cleric's Staff +3, 40 Darts of Wounding, and 80 Darts.

  8. This is the Library and it is a treasure trove:

    The bookshelf at (x=1440, y=1870) contains 40 Darts of Stunning, Scrolls of Power Word Stun and Finger of Death, a few books, and minor treasure.

    The table at (x=1530, y=1820) contains 231 GP, a Scroll of Ray of Enfeeblement, 40 Arrows of Piercing, 40 Arrows +2, and minor treasure.

    The bookshelf at (x=1720, y=1760) contains 40 Bolts +2, some minor treasure, and some books.

    The vase at (x=1780, y=1510) contains a Moonbar Gem, 40 Bullets +2, 80 Bullets, and minor treasure.

    The bookshelf at (x=1840, y=1830) contains 564 GP, 40 Arrows +1, 40 Arrows, 80 Bolts, and a book.

    Incidentally, if you kill Dace Sontan at 9 but don't Stake him in his coffin, he will meet you here and beg you to release him from undeath.

  9. Before entering this room, you may want to prepare for a Vampire battle. Here you will meet Dace Sontan, the former Coordinator of the Asylum and, as Bodhi warned you, now under her "Influence".

    Once you have killed Dace, he retires to his coffin. If you have a Wooden Stake in your inventory, click the coffin in the center of the room to Stake him and relieve him from undeath. If you don't have a Wooden Stake, you can loot one from the Kobold Captain at 4.

    You receive 8,500 XP for killing Dace Sontan and 9,000 XP for Staking him. Also, you gain the Hand of Dace which is needed to open the gate to Level 3 of the Asylum Dungeon at 13 on Level 1.

  10. When you enter this room, the doors slam shut and you are attacked by six Umber Hulks, three in each half of the room. The doors open again after a few rounds.

    Prepare in advance. My suggested strategy is to protect as many characters as possible with Chaotic Commands. Barbarians or Berserkers (like Korgan) can use their Enrage ability to avoid the Umber Hulks' confusing gazes. Then Haste the party and send in the protected fighters to take out one set of Umber Hulks before the doors open again; then clear out the rest.

  11. Here is the entrance from 2 on Level 1 of the Dungeon.


Amazon.com
Amazon.ca
Amazon.co.uk
Sorcerer's Place is a project run entirely by fans and for fans. Maintaining Sorcerer's Place and a stable environment for all our hosted sites requires a substantial amount of our time and funds on a regular basis, so please consider supporting us to keep the site up & running smoothly. Thank you!

Disable all ads!