Pillars of Eternity logo


Pillars of Eternity Online Walkthrough by David Milward


INTRODUCTION & ABOUT  |  WORLD MAP  |  WHITE MARCH MAP
General:  
Quests  |  Tasks  |  Bounties  |  Items  |  Characters
Areas:  
Act 1 Areas  |  Act 2 Areas  |  Act 3 Areas  |  Act 4 Areas  |  Caed Nua  |  White March - Part 1  |  White March - Part 2  | 
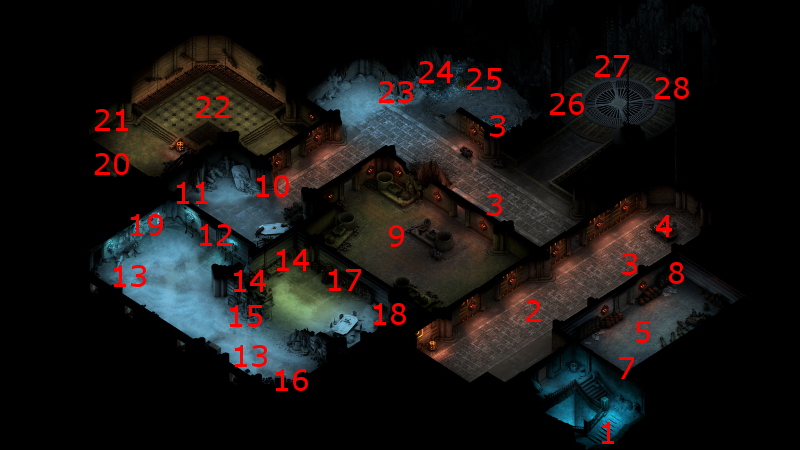
Disable all ads!

White March - Part II Areas:   Stalwart Village  |  Stalwart Mines  |  Luminescent Caves  |  Durgan's Battery  |  Durgan's Forge  |  Lower West Tower  |  Upper West Tower  |  Whitestone Hollow  |  Iron Flail Fort  |  Mowrghek Ien  |  Abbey of the Fallen Moon  |  Halls of Presence  |  Halls of Silence  |  Cayron's Scar  |  Ionni Brathr Fragment  | 

Lower West Tower

Lower West Tower

  1. These stairs lead back down to Durgan's Battery at #6.

  2. Here you'll have to fight a few Young Skuldraks, who shouldn't be much trouble.

  3. These places will have Skuldraks, Skuldrak Screechers, and Young Skuldraks. Skuldraks are basically somewhat more powerful versions of Skuldrs, with the same ability to stun party members. They leave behind Skuldr Ears when killed.

  4. This table has note titled Artillery Lift Notice, which may provide clues for the Ready the Cannons quest.

  5. There will be several Crystal Eaters and Moon Spiders in this room. The Moon Spiders can make projectile attacks that inflict cold damage, while the Crystal Eaters can poison their targets. They leave behind Spear Spider Legs and Spider Venom Sacs when killed. It may be advisable to lead them out of the door first instead of bursting in and getting yourselves attacked from all sides.

  6. This bookcase will have a Dwarven Tome.

  7. This corpse has the Cannon Forge Key.

  8. This bookcase will have a note titled On the Treatment and Preservation of Cannons, which may provide clues for the Ready the Cannons quest.

  9. There will be a few Forge Guardians in this room, along with a few Greater Flame Blights and several Magma Blights. The Forge Guardians will leave behind Primal Rocks when killed, while the Blights will leave behind Primal Flames when killed.

    There will also be a few Forge Guardians that were previously lying dead. One of them will have a couple of Durgan Iron Ingots.

  10. This pile will have a noted called Lever Request.

  11. This trapped chest will have the Dwarven Lever.

  12. This door can only be opened with the Cannon Forge Key.

  13. These places will have a few each of Young Skuldraks, Skuldraks, Skuldrak Screechers, Moon Spiders, and Crystal Eaters all together.

  14. These racks will each have a random weapon, usually of Fine quality, in them.

  15. This rack will have a few mundane and random helms in it.

  16. This trapped chest will have a stiletto named Vent Pick in it.

  17. There will be two bookcases here. One will have the Pargrun Rust-Dissolver. The other has Arden's Notes. Both have relevance to the Ready the Cannons quest.

  18. The chests in this corner will both have random potions in them.

  19. Clicking on this wall leads to a scripted interaction whereby you can both end up on the other side at #20 and safely dissipate the gas that is trapped in the room at #22. First, the character you select will need either a Might score of 14 or a Hammer and Chisel to break through the wall.

    You next go along the ledge and break through the other wall. The gas from the room at #22 will start to come out from the fissure. The character you selected needs to make a Constitution check of at least 16 to avoid sustaining an injury.

    After that, with or without an injury, you'll end up at #20.

  20. This is where the party arrives assuming they took advantage of the scripted interaction at #19.

  21. A pile here has the Patinated Cog.

  22. Diseased Puddings
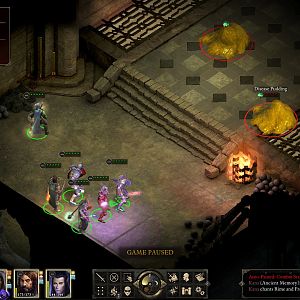
This room will have poison gas in it, along with a few Diseased Puddings. The poison gas will not be a worry if you used the scripted interaction at #19 to dissipate the gas. Otherwise, another idea is to simply lead the Diseased Puddings out of the room and then kill them. The Puddings leave behind Ooze Plasmas and minor random items when killed.

  23. This skeleton will have some random gems on it.

  24. This nest will have a random gem or two, plus some coins.

  25. A hidden nest here has a cloak called the Mantle of the Excavator.

  26. Here is one of three components that need to be restored in order to enable to access to the Upper West Tower. The chain here needs to be restored with the Pargrun Rust-Dissolver from #17.

  27. Here is one of three components that need to be restored in order to enable to access to the Upper West Tower. The lift mechanism here needs to be restored with the Patinated Cog from #21.

  28. Here is one of three components that need to be restored in order to enable to access to the Upper West Tower. The switch here needs to be restored with the Dwarven Lever from #11.

    Once all three components are restored, you can then hit the switch here to lift the party up to the Upper West Tower. Problem is, you will potentially face ambush from several Skuldraks. There are at least three ways to address the situation during a scripted interaction:

    • You can have your party stand in the middle of the platform. Your party will sustain injuries as a result, and you'll have to fight a large number of Skuldraks once you're at the top.

    • You can position your characters at the edges of the platform. The character with the lowest Athletics score will slip and cling for dear life at the edge of the platform. Rescuing your character requires expending a Rope and Grappling Hook, a Dexterity score of 22, the Barbarian's Wild Sprint ability, or the Monk's Flagellant's Path ability. If you do not take one of these actions, the party member will fall and die permanently, being forever lost to you as a joinable companion. Your main character, however things go, will sustain at least one injury. You will still have to fight some Skuldraks, just not as many.

    • A character with a Mechanics skill of at least 10 can repair the platform so as to avoid fighting any Skuldraks at all. The higher the Mechanics skill, the less turns it will take and the less injuries that will be sustained.

    Once this process is complete, the party will find itself in the Upper West Tower at #1. The platform, from this point onwards, will now serve as a transit point between both the Lower and Upper levels of the Tower.


Amazon.com
Amazon.ca
Amazon.co.uk
Sorcerer's Place is a project run entirely by fans and for fans. Maintaining Sorcerer's Place and a stable environment for all our hosted sites requires a substantial amount of our time and funds on a regular basis, so please consider supporting us to keep the site up & running smoothly. Thank you!

Disable all ads!