Pillars of Eternity logo


Pillars of Eternity Online Walkthrough by David Milward


INTRODUCTION & ABOUT  |  WORLD MAP  |  WHITE MARCH MAP
General:  
Quests  |  Tasks  |  Bounties  |  Items  |  Characters
Areas:  
Act 1 Areas  |  Act 2 Areas  |  Act 3 Areas  |  Act 4 Areas  |  Caed Nua  |  White March - Part 1  |  White March - Part 2  | 
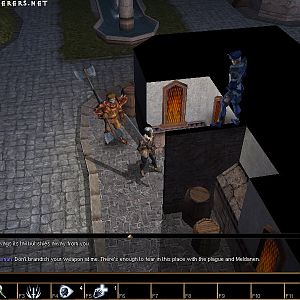
Disable all ads!

White March - Part II Areas:   Stalwart Village  |  Stalwart Mines  |  Luminescent Caves  |  Durgan's Battery  |  Durgan's Forge  |  Lower West Tower  |  Upper West Tower  |  Whitestone Hollow  |  Iron Flail Fort  |  Mowrghek Ien  |  Abbey of the Fallen Moon  |  Halls of Presence  |  Halls of Silence  |  Cayron's Scar  |  Ionni Brathr Fragment  | 

Mowrghek Ien

Mowrghek Ien

Spots with traps are marked by a 't'.

  1. Here is the initial point of arrival. It also provides access to the White March map.

  2. You will find Dyrcaps here.

  3. You will find Skeanbones here.

  4. You will find a Settler's Arrow here.

  5. You will find a River Reed here.

  6. You will find a Golden Celery here.

  7. The odd Wraith or two will attack you around here. They leave behind Spirit Residues when killed.

  8. You will find Admeth's Wyrts here.

  9. Bog BatsYou encounter a Bog Lurker here, along with a lot of Bog Bats that use acid spit attacks. The Lurker leaves behind an Awakened Root.

  10. You will get attacked by a Giant Dank Spore here, which can cause Confusion in its victims. It will leave behind a Sporeling when killed.

  11. You will find Burned Ladies here.

  12. There will be a couple of crates in this crumbled tower. One of them has random scrolls. The other has the Bog Batling, which you can have as your pet.

  13. You will get attacked by a large assortment of creatures here, including Bog Lurkers, Bog Batlings, Lesser Peatsucker Oozes, Moon Spiders, and led by a Menpwgra. The items they leave behind include Awakened Roots, Skuldr Ears, Ooze Plasmas, and an Awakened Wood.

  14. A corpse here will have the Hunter's Mail, along with a random weapon of Fine or Exceptional quality, a random scroll or two, and some coins.

  15. Peatsucker Oozes
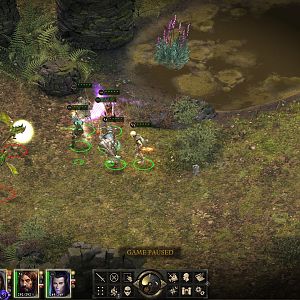
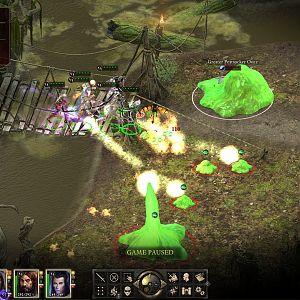
Here you will get attacked by Lesser Peatsucker Oozes led by a pair of Greater Peatsucker Oozes. Note that they are capable of causing paralysis with their projectile attacks. They leave behind Ooze Plasmas, and possibly random potions, when killed.

  16. You will find a Pilgrim's Crown here.

  17. Here is Herla, who provides the Bogged Down task.

  18. There will be more Bog Bats to kill here.

  19. Here you will find Benno, who's entrapped by magical sigils. Freeing him is the focus of the Bogged Down task.

  20. You will find a Blood Moss here.

  21. You'll occasionally find Bog Cult members around at these spots. Assassins will leave behind Lockpicks when killed. Acolytes will be Druids. Apprentices are Wizards and will leave behind an Exceptional Wand, an Exceptional Robe and an Apprentice's Tome when killed. Barbarians will leave behind Exceptional Pikes and Monk Outfits when killed.

  22. You will find Berath's Bells at these spots.

  23. There is a vine-covered wall here whereby you can descend into the sunken ruin below through a scripted interaction. Your choices are:

    • Climb down - Likely to result in injuries to characters with lower Athletics scores.
    • Use a rope to get down - Also presents a risk of injury upon getting down.
    • Hack some of the vines away - Allows the party to get down without any injuries if the progatonist can make a Might check of 17.
    • Jump - Allows the party to get down without any injuries if the protagonist can make an Athletics check of 8.

  24. A partially submerged corpse here will have a Morningstar called Acuan Giams. It has the Steal Spell power, which conceivably could allow non-spellcaster classes to use spells once the power has taken effect.

    Be that as it may, taking the weapon will result in you getting attacked by a pair of Ancient Wraiths and a more powerful version of a Cean Gwla called a Wailing Shade. All of them leave behind Spirit Residues when killed.

  25. You can squeeze through a hole in this wall to get through to the other side.

  26. You will find a couple of random potions in this crate.

  27. You will encounter a very large number of Bog Cultists here, including Barbarians, Assassins, Acolytes, Apprentices, and now several Bog Cult Summoners as well, who are Chanters. The Chanters will leave behind Exceptional Padded Armors and Exceptional Hatchets when killed. The Assassins here, unlike the ones you may have previously encountered, will leave behind Exceptional Brigandine Armors, Exceptional Stilettoes and Exceptional Small Shields when killed.

  28. A crate here will have a random scroll and random food items.

  29. A crate here will have a couple of random potions.

  30. You will find a Orlan's Cradle here.

  31. There will be another large group of Bog Cultists here, but with the difference that several of them will be Moon Godlikes. That alone makes this battle tougher than usual, since the Silver Tide power will likely trigger multiple times in their favour over the course of the battle. Spare no spells with the hope of overwhelming them as quickly as you can.

  32. A crate here has An Angry Letter, which provides a clue as to the Bogged Down task.

  33. There will be another large group of Bog Cultists here, led by Arcanist Badrwn. He leaves behind the Arcanist's Treatise when killed.

  34. A crate here will have a random scroll, Camping Supplies, as well as Badrwn's Notes, which indicates the solution to the Bogged Down task.

  35. You can travel through the vines here to get to the other side.

  36. Here you will encounter Llengrath and her two pet Bog Dragons, Gafonercos and Tunisulfus, who are the focus of The Phylactery's Promise quest.

  37. There will be a Tyn Hat here.

  38. These exits that provide access to the World Map.


Amazon.com
Amazon.ca
Amazon.co.uk
Sorcerer's Place is a project run entirely by fans and for fans. Maintaining Sorcerer's Place and a stable environment for all our hosted sites requires a substantial amount of our time and funds on a regular basis, so please consider supporting us to keep the site up & running smoothly. Thank you!

Disable all ads!