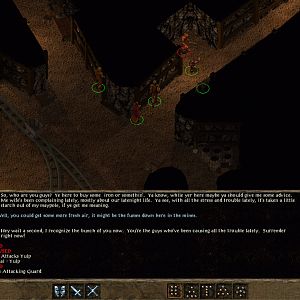
The Doemenel Doorman will be here. He won't let you go much further unless you cite a specific Doemenel contact or a specific order of business with House Doemenel that will justify you coming in. You could attack him and slaughter all the guards. The loot they leave behind typically includes Mail Armors, Mail Coifs, Swords and Arquebuses.
If you drop either Danna's name as a result of the the quest called At All Costs or Medreth's name as a result of the Cat and Mouse task, he will lead you to Abrecan Doemenel at #5.
If you mention that you have arrived to see Bricanta Doemenel, then he'll give you permission to go upstairs to the next level.
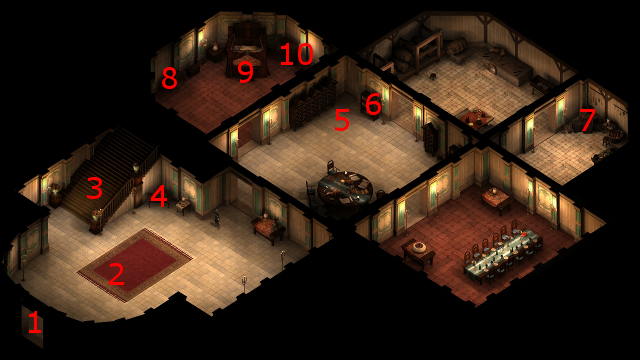
The stairs here lead to the second floor at #11.
The chest here will have a random gem or two.
Here you'll find Abrecan Doemenel. He is willing to give you the quest called A Two Story Job either if you completed the quest called At All Costs to Danna's satisfaction by helping her kill Verzano, or if you completed the Cat and Mouse task to Medreth's satisfaction in a way that leads to Nyfre's death.
Here is Bricanta Doemenel, who offers the Hard Feelings task. Performing that task may in turn faciliate completing the Supply and Demand quest, depending on which path you take.
Bricanta will open her shop to you if you complete her task for her. Unique items in the shop include:
She also sells a few weapons of Exceptional Quality, as well as alcholic drinks and drugs.
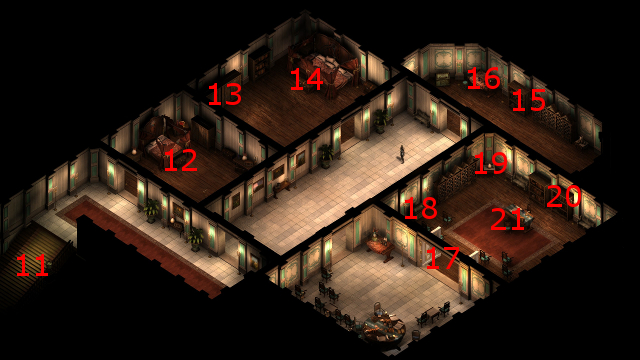
The Guards that stand on either side of this door will attack you if you get too close, unless you had previously completed the quest called A Two Story Job. In that case, they'll let you pass through.
The locked and trapped chest here will have a few high-tier gems plus some coins.
Sorcerer's
Place is a project run entirely by fans and for fans. Maintaining
Sorcerer's Place and a stable environment for all our hosted sites requires a substantial amount of our time and funds on a regular basis, so please consider supporting us to keep the site up & running smoothly. Thank you!
Supporting Sorcerer's Place
Has Sorcerer's Place been useful? If you'd like to show your appreciation
for our hard work on the site, and help us pay the bills the site generates
every month, please consider helping support SP.
Thank you!
"Ahhh, this reminds me of the turnip cellars...except Uncle Gerhardt isn't passed out by the turnip still in the corner..." -Jan Jansen, Baldur's Gate II