Pillars of Eternity logo


Pillars of Eternity Online Walkthrough by David Milward


INTRODUCTION & ABOUT  |  WORLD MAP  |  WHITE MARCH MAP
General:  
Quests  |  Tasks  |  Bounties  |  Items  |  Characters
Areas:  
Act 1 Areas  |  Act 2 Areas  |  Act 3 Areas  |  Act 4 Areas  |  Caed Nua  |  White March - Part 1  |  White March - Part 2  | 
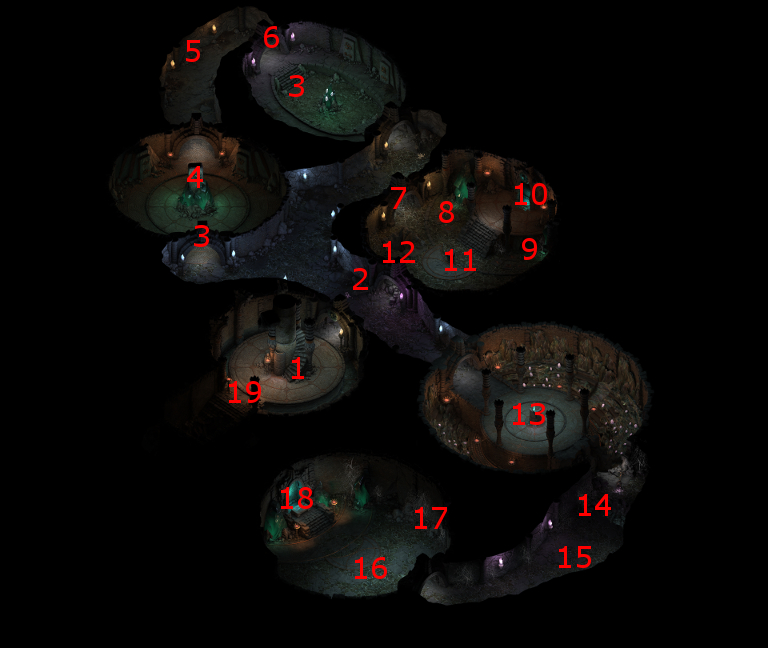
Disable all ads!

Act III Areas:   Stormwall Gorge  |  Lle a Rhemen  |  Elmshore  |  Hearthsong  |  Elm's Reach  |  Teir Evron  |  Blood Sands  |  Oldsong  |  Galawain's Maw  |  Noonfrost  |  Northweald  |  Temple of Hylea  |  Burial Isle

Lle a Rhemen

A frequent foe on the Upper Level will be Widowmakers and Widowmaker Spiderlings, as well as Crystal Eaters and Crystal Eater Spiderlings. All of them are capable of causing poisoning with their attacks. They leave behind Spider Venom Sacs when killed.

Lle A Rhemen, Upper Level

  1. This exit leads back out to the Stormwall Gorge at #6.

  2. The corpse here will have random gems.

  3. Cean Gwlas and Shades will attack you in these rooms. They leave behind Spirit Residues when killed.

  4. Here is a Stone Head will ask you which power you value most. The choice is potentially important, since it can affect which powers the Cladhaliath spear will have should you complete the ritual to obtain it. The dialogue choices and the corresponding power for the spear are as follows:

    • I bring people together. I'm at my best when working alongside my allies. (+4 Accuracy and x1.25 damage when attacking an enemy also targeted by an ally)
    • I am consistent and reliable. I can work through any obstacle with patience and dedication. (20% of Grazes converted to Hits)
    • I'm bravest when things are at their worst. I face life's rigors head-on and triumph. (+10 Accuracy and x1.2 damage when Endurance below 50%)
    • I let nothing get in the way of what needs to be done. I make the hard choices. (x1.2 damage vs. Flanked, Prone or Stunned enemies)

    Note also that there will four runes on the walls of the room. One of them will glow, and which depends on what answer you gave the Stone Head. Remember which one glows when it comes time to complete the ritual for the spear.

  5. A corpse here will have a random weapon and a random gem.

  6. Here is another Stone Head that will ask you which power you value most. The choice is potentially important, since it can affect which powers the Cladhaliath spear will have should you complete the ritual to obtain it. The dialogue choices and the corresponding power for the spear are as follows:

    • I desire resilience and the ability to draw strength from my struggles. (20% of damage restored as Endurance)
    • I aim to become a mightier version of who I am today. (+8 Accuracy and x1.3 damage)
    • I would inspire those around me and lend my strength to our common purpose. (+10 Accuracy for allies attacking the same target as the wielder)
    • I wish to subdue my foes with my power. (Critical Hits can Stun)

    Note also that there will four runes on the walls of the room. One of them will glow, and which depends on what answer you gave the Stone Head. Remember which one glows when it comes time to complete the ritual for the spear.

  7. You will get attacked by a lot of Widowmakers and Crystal Eaters when you first enter the room through this archway. A voice will sound in your head, screaming "Thief! Intruder!" following the battle.

  8. There are a series of runes here that mirror the ones at #4. If you want to enchant the Cladhaliath spear, then be sure to step on the rune that resembles the one you set glowing in #4.

  9. There are a series of runes here that mirror the ones at #6. If you want to enchant the Cladhaliath spear, then be sure to step on the rune that resembles the one you set glowing in #6.

  10. There will be another Stone Head here, with which you can complete the ritual to enchant the Cladhaliath. The prerequisites are that you need to have answers the questions posed by the Stone Heads at #4 and #6, you need to have set the proper runes alight at #8 and #9, you need the Soul Vessel from #16, and you need the Cladhaliath spear itself from the sarcophagus at #18.

    Once you have met all the prerequisites, the Stone Head will ask if you're prepared to sacrifice a piece of your soul to empower the spear. You can answer yes, since there isn't any negative in-game consequence for your character for doing so.

    After that, you can complete the enchantment of Cladhaliath at the urn at #11.

  11. Here is the urn that you can use to complete the enchantment of the Cladhaliath spear. Clicking on it after completing the ritual at #10 will open a crafting menu similar to the one you usually get when you select the enchant option for an item. The enchantment option that will be available to you is titled "Engwithan Soul Spear", and the specifics of that enchantment will depend on the answers you gave to the Stone Heads at #4 and #6.

  12. There is a tunnel entrance here. There are three ways to get through to the other side:

    • Expend a Hammer & Chisel to hack through to the other side.
    • Have a character make a Might check of 16 to force your way through to the other side.
    • Simply crawl through.

    The first two options cause spiders to attack you and leave you here if you win. Only then can you get through to #14. The third option lets you get through to #14 without getting interrupted.

  13. You will get attacked by several Spectres here, which will explode for radius damage upon dying. They leave behind Spirit Residues when killed.

  14. Here is your destination after going through the tunnel that starts at #12. You can always go back the way you came.

  15. There is a trap here. You may want to retreat a little once you reach #14, since nearby spiders are very likely to rush you and trip this trap.

  16. Nidrek
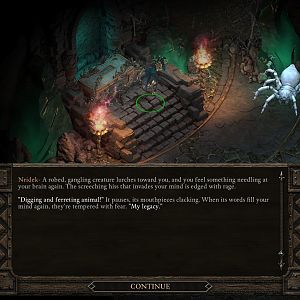
Here you will find the Vithrack named Nridek, along with a LOT of Widowmakers and Crystal Eaters. He wants to leave to start a new colony, and there is a Benevolent dialogue option that will let him go free. However, if it's important to you to obtain the Cladhaliath spear, keep in mind that he will also take with him the Soul Vessel that you will need for the ritual at #10.

    If you do want the Cladhaliath spear, then choose the Aggressive option and attack him. This fight can be dangerous, since his Cipher powers can render multiple party members vulnerable to the attacks of the horde of spiders. A Litany against Major Afflictions spell can be really helpful if you have it. If you win, the spiders leave behind the usual Spider Venom Sacs. Nridek himself will leave behind a Vithrack Brain and the Soul Vessel.

  17. Here is a hidden niche that can only be discovered while in scouting mode. It will have an item from the "Lle a Rhemen - Upper Boss Room Hidden" section of the random drop list.

  18. This sarcophagus has the Cladhaliath spear.

    If you have accepted the Bronze Beneath the Lake quest, then it will also have the Ancient Engwithan Weapons.

  19. You can use a Rope & Grappling Hook at this point during Act 3 to create a way down to the Lower Level at #25, and vice versa.

  20. Lle A Rhemen, Lower Level

  21. This exit leads back out to the Stormwall Gorge at #22.

  22. Several Sporelings and a few Swamp Lurkers will attack you here. The Sporelings leave behind Sporelings when killed, while the Lurkers leave behind Awakened Roots.

  23. You will find Orlan's Cradles at these spots.

  24. The central room will have a pair of Menpwgras attack you, along with their numerous Sporeling minions. The Menpwgras leave behind Awakened Adras when killed.

  25. This trapped sarcophagus will have an item from the "Lle a Rhemen - Lower Coffin" section of the random drop list.

  26. This point provides a way back to the Upper Level at #19 if you have used a Rope & Grappling Hook there.

  27. This hidden button can be discovered while in scouting mode. It will open the secret door at #27.

  28. This secret door can only be opened by pressing the hidden button at #26.

  29. This urn will have an item from the "Lle a Rhemen - Lower Hidden Room" section of the random drop list.

  30. This vase will have a random gem in it.

  31. Here is where you'll encounter the enormous Troll named Glasdial and his minions while pursuing the bounty on him.


Amazon.com
Amazon.ca
Amazon.co.uk
Sorcerer's Place is a project run entirely by fans and for fans. Maintaining Sorcerer's Place and a stable environment for all our hosted sites requires a substantial amount of our time and funds on a regular basis, so please consider supporting us to keep the site up & running smoothly. Thank you!

Disable all ads!