-

- Forums
- Chatrooms
- Gallery
- Gameplay Videos
- Upload
- Articles
- Mod Reviews
- Shop SP: Games, Movies, Books
|
|
Temple of the World Serpent
To the Temple of the World Serpent
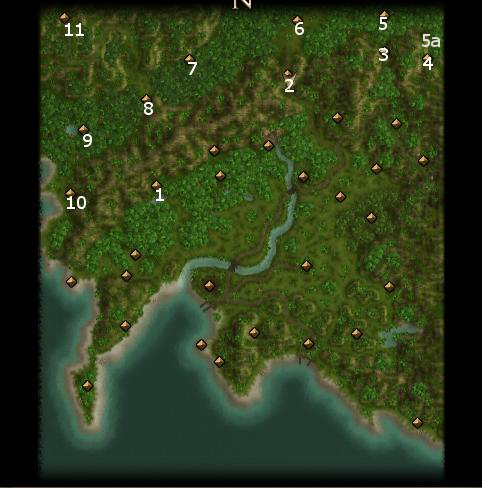
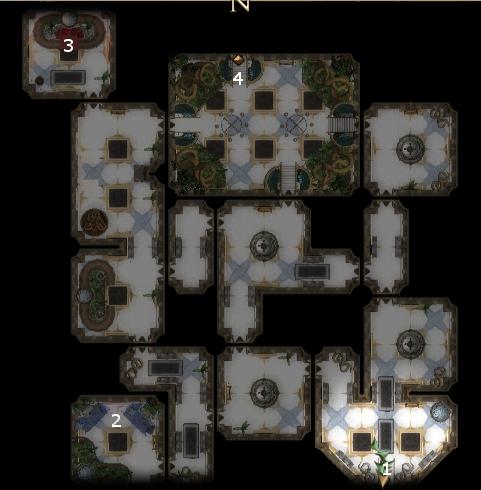
The entrance to the Temple of the World Serpent is at #11 on the Overland Map. Reaching it involves taking a winding path up the mountain that starts north of the Barrow at #8, as shown in the video.
Entry Hall
I start off at #1 on the Entry Hall map. I buff up to the absolute max, Barkskins, Superior Resistances, Spell Resistances, Mass Death Ward, Flame Weapon for the warriors, attribute boosters and other buffs (e.g. Greater Magic Fang, Jagged Tooth) for Yushai.
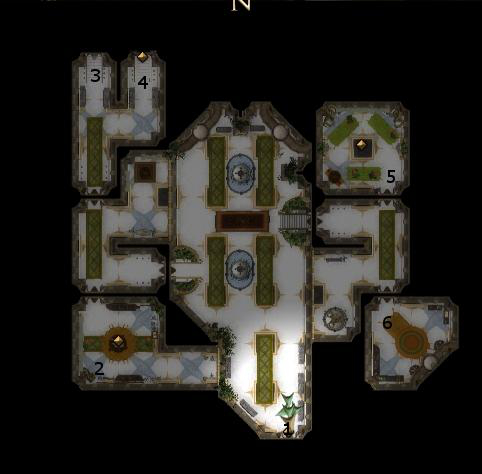
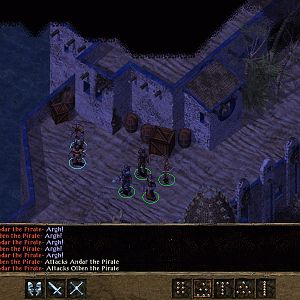
Just a little ahead is Preacher Madeem. Now I have an interesting choice. I could try to complete the quest called "Infiltrating the Temple of the World Serpent". What that means is having to make my way all the way to the last level of the Temple, called the Throne of the World Serpent, without having killed any of the Yuan-ti on the first three levels. This can sometimes involve making conversational skill checks, avoiding the wrong Yuan-ti in certain places, disarming traps, etc. If you can pull it off, you'll get 5,000xp, but you'll likely miss out on some loot. To get it started, you would need to make a Bluff, Diplomacy or Intimidate check with Preacher Madeem.
I went with the other choice, and began the slaughter. Pretty much every Yuan-ti and Pureblood on this level will converge towards me. That convergence will be gradual, so the battle can become an easy killing off one trickle after the other assuming that I can kill the ones in front of me fast enough, like I do here. At one point Serpentlord Hal'seh joins in, but he's easily cut down too. He leaves behind Tsaa Olo's Disaster (Adamantine Scimitar +2, +2d6 damage vs. humans, Poison DC=18 1d2 Dexterity).
Keep in mind it's possible to get the best of both worlds. You could complete the infiltration quest for the 5,000xp, and then slaughter everything and get all the loot too afterwards.
Had I not proceeded straight towards slaughter, Serpentlord Hal'seh would have been at #5 on the Entry Hall map. If you want to complete the infiltration quest and happened to bump into him at #5, a Bluff check would have sufficed to maintain your cover.
At #6 would have been a Snaketongue merchant had I not killed everyone. He sells mostly +3 weapons, plus a few odds or ends like an Amulet of Health +6, a Ring of Protection +3, Bracers of Armor +6, an Amulet of Health +4, or a Ring of Major Acid Resistance. I don't need any of it though.
At #2 is a Scrying Orb. Viewing its images reveals events leading up to the spellplague and the D&D 4th edition of the Forgotten Realms universe, Mystra dying after taking a fatal blow from Cyric, and Zehir overcoming the Mulhorandi deity, Horus-Re.
I continue northwards through a locked door. Further north, another locked and trapped door leads to the stairs to the Armory at #3. Items that can be found in the Armory include:
The stairs to the Main Hall is at #4. I use one of the Stones of Alarm that I had bought from Akila earlier, allowing me to rest up.
Main Hall
I didn't show it in the video, but I buffed up to the max before going up the stairs.
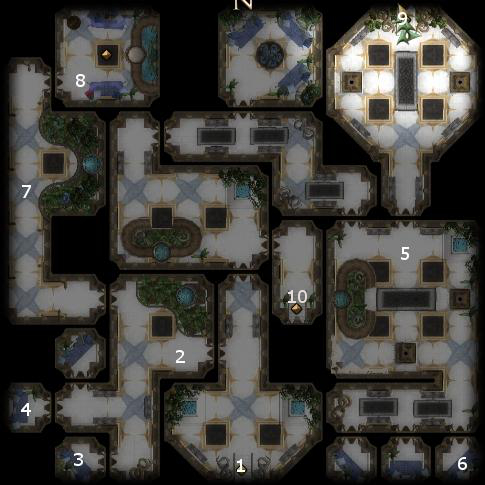
I start off at #1 on the Main Level map. Combat begins pretty much right away. Enemies also come in at a steady trickle, so the battles pretty much play out like they did in the Entry Hall. At some point Serpent Ar'sulis shows up, and I cut him down as well. He leaves behind a Venomdrinker (Scimitar +1, +1d4 negative energy damage, Poison DC=18 1d2 Strength, +1 saving throws vs. poison). An Iron Golem also shows up as well, but I kill it too.
At #2 is an Elf named Nessa, who drops vague hits about clues to reaching the next level being nearby.
A chest at #3 holds a Ring of Protection +3. A chest at #4 holds a Kukri +3.
The hallway starting at #7 holds a LOT of magic dart traps. The hallway itself leads to the Shadowdancer Chambers at #8. Inside the chambers is a trapped and locked chest that holds the Se'Sehen Almanac. The Almanac provides clues needed to reach the Holy Sanctum without any battles if you're wanting to complete the infiltration quest.
At #10 are the stairs to the Library. I kill off the Snaketongue Archivist once I go down the stairs. A bookcase at the end of the library has scrolls of:
At #5 would have been Serpentlord Ar'sulis had I been trying to complete the infiltration quest. A chest at #6 has a Wand of Cure Critical Wounds, an Amulet of Will +3, and a Ring of Major Cold Resistance.
At #9 is the stairs leading up to the Holy Sanctum. I can open the door easily enough after having slaughtered everyone. However, if you're doing the infiltration quest, then opening the door requires you need to answer random questions. The answers are provided by the Se'Sehen Almanac at #8. The first question will come from this series of pairings of clues (on the left side of the dash) and answers (on the right side of the dash):
Holy Sanctum
I go up the stairs to the next level, where I start off at #1 on the Holy Sanctum map.
There will be traps throughout the level, but they're alarms that won't actually harm party members. Yuan-ti Abominations and Yuan-ti Holy Guardians also patrol the level. If you want to complete the infiltration quest, a good idea is to cast Greater Invisibility on your thief, have your thief sneak around and disarm the traps, hit the lever at #3, and go up the door at #4. He'll bring the rest of the party up with him when he does that. Be that as it may, I was content to go around disarming the traps and slaughtering the Yuan-ti as I went along.
Lords is a Cleric and is likely to lead off with a Storm of Vengeance spell. Hence the casting of Spell Resistance on everyone. I'm easily able to run up to them and cut them down.
At #3 is the Serpentlord Ul'Shan, whom I easily kill. Also in the room is a lever which opens the door to the next and final level. A Thief can unlock that door as well.
That door is at #4. I use one of my Stones of Alarm to rest up.
Throne of the World Serpent
I buff up to the absolute max, and then go up the stairs. I start off at #1 on the map of the Throne of the World Serpent.
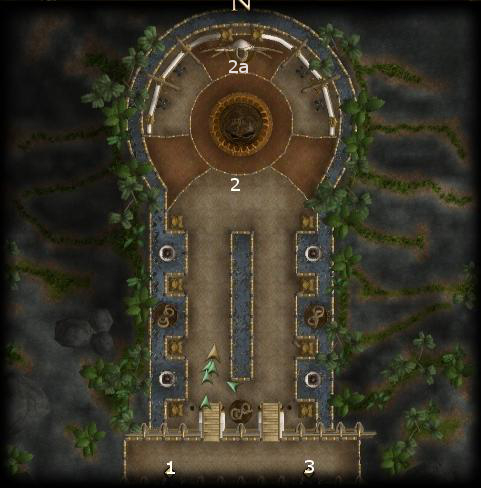
At #2 will be an enormous congregation of Yuan-ti, led by Heirophant N'Safa. There will also be an enormous Yuan-ti called the Herald of Zehir, packing a huge sword and wearing an Aztec-type head dress. They attack almost immediately after.
A potential worry in this battle is that Heirophant N'Safa is a powerful cleric, and will try to hit the party with spells like Word of Faith and Storm of Vengeance. Good thing I cast Spell Resistance on everybody beforehand, right?
The other huge worry is the Herald. He's very resistant to pretty much every type of damage, and inflicts both incredible damage and poisoning to boot which each blow of his wicked looking sword. His weak point is that he does not have immunity to level draining. The solution becomes obvious. Janette hits him over and over again with Energy Drain spells until he goes down.
The battle is soon won with the rest of the party doing their thing, including Umoja hitting almost every enemy with a Storm of Vengeance and Finch keeping everybody on the up and up with a Hymn of Requiem.
The Herald leaves behind the Fang of Zehir (Adamantine Falchion +4, +2d6 divine damage, keen, Blood of Zehir poison on each hit). It's actually an upgrade for Logan, so he equips it. Not that there's any time left in the game. I guess more for show than anything else.
Epilogue
At #3 is the door that gives three options. One is to exit to the Overland Map. Another is to retire the adventurers immediately. Another is to go straight back to Sa'Sani immediately in the Viper Temple. I chose the latter, because I then have more options in terms of how I want to set the epilogue.
Once I get back to Sa'Sani, I now have three choices. I can kill her, let her run her company but accept gold from her, or let her run her company but with the promise not to harm anyone in the process. One of these three choices will affect the epilogue.
The specifics of the epilogue depend on what you did at several points during your adventures.
If you did enough side quests in Samarach, particularly the one in Nimbre, then I made a good impression on the locals and Samarach becomes relatively more welcoming towards foreigners. Otherwise, Samarach remains insular and unfriendly towards foreigners, along with rumors that Yuan-ti have infiltrated high-ranking Samarachan positions.
If you killed the Prioress of the Depths, then the storms will have waited but along with an ominous portend that Umberlee will want revenge.
If you let the Luskans remain in control of Port Llast, or killed Nya yourself, the epilogue will indicate that Nya will have either died or fallen into madness.
If you free Port Llast and allowed Nya to live, then she becomes famous across the Sword Coast as a merchant in magical wares.
If you raised an army of the dead against the Luskans, then it will become a heroic tale sung in taverns everywhere but Luskan.
If you rose to the highest ranks in your sponsoring merchant cartel by donating enough trade bars to them, then you will get an epilogue snippet that is specific to the cartel that sponsored you. Otherwise, none of this will show up in the epilogue.
If you let the Black Dragons remain in control of West Harbor, then the villagers will at some point flee altogether. The Black Dragons and Harbormen alike abandon the village, and it ends up overrun by the Mere.
If you freed West Harbor, ended Sheydann Zinn's Cult with Jan Buckman still alive afterwards, then he and several others become the leaders of West Harbor, which becomes a prosperous trade center.
If you let the Black Dragons take over West Harbor but kill them afterwards, or if you end Sheydann Zinn's Cult but Jan Buckman dies during the struggle, then Goodwife Aruna takes over West Harbor as the mayor.
Each of the companions that joined you at some point or another will get their own epilogues. As long as they joined at some point, and are on the roster of joinable cohorts that appear when you click on the registry book, then they will get their own epilogues.
The only cohort epilogue that can turn out different is Septimund's. If Nya died or turned to madness after the Luskans stayed in control, then he carries on a lonely and tireless crusade on behalf of Kelemvor to rid the world of undead. If Nya lives and Port Llast is freed, then they carry on a long-distance relationship of sorts.
If you had killed Sa'Sani, then the Yuan-ti lose any sense of subtlety and begin several violent confrontations across the Sword Coast. If you had accepted gold from Sa'Sani, then she continues to run the Merchant Company, just as ruthless as ever. If you made Sa'Sani promise not to harm anyone, then she runs her business company more benevolently, even to the point of abandoning her identity with the Sauringar Clan.
How successful you were as a merchant also affects the specifics of Sa'Sani's epilogues, affecting the degree of success to which Neverwinter can regain power and prosperity.
Lastly, if you have a character who can make a Lore or Bluff or Intimidate check, you can start the epilogue all over again, but this time you can pick and choose different possibilities to tailor the epilogue. Even if they weren't what you actually did during your adventures.
*** THE END ***