-

- Forums
- Chatrooms
- Gallery
- Gameplay Videos
- Upload
- Articles
- Mod Reviews
- Shop SP: Games, Movies, Books
|
|
Hotenow Cave
Clan Whitestone Mine
Now I begin exploring Samarach on the other side of the Viper Temple. At #6 is an Abandoned Camp, which cannot be entered and apparently serves no real purpose.
At #5 is a Destroyed Temple, from which you can procure several Potions of Cure Critical Wounds, a Restoration scroll, and a Raise Dead scroll.
At #5a is a Yuan-ti ruin. A successful Lore check reveals an allusion to Hrr'Sha and his lover, Irinya.
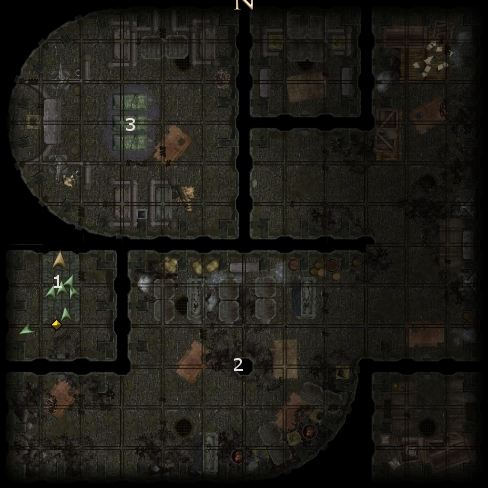
At #4 is the entrance to a mine. Inside the mine are a few Dwarven Miners, a few Elder Earth Elementals, and the Miner Foreman. The Miner Foreman is armed with a Master Breastplate +3, and a Flail +3
Also in the mine is a locked chest. The chest itself contains three Rubies, three Emeralds, two Diamonds, a Beljuril, a Blue Diamond, and a Star Sapphire. Trying to open the chest will result in all of the Miners, the Foreman, and the Elementals attacking you. I chose to leave them in peace. But it may be worth your while if you decide you need the treasure, especially the gemstones for crafting purposes.
Fixing a Hole
A prerequisite to this quest is that I need to have fully completed the A Knot in the Weave quest beforehand. The other prerequisite is speaking again to Akila in the Thayan Enclave after having uncovered Il'foss and Kizu. Akila now indicates to me that there is a tear in the weave. One point in the tear is in the Sword Coast, but at a location that he can't pinpoint. The other location is in the Jungle of Chult, at a temple that he can indicate on my Overland Map. It is in fact at #3 on the second Samarach Overland Map.
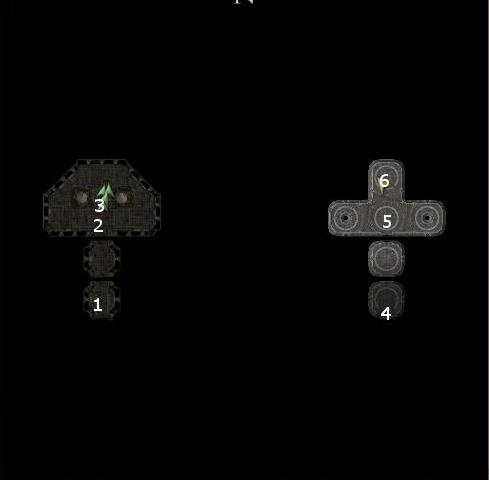
I start off at #1 on the Chambers of Shade map. A Champion of Shade from #2 immediately attacks the party. For the time being, the Champion is invincible and can never be reduced to 0 hit points no matter how much damage is inflicted on it. However, notice a purple ray exuding from the portal at #3. The solution is simple. I send Janette through the portal at #3, which takes her to the portal at #4. A Netherese Arcanist is then immediately in view. Janette runs him down and kills him. Now the Champion of Shade can be killed as well. *Note* You may want to advance forward when you first enter the Chambers of Shade, since it's possible for the Champion of Shade to hem the party in if he advances to far forward himself.
I bring the good news back to Akila for 1,600xp. I return to the Chambers of Shade. You may have noticed well beforehand that certain portions at the northern edge of the Sword Coast were inaccessible. The exit at #6 on the Chambers of Shade map now allows access to that part of the Sword Coast.
On another note, sometimes it is a good idea to temporarily unsummon an animal companion. Earlier, I had trouble reaching the Champion of Shade because Yushai had reached him first and that meant the rest of the party couldn't reach the Champion since Yushai was blocking off the narrow hallway. An animal companion will always act on its own AI, and won't respond to commands that I give. I therefore unsummoned Yushai to clear the way for the rest of the party.
Likewise, party members have to go through the portal at #3 one at a time to reach the portal at #4 and ultimately the exit at #6. Yushai, however, can't be sent through. So it's a simple matter to unsummon him, and then summon him back after Umoja crosses over to #4.
Forgotten Crypt
Now take the exit to reach #40 on the Sword Coast Overland Map, as per below.
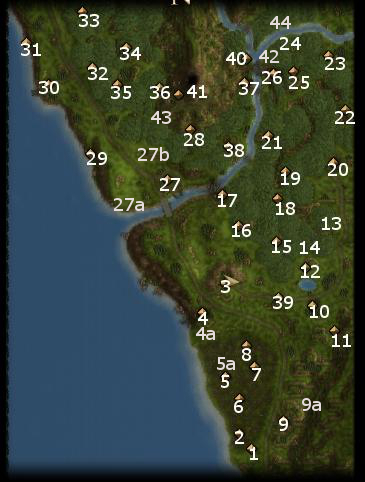
The entrance to the Forgotten Crypt is at #44 on the Sword Coast Overland Map.
I start off at #1 on the Forgotten Crypt map. As far as buffing goes, I am content to have Janette use a Mass Death Ward on everyone.
Ahead at #2 will be a lot of Greater Shadows. Physical attacks helped along by Beshadowed Blast / Eldritch Chains are sufficient to kill them off quickly. The sarcophagi in this room will mostly have gemstones. One of the sarcophagi will have Tempertuppin's Ever-Thrower (Sling +1, unlimited bullets +1d6 fire damage) and another will have a Ring of Greater Cold Resistance (+30 cold resistance). I have no use for either item.
At #3 will be a Death Knight and several Mummies. The same method works for them as well. A trapped coffin in the room has the Lawgiver (+1 Bastard Sword, +3 vs. chaotic), while another trapped coffin has the Staff of Valmaxian (Quarterstaff +3, +2 deflection bonus to armor class, Chain Lightning (11) / 5 charges, Ethereal Visage (9) / 5 charges, Fireball (5) / 3 charges, Sorcerers and Wizards only). I have no use for either weapon though.
King Karagg
I go westwards. As I show in the video, there is a trail that continues westwards and up the side of the nearby mountain. It ultimately leads to the entrance to the Hotenow Cave, which is at #41 on the Sword Coast Map.
Once inside, I buff up spells that will enhance my physical abilities to fight, but don't bother with buffs that will provide spell resistance or saving throw bonuses. My enemies in the next fight can't use magic. I also don't bother having Umoja use Flame Weapon spells on anyone, since my enemies will be immune to fire damage.
Up ahead will be several Fire Giants lead by King Karagg. I could use a Diplomacy or Intimidate check to talk him out of a fight, but I'd rather slaughter the whole lot of them. Janette unleashes a Word of Faith, and then activates her Shocking Weapon power. Gallard maintains his Parry stance. Logan is swinging away. Vandala starts off with Retributive Invisibility and then starts using her Eldritch Blasts. Umoja unleashes a Storm of Vengeance, and then a Call Lightning Storm spell. Finch uses his Hymn of Requiem, and then a Curse Song. The battle is over very soon. King Karagg leaves behind the Boots of the Mountain King (Stonekins (7) 1 / day, Freedom of Movement), but I have no use for them.
On the west side of the cave will be a couple of weapon racks. They hold:
+3 Weapons
Now it's time to make magic weapons of +3 enhancement. For some of my characters, their weapons already had the maximum number of 3 enchantments. So I sometimes have to go out and buy a new weapon to start all over.
First, I buy a spear for Janette. I enchant it with +3 enhancement bonus, +2d6 damage vs. evil, and +1d10 massive critical damage. It now makes sense to emphasize massive critical damage now that Janette has obtained the Improved Critical (Spear) feat through her Divine Champion levels.
Now it's time for Gallard's weapons. Kizu's Shortsword already has a +3 enhancement bonus and the ability to inflict Wyvern poison without limit. I simply add a Vampiric Regeneration enchantment to it. The idea is Gallard has numerous attacks through his Perfect Two-Weapon Fighting feat. If he inflicts enough counter-attacks even while in Parry mode, he can conceivably regenerate whatever damage might make it through his high armor class and Parry skill checks.
His off-hand dagger still has only two enchantments on it. So I raise the enhancement bonus to +3, and then add the Vampiric Regeneration enchantment to it as well.
I bought another Falchion for Logan. I then added a +3 enhancement bonus, +1d6 sonic damage, and +1d6 electrical damage. +2d6 massive critical damage also gets added on top on critical hits through the Overwhelming Critical (Falchion) feat.
Next up is Umoja. Remember the Scythe +3 that I found in the Hotenow Cave? I now add +1d6 acid damage and +2d6 damage vs. beasts.
Remember the Composite Longbow of Deadly Precision that I purchased some time ago from Arivyndaire near New Leaf? Now I raise its enhancement bonus to +3. I then add +1d6 electrical damage. Umoja's Belt of Strength +6 (soon to be made) will allow him to take full advantage of the +4 Mighty feature. Umoja's previous bow had +1d6 electrical damage and +1d6 sonic damage. Now I make the transition to a Mighty bow, because the extra Strength-based damage will get multiplied on critical hits.
+4 Armors and Shields
Most of my characters' armors and shields have only 2 enchantment slots taken up, so I go ahead and raise their enhancement bonuses to +4.
I also add elemental resistances to the armors and shields now as follows:
Rings of Protection +3
Next up is creating a few Rings of Protection +3. Janette and Gallard already have their own. Logan gets his deflection bonus to armor class through his Adamantine Helm. That leaves Vandala, Umoja, and Finch.
Each Ring of Protection +3 requires 9,000gp, a Gold Ring, a Ruby, and the Shield of Faith spell.
Belts of Strength +6
Now I return to the Sword Coast, and purchase three Mithral units from Highcliff.
I then get close to the workbenches in the Merchant Headquarters, and create three Belts of Strength +6. Each belt requires two Bear Pelts, one unit of Mithral, and 18,000gp. Janette, Logan and Umoja each get one.
Fowl Play
Lo and behold, another special encounter shows up just outside of Candlekeep. It's a Group of Chickens.
I approach the chickens, examine the piece of paper on their leader's back, use a Spellcraft check to deduce that they were subjected to magical polymorphing, and speak with them to learn further of their predicament.
A Dispel Magic or Greater Dispel Magic spell suffices to turn them back to their original forms, adventurers named Darius Noth, Maggrin Stiffshield, Larkin Deets, Grommkesh Bubgar and Timothy Duff. I get 600xp for each adventurer turned back to normal.
Their leader gives me a Chainshirt +3. Janette uses a Diplomacy check to wheedle a Dagger +2 out of him as well.
I could have chosen to attack them, but there aren't any special rewards for doing so.
Boots of Hardiness +3
Now I go to Leilon, and purchase five Adamantine from the town. They've run out after five, so I rest up about four times. Their Adamantine supply replenishes, so I buy four more Adamantine for a total of nine.
I then return to Samargol. I enter the Shrine of Waukeen and purchase three Scale Boots from the Cleric of Waukeen.
I next go to the Craft Stations. Remember when I obtained Blade Spider Cogs in the Ruined Temple during Act I? Gallard hands them over to Janette.
I now craft three pairs of Boots of Hardiness +3 (+3 Constitution, +3 dodge bonus to armor class). Each Boots of Hardiness +3 requires three units of Adamantine, a Blade Spider Cog, a Scale Boots, 12,000gp, and a Stoneskin spell. Janette, Gallard and Logan each get one of the boots.
My next destination is Zecorian's Demesne.