-

- Forums
- Chatrooms
- Gallery
- Gameplay Videos
- Upload
- Articles
- Mod Reviews
- Shop SP: Games, Movies, Books
|
|
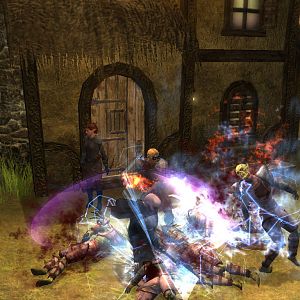
WEST HARBOR
Farlong House
Bevil comes in and informs Valeria that West Harbor is under attack. I loot the nearby chest for all its items, but equip only the Shortsword for Valeria. A small room to the left has a chest with Arvoreen's Amulet of Aid (6 charges of Aid) inside.
I go downstairs, and some Duergar burst in through the door. There are only three of them, so they're pretty easy to kill. They leave behind a Club +1, which I hold onto, and a Phenalope gemstone. The bookcase to the left has a random item or gold.
Reporting for Duty
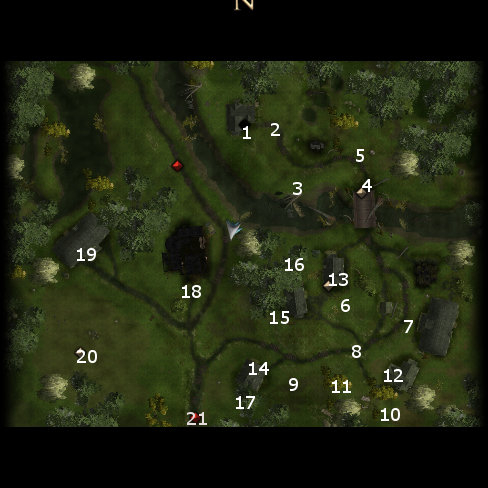
I leave the house, which brings me to #1 on the map. Brother Merring is at #2. He urges me to report to Georg at the bridge, and then casts Blessing on me.
Next up will a series of fights. The first two will be against a Duergar, and two Derro Savants at around #3. I let Bevil go ahead, allowing Valeria to judge when to join in for sneak attacks.
Just north of the bridge, at #4, will be several town militia and Duergar in combat with each other. Bevil dives right in, while I always have Valeria picks her spots and look for sneak attack opportunities. As much as possible, I want to land the killing blow on a monster instead of somebody who isn't in the party so that I can get the xp for the kill. I therefore make a point of concentrating my attacks on a Duergar or Derro who's 'near death'.
I then speak with Georg, who tasks me with rallying the rest of the militia as there will be more evil creatures coming in for the attack. I have to find and recruit at least five more militia members to complete the quest.
One thing to keep in mind is that the Harvest Cup gives two free chances to use Cure Light Wounds on yourself or another party member, as I showed when Amie was getting low on hit points. Use it, it can be to your advantage, especially during a low-level yet prolonged part of the game like this one.
*Evil* Reporting for Duty
The equivalent video for Zarathos, where he manifests a rather more depreciative view of Georg.
The video also shows the use of the Sound Burst spell on several Duergar gathered around the militia. The spell inflicts minor damage, but will also stun its targets.
Ward Mossfeld
Ward Mossfeld is at #5, and he's badly wounded. I speak to Brother Merring again at #2, who gives me some Swamp Moss. I return to Ward, and use a Swamp Moss to help stop his bleeding. One of militia members is now recruited.
*Evil* Ward Mossfeld
Zarathos prefers to slit Ward's throat and gain 3 Evil points. A benefit of this approach is that there will be less militia members to steal xp from me when the next waves of attack come.
Lazlo Buckman
I continue across the bridge and towards #6, where I find Lazlo Buckman being attacked by several Duergar and a few Derro Savants. The same methods work as well. Again, as much as possible, you want to land the killing blow on a monster instead of somebody who isn't in the party so that you can get the experience for the blow. I therefore make a point of concentrating my attacks on a Duergar or Derro who's 'near death'. Notice how I often take this to the point of letting Lazlo strike a first blow on a Gray Dwarf first, so that Bevil or Valeria can land the killing blow almost immediately thereafter.
Ian Harman
At #7 is Ian Harman, who is reluctant to join the fighting. A Diplomacy check (like I do), an Intimidation check, or beating him into submission will work to get him to join the militia. Three of five are now recruited.
Pierson
I unlock the door to the house at #12. Inside will be Pierson, whom I convince to join the militia. I then loot the containers in the house for any items or treasure that I can get.
*Evil* Pierson
The video with Zarathos shows other options. Bluff and Intimidate checks don't succeed, because my Intimidate skill hasn't been developed yet. Bashing down the door finally succeeds.
Amie's Death
I leave the house and go north a bit at #8, where Tarmas is locked in battle with a Githyanki Mage. Amie attempts to help out, but the Githyanki kills her with a fire spell. He promptly leaves, but not before summoning three Spiders.
The Spiders are worth 75xp each, but only if one of my characters lands the killing blow instead of Tarmas. I won't get the xp for a Spider if Tarmas lands the killing blow. I thus make a point of ensuring that I get the 225xp total for all three spiders, even if it means reloading if Tarmas ever gets a killing blow on any of them. The video concludes with a discussion between Tarmas and Valeria.
Web Mossfeld
I go a little north and west to help out Web Mossfeld at #15. He's getting attacked by three Bladelings. Again, I want the 42xp each that comes with landing the killing blow on them.
Nearby at #16 will be another Militiaman getting attacked by a Bladeling and a Duergar. I don't mind missing out on the 17xp for the Duergar (although I got it this time), but I definitely want the 42xp for the Bladeling.
I then speak to both Web Mossfeld and the Militiaman so that they'll group with the rest of the militia. I get 50xp for recruiting at least five militia, although there are two more to be found as well. One of the Bladelings left behind a Bladeling Spike.
Wizard's Arsenal
I enter Tarmas' house at #13. The table has a scroll of Identify and a book called Crafts of Evermeet.
There will also be a trapped bookcase. *NOTE* Whenever you can manage it, always try to recover the trap instead of disabling it. Sure, recovering instead of disabling raises the DC by 10. But if you can pull it off, you'll have a trap kit that you can sell (or use). And indeed, there's no xp to be had for disabling traps during the OC. The bookcase itself will have minor random loot.
The nearby chest will have an instrument called the Fachluchan Bandalore (Light (5) 1/day).
Wyl Mossfeld and Pitney Lannon
At the south side of town will be Wyl Mossfeld and Pitney Lannon, #11 and #14 respectively. I give each of them Swamp Moss to staunch their wounds and get them to join with the Militia. This is over and above the five I needed to finish the Reporting for Duty quest, but I still get 50 bonus xp each.
*Evil* Wyl Mossfeld
Zarathos simply prefers to slit the throat of Wyl Mossfeld to pick up 3 more Evil points.
Dying Gray Dwarf
The milita is gathered to the west, but first I circle around it and to the north. At #18 is a dying Gray Dwarf, whom Valeria interrogates briefly. A nearby barrel will have some random loot.
*Evil* Dying Gray Dwarf
Zarathos slits the Gray Dwarf's throat right away.
Next Wave
Now I join Georg and the rest of the militia at #20. Another wave of Gray Dwarves and Bladelings rush in to attack from the west. Remember, Bladelings are worth more xp than the Duergar so I go for the killing blows on them every chance I get. Some Duergar head into the Starling Farmhouse, so I pursue them.
Starling Standoff
I loot a chest to my right for some loot, including a Dagger +1 that Valeria equips. I don't even bother speaking to Retta. I simply go right into the next room. The reason is that I don't want to give up any of the 75xp per Gray Dwarf to the dogs. Once I'm done, I let Retta know that the children are safe.
Last Wave
I now leave the house to help hold off the last wave. As always, I go for the Bladelings whenever I can in order to maximize my xp.
Swamp Ruins
And here is where Daeghun assigns Valeria the task of retrieving a Silver Shard from nearby Swamp Ruins.
4th Level
But first, I take the opportunity to level up. Bevil takes the Great Cleave feat, which can be really helpful against low-level enemies with few hit points.
I pick up a couple of Longswords left behind during the last battle, and sell off my excess loot to Tarmas so I don't weighed down. The exit to the World Map is at #21.
The nearby Swamp Ruins is my next destination.