-

- Forums
- Chatrooms
- Gallery
- Gameplay Videos
- Upload
- Articles
- Mod Reviews
- Shop SP: Games, Movies, Books
|
|
TOMB OF BETRAYERS
Johcris' Vengeance
I return to the Docks District, whereupon a cinematic plays showing that Johcris is plotting with an archmage from Luskan to pursue revenge against Qara.
I make my way back to the Sunken Flagon. Khelgar places a Light Shield Mold and two Zalantar Planks into the Blacksmith's Workbench. He has the 11 skill ranks in Craft Armnor that are needed to craft a Zalantar Light Shield for Valeria. He uses the Smith's Hammer on the bench to create the Shield. *Note* I used the NWN2gff editor to make the Zalantar Light Shield resemble the Witchblessed Shield. This was purely for aesthetic reasons.
Valeria's long term objective is to don the Zalantar Light Shield along with a Mithral Chain Shirt. A Zalantar Light Shield actually provides a -5% reduction to arcane spell failure. A Mithral Chainshirt and a Zalantar Light Shield together will provide an ideal combination for Valeria, as in the aggregate she would then have only a 5% chance of arcane spell failure.
I switch out Neeshka for Qara upon leaving the Sunken Flagon. Neeshka will be by and large ineffective against the sneak attack-immune undead. Qara, however, will be right at home burning hordes of undead with her fire spells.
Missing Priest
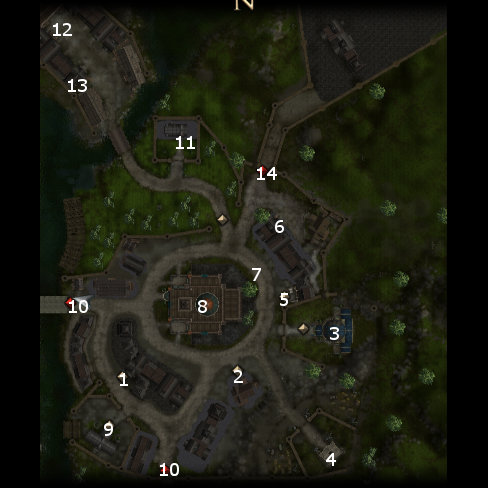
I return to the Merchant Quarter and make my way to the Temple of Tyr at #3. I agree to Judge Oleff Uskar's request to find out what happened to a priest of Tyr that has gone missing in the nearby Tomb of Betrayers (at #4). Judge Oleff does have some wares for sale, but either I don't need them yet (i.e. Khelgar needs to become a Monk first) or they would at most be interim items that in the long run become a waste of gold.
Shield of Dawn
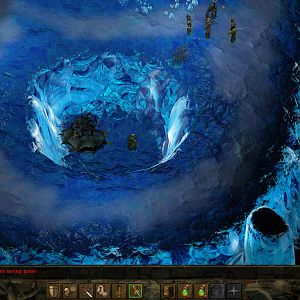
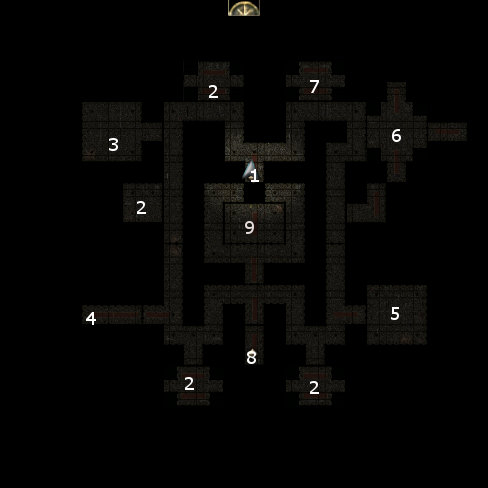
I start off at #1 of the Tomb of Betrayers map, and begin to make my way east and south. There will be plenty of traps and undead monsters, including Zombies, Ghouls and Shadows. Rooms labelled #2 and #7 will have some undead and chests with random loot, but no special or unique items.
Valeria always takes the lead, and uses 'follow me' by default so that she recover any traps she finds but without party members rushing ahead and tripping them. If undead monsters are near the traps, she'll hold position to let Qara safely unleash a Fireball to hit the undead as they're oncoming. I then issue an 'attack nearest' command once the undead close in on the party. Elanee may unleash a Call Lightning spell if enough undead survive to swarm the party. Note also that the traps will always be at the rectangular tiles on the floor.
At #6 is a large room with a straight row of rectangular tiles near the door. Trying to approach the gate while it's closed will cause Tomb Guardians to appear, who can be quite tough. It doesn't matter if you beat 'em. Try again, and more will come out. The key is that the tiles near the door act as pressure plates. I have Qara stand over the tiles, and then Valeria goes on ahead and loots the chest.
At #5 is a large room with a chest inside. Many tiles in the room act as triggers for bolts that will hit party members. The safe way is for Valeria to activate 'stand your ground', and then go by herself and around the tiles to reach the chest. The chest itself will have the Shield of Dawn (+1 light shield, +3 vs. undead). Elanee equips it.
Ring of Caitlyn
More of the same, but on the west side of the Tomb. At #4 is a chest on the other side of a hallway. There will be Fireball traps that can't be disarmed across the breadth of the hallway, but Valeria is able to use her Evasion ability to safely get across and loot the chest, more or less.
At #3 is a room with two rows of rectangular tiles that act as pressure plates. These pressure plates act as triggers for Fireball traps. There is, however, a large stone block that can block the Fireballs as well as a lever that can move the position of the block. The safe procedure is obvious. Have the party Rogue activate the 'stand your ground' mode. Use the lever to position the block so as to move across the first set of pressure plates. Have the party Rogue move across the first set of pressure plates. Have another character use the lever another time so that the block aligns with the second set of pressure plates. The party Rogue can now move across the second row and safely loot the chest. The chest will include, in addition to some random loot, a Ring of Caitlyn (+2 deflection bonus to armor class, +1 deflection bonus to armor class vs. undead). I hold onto this, as it may provide a useful protective ring in the interim for Casavir or Zhjaeve once either becomes a joinable companion.
It's a simple matter to manipulate the lever and block again so that Valeria can safely regroup with the party. I now head south towards #8.
Fenthick
I go through the door and speak with Onan of Tyr, who explains the situation to me. I then go north towards the room at #9. There will be plenty more undead to kill in the hallways surrounding the room.
Waiting in the room at #9 will be the undead spirit of Fenthick. Fenthick always relies on missile fire, and will always run if party members try to close in for melee combat. This approach also has the additional point of trying to bait the party into running across the many pressure plates in the room, which will always loose additional arrow fire on the party whenever stepped on. The solution is simple. I have Valeria issue a 'stand your ground' command, and then lead Qara into the room. Qara then brings Fenthick down with Flame Arrow after Flame Arrow, and then repeated use of Magic Missiles spells afterwards. Fenthick leaves behind a Shortbow +2, some Arrows of Vampiric Regeneration, and a book called The Fantastical Vestments of the Priests of the Realms. I have no use for any of these items, so I'll just sell them.
Onan of Tyr
First I hit the lever in the room at #9. Then I speak to Onan at #8 and lead him out of the Tomb. I have to fight a few more Shadows that have spawned near the north entrance.
I then return to Judge Oleff in the Temple of Tyr and get 300xp for completing the quest.
Now I resume the main quest line. Whether it is Valeria working for the City Watch or Zarathos working for the Shadow Thieves, my next destination is the Back Alley.