-

- Forums
- Chatrooms
- Gallery
- Gameplay Videos
- Upload
- Articles
- Mod Reviews
- Shop SP: Games, Movies, Books
|
|
Shattered Spear
To the Shattered Spear Tribe
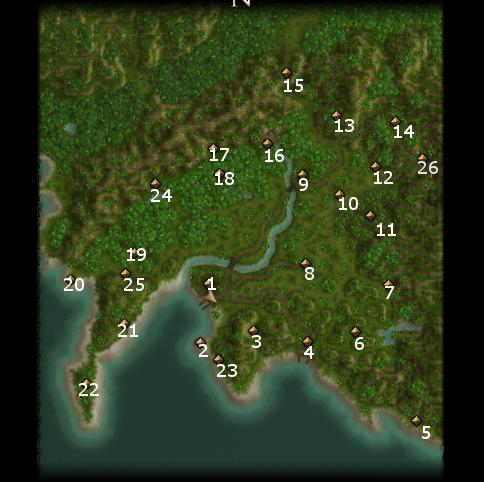
Vadin'ya has another quest for me, to obtain a Flawless Gem from the Batiri tribe known as the Shattered Spear. The tribe's lair is located at #17 on the Overland Map.
I end up fighting plenty of monsters along the way. Including two fights with Will-O-Wisps. Remember, I want to rack up on the Glamers whenever I get a chance, so I go for both fights without hesitation. Incidentally, one of the Wisp encounters was actually quite a distance from me to begin with. There was a risk that the Wisps could go away (i.e. disappear from the Overland Map) if I don't trigger a fight with them within a certain amount of time. If you find yourself in that situation, simply have a character with a high Survival skill (e.g. Umoja) take over the lead so that you can close the distance faster.
Another one of the random encounters was against a group of Batiri. This time, it included a Shaman. A Shaman will always start off trying to cast an Entangle spell at where the party starts off. The trick is simple, I have my warriors run ahead and out of the area that will be hit by the Entangle spell. The fight becomes pretty easy after that. One of the Batiri leaves behind a crate, which yields an Ore that I can trade.
12th Level
I'm getting pretty close to 66,000xp, so now I grind it out towards my 12th level of experience for all the party members.
Again, some of the fights included Will-O-Wisps, which I didn't include in the video. Nonetheless, I made a point of collecting their Glamers, both for an upcoming quest and for my crafting needs.
Strange Druid
While I was hunting for xp, another special encounter showed up on the Overland Map. It's a Strange Druid and his pack of panthers. I deliberately pick a fight with them. They're easily to kill after Vandala hits the panthers with a Noxious Blast / Eldritch Chain, and a couple of my warriors close in on the Strange Druid.
The Strange Druid leaves behind two items. One is a Zalantar Spear (+2 magic damage), which I don't have any use for. The other is a Zalantar Light Shield (-5% chance of arcane spell failure), which Vandala equips.
Batiri Bargain
I enter the lair of the Shattered Spear tribe, and start off at #1 on the Shattered Spear Tribe map just below. It is definitely more beneficial to do a quest for them than to slaughter them.
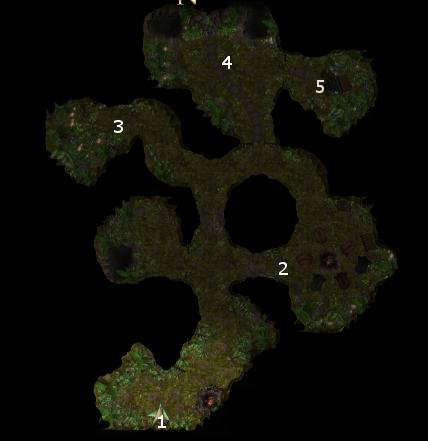
A weapon rack in the east cave (#2) has a Spear +1, and 99 Arrows +1. A weapon rack in the northwest cave (#3) has a Batiri Club (+1d4 slashing damage) and a Light Shield +1.
A locked chest in the northeast cave (#5) has an Amulet of Natural Armor +1. Logan wears it for now. I'll sell off the Snaketongue Amulet when I get a chance.
At the north end of the lair (#4) is the matron of the tribe, Cuamogh. She's willing to give me the Flawless Gem if I can retrieve the Shattered Spear from a nearby Ruined Temple.
To the Ruined Temple
The Ruined Temple is at #18 on the Overland Map. I fight more Dienonychuses and Will-O-Wisps along the way. Of course, the upside is get more Glamers out of it as well.
Serpentguard D'Shai
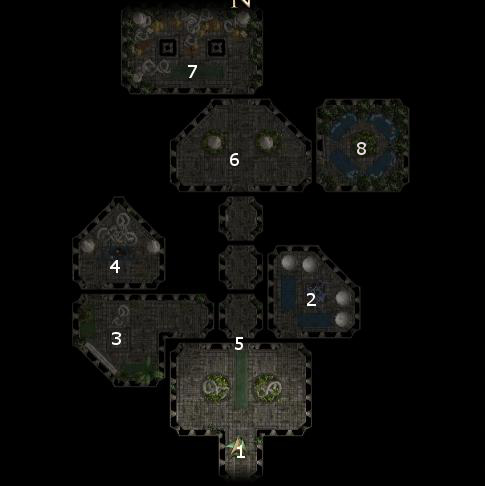
I start off at #1. I buff everybody up, Bark Skins for the warriors, Strength and Constitution boosts for the warriors, Death Ward for Vandala. Gallard disarms a trap just a little ahead.
Gallard has the party 'stand their ground' and goes on ahead to the room at #2. Note that I don't rush ahead, since there's a trap in the room. Gallard simply leads the Spider Constructs and Yuan-ti Holy Guardian back to the room at #1. Yuan-ti Holy Guardians start off with several buffs in place, and can inflict Constitution-draining poison with their attacks, so care is needed for these fights. I always carefully position Gallard so that he absorbs the onslaught, more or less harmlessly, while the rest of the party can take their shots. It is only then that I disarm any traps in the room for the xp.
I pick up any Blade Spider Cogs that the Constructs leave behind. I'll need them later for crafting Boots of Hardiness +3.
I repeat the process for the room at #3. A lever at #4 opens the gate at #5. But before I go any further, I briefly leave the Temple, rest up, re-enter, and buff myself up all over again.
Gallard leaves the party behind again, disarms the trap in the corridor leading north, and then enters the room at #6. He leads the Yuan-ti Holy Guardian and the Spider Constructs back to the room at #1. The other Holy Guardians at #8, led by Serpentguard D'Shai, will start to trickle in as well. Umoja will also start to help out with Greater Lightning Storm spells in order to help speed along what can be a pretty prolonged and tough battle. I eventually manage to wear them down.
Relic of the Shattered Spear
The door leading to #7 is trapped, and the DC is 40. I just have Logan bash in down and take a little damage in the process.
There will be two trapped chests in the room. One will have a random scroll. The other will have random loot, and the Shattered Spear.
I bring the Shattered Spear to Camuogh in her cave. I get 1,600xp, and the Flawless Gem.
Waterfall Cave
I head east towards the cave at #16. Once inside, I buff up to the max, Bark Skins, attribute enhancements for the dinosaur, Death Ward for Vandala, Greater Magic Weapons, and Extended Flame Weapons. The last is important due to the battle that is coming up.
Further within the cave will be an enormous Fell Troll. Gallard occupies his attention, and then the rest of the party swoops in. I eventually manage to bring it down, and finish it off with the extra fire damage from my weapons. It leaves behind some gold, and plenty of gems.
It will also leave behind a Ring of Protection +3. Gallard wears the ring for the rest of the game, as he is the priority for any items that enhance protection against physical attacks. I handed off the Ring of Protection +1 he had been wearing to Umoja.
It also leaves behind an Amulet of Natural Armor +3. Gallard wears it for the rest of the game, for the same reasons. Vandala gets the Amulet of Natural Armor +1 that he had been wearing.
Flawless Gem
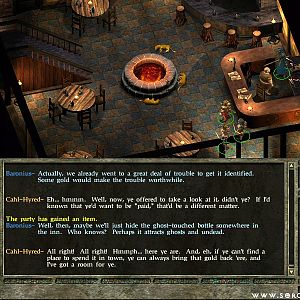
I am at full capacity in terms of carrying resources like Ores and Skins, so I head over to Taruin and trade in for trade bars. I also rest the night in the tavern.
There are also plenty more Ores and Skins that can be revealed by Gallard with his Search skill, south of the Waterfall Cave. So I go and retrieve them. I kill a couple of Will-O-Wisps along the way for their glamers. I thereafter do another trade with Taruin.
I return to Samargol and give the Flawless Gem to Vadin'ya. My reward is 700xp and 5,000gp.
Now I'll do some quests for Volo.