-

- Forums
- Chatrooms
- Gallery
- Gameplay Videos
- Upload
- Articles
- Mod Reviews
- Shop SP: Games, Movies, Books
|
|
Market Triangle
The King of Spiders
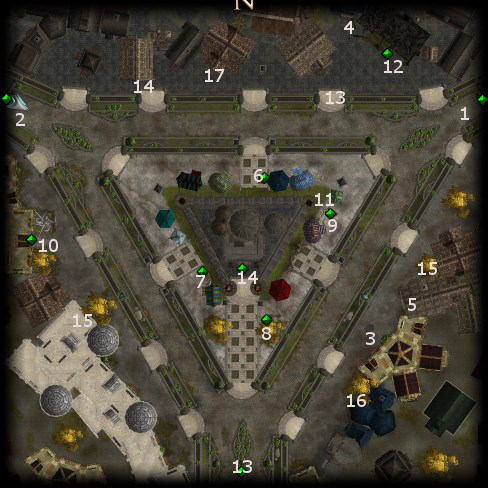
I return to the Market Triangle. I make my way to the door to a house at #5 on the map. A ghostly boy's face appears at the window. I enter regardless.
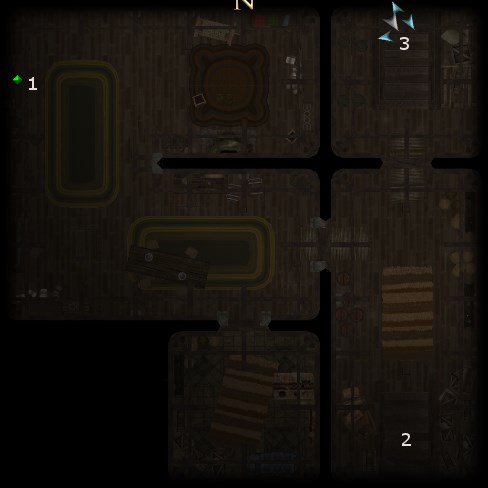
I start off at #1 on the Main Floor map. There isn't much to see. The stairs to the next floor is at #2.
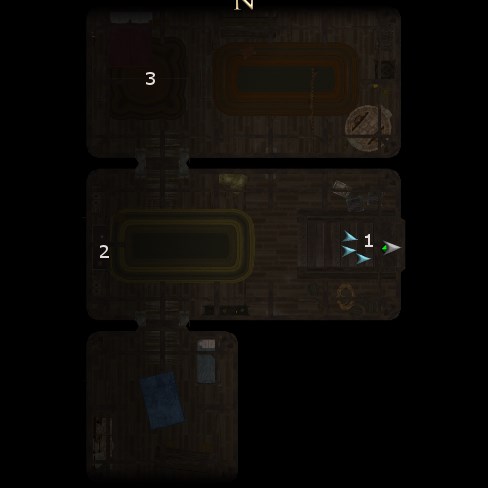
Now I'm at #1 on the Upper Floor map. Ahead at #2 is Peter's Journal, which describes events leading to the family's demise.
At #3 is the bedroom where the wife and son lie dead. It is also where I first get confronted by Sarichna, who summons several Giant Spiders. It's easy for Salazar to get overwhelmed, because he starts off in the room by himself, and Sarichna and the Spiders are going to try to surround him. I make things easier by having Salazar tuck himself in between the bed and the wall as shown on the video. That allows Mantides and Rinara to go to work with their attacks, and Charissa to unleash her offensive spells. It's still a tough fight in any event.
I make my way back to the stairs leading down at #1. It is then that I find the Basement Key.
I took a beating during that last battle, so now I rest up at the Black Eye Tavern. No need to worry, the quest will keep.
The Basement Key opens the door and stairway at #3 on the Main Floor map.
I start off at #1 on the Basement map. Ahead will be a series of fights against Giant Spiders and Mutated Spiders. Salazar hangs back and uses his Brimstone Blast / Eldritch Chains, leaving the physical combat to the other party members. I am careful to use the 'stand your ground' and 'follow me' commands in order to prevent individual party members from running ahead of the rest of the party, and reissue 'attack nearest' commands when I'm confident it will mean the party will attack together as a group instead of stranded individuals.
At #2 is the father, who has been killed. His corpse contains Peter's Ring, which is useless. It can't event be sold, so I don't bother looting it. A nearby crate also has a few potions. The battles continue throughout the lengths of the tunnels.
At #3 is the final confrontation against Sarichna and his three Spider Queens. As always, Salazar hangs back and pummels the enemies with Brimstone Blast / Eldritch Chains. Charissa unleashes Hammer of the Gods and Call Lightning. Mantides and Rinara hack away. The battle is pretty tough, but I manage to outlast them.
Sarichna leaves behind Spider's Kiss (Scimitar +2, Poison DC=18 1d2 Strength), which Charissa uses as an interim weapon.
The party makes to leave the house. The ghostly members of the family appear on the Main Floor and thank the party. The party members get rewarded with 1,000xp.
9th Level
And here is where the party advances to their 9th level of experience.
Adamantine Greatsword
I begin by changing one of Charissa's second-level spells to a Fox's Cunning. I then rest up at the Black Eye Tavern.
I then return to the Market Triangle and begin checking out the wares of the various merchants. The Armorer is at #6. He sells some mundane armors, as well as a few +1 or +2 armors and shields, and some unique armors and shields as well. I'm not interested in any of it for now.
At #7 is the Crafting Merchant. I speak with her briefly but then end the conversation. I then step back a little from the Merchant and to the nearby stairs. That prompts a conversation between Charissa and Rinara on the subject of Rinara's sleight of hand skills.
It is after that conversation that Charissa casts the Fox's Cunning spell on Salazar. I didn't want the spell's limited duration wasted by the conversation. The spell serves to raise Salazar's Appraise skill rank even further. I begin by selling as much of my excess goods as possible to the Crafting Merchant.
I then purchase the following from the Crafting Merchant:
At #8 is the Druid Merchant. Her wares include armors, weapons, and other miscellaneous items with a nature theme. She also sells a few exotic things like a Shederran Plank and a Duskwood Plank. I don't buy anything from her, but I do sell to her whatever I couldn't sell to the Crafting Merchant.
At #9 is the Weapon Merchant. Salazar had cast Beguiling Influence on himself beforehand. The Weapon Merchant is initially suspicious of Rinara and her Devil's Bite weapon. I make a Bluff check to throw him off his suspicions, and thereby increase my influence with Rinara. Perform and Sleight of Hand were alternatives, but I didn't have good enough skill ranks in those.
Now is another instance of justified spending before I get 40,000gp. I purchase an Adamantine Greatsword from him, and have Mantides sell off his Greatsword +1.
I next enter Mintassan's Mysteries at #10. There will be a complete set of crafting workbenches, to the right of the door. Salazar places the Adamantine Greatsword, the Faint Power Essence, the Faint Water Essence, and the Diamond into the Magician's Workbench. Charissa casts a Cure Critical Wounds on the Workbench to add +2d6 damage vs. evil to the Adamantine Greatsword.
It will become Mantides' weapon for much of the game. Opponents with damage reduction are fairly frequent during MoW, so an Adamantine weapon, with bonus damage against evil, for my main hitter is definitely helpful. I don't feel the need to add any enhancement bonus, since I want to add another damage bonus (fire) and because Charissa can always cast Greater Magic Weapon on Mantides' weapon at the start of each new day.
The Deathtrap
Remember the beggar who ran off after the explosion when I first entered the Market Triangle? Slicker can be found at #11 on the Market Triangle map. The conversation basically amounts to that a nearby house was supposed by all to have been abandoned, but Slicker has observed that it hasn't really been abandoned of late.
The entrance to the house in question is at #12 on the map. Inside the Gutted House is an unconscious man whom I can't speak to until I either cast a healing spell or use a Healing Kit on him. Once he rises, it's apparent that the man is suffering from amnesia and that he would like my help.
There will be a conspicuous stone statue in the middle of the Gutted House. I click on it, and that prompts the Strange Man to use the Stone Key he has on his person to open the way to the Arcane Cellar.
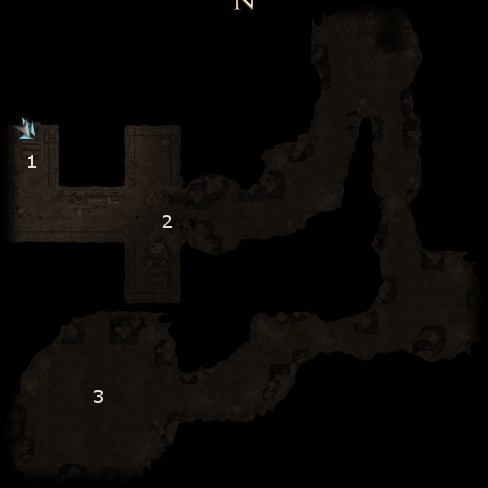
I start off at #1 on the Arcane Cellar Map. At #2 will be what appears to be a gangway over water, with a fearsome looking Quelzarn (i.e. Sea Serpent) on either side of the gangway. It's a simple matter of walking through and exposing the whole thing as an illusion.
I go through the door at #3, whereupon a Dwarf named Rupert gets frightened and runs away. It is at #4 that I find Rupert again. Either a Diplomacy or an Intimidate (as in my case) check suffices to get Rupert to talk. The key piece of info is that there is a nearby locked door that impedes progress.
I examine the locked door at #5. I then speak to Rupert a second time. A second Diplomacy or Intimidate check gets him to cough up the location of the key. After that, I click on the Copper Pot in the Kitchen at #6. I thereby obtain Uzalimons' Key. I proceed through the door.
Uzalimon's Sanctum at #7 has a lot of random scrolls and wands. Also among the containers will be a Radiant Fire Essence. However, there won't be any Beljuril or other such high-grade gems for crafting in MoW, so I'll just end up selling it.
The portal at #8 leads to the Misty Mountaintop. Once I step through, I notice a botched ritual involving a few Wizards led by Uzalimon, and surrounding a Lich named Kokrulobis. The Strange Man, named Mandalion, suddenly recovers his memory and helps free Kokrulobis. Combat is inevitable.
This fight can be very tough because under normal circumstances Kokrulobis would keep himself protected with damage reduction spells, giving him a free hand to blast away with his spells. I have a trump card though. I direct Mantides, with his holy Adamantine Greatsword, to make straight for the Lich and keep attacking him until he falls. The other party members take care of Mandalion easy enough and join in on the attack.
Kokrulobis leaves behind:
Now I have a choice. I could talk to Uzalimon to get a sense of what happened, but then he leaves afterwards and I get no reward. It's far better to attack him and his apprentices. There's no alignment or influence penalties for doing so. And indeed, it's preferable since there's some xp and plenty of loot to be had for killing off the Wizards.
The battle can be tough though, since at least three of them can bombard the party with damaging spells. First, I have Salazar issue a 'stand your ground' command. I position Rinara near the female Elf Wizard named Amak. I position Charissa near the Halfling named Payana. I keep Mantides close to Uzalimon. I then speak to Uzalimon and initiate the attack option. Charissa soon takes care of Payana. Mantides stays on top of Uzalimon and interrupts his spells. Rinara hounds Amak. Salazar aims his Brimstone Blast / Eldritch Chain blasts at the male Elf Wizard named Susstel. And the battle is soon won with a minimum of trouble.
Amak leaves behind:
Amulets and Rings from Mintassan
I sell as many of my wares as I can to the Weapon Merchant and the Armor. The three items I hold back on are the Greater Battle Robes, the Ring of Spell Battle, and the Ring of Spell Defense. There's a specific reason why. Remember, I always keep Fox's Cunning on Salazar to maximize his Appraise skill rank.
Once I've sold as many items as I can, I buy two items from the Armorer. One is the Paladin Helmet (+1 Concentration) for Mantides. Magical helmets are scarce in MoW, so I guess it's more for thematic reasons than anything else.
The other item is the Tower Shield +2 for Charissa, which she uses for the rest of the game. It's all about maximizing armor class for Charissa.
Now I make for the Undergate. There's a specific reason why.
Most merchants in MoW are only willing to offer at most 5,000gp or 10,000gp for a given item in my inventory. Most merchants also have limited gold with which to purchase my items.
At #4 on the Undergate map is a Lizardfolk Witch. She's a special merchant in two senses. One, she is not bound by the 5,000 or 10,000gp limit. She'll pay me full price for any item that I have, even if it's over 10,000gp. Second, she has unlimited gold and will never run out of gold with which to make purchases. Anytime I get an item worth more than 10,000gp and that I won't keep, she's the one I'll sell it to.
I bring myself close to 70,000gp after selling her the Greater Battle Robe, the Ring of Spell Battle, and the Ring of Spell Defense. I then take the portal at #5, which brings me near Slicker in the Market Triangle.
I then head over to Mintassan's Mysteries. I buy the following:
*Evil* The order in which I purchase items is very different in the evil playthrough. Selene and Mantides will be the only party members left after Selene becomes a Vampire. So I prioritize Selene (e.g. Golden Bamboo Staff, Fukio's Silks, Belt of Agility +2) and Mantides (e.g. Tower Shield +2, Boots of Hardiness +2, Horse Hair Helmet) first and foremost. I start to purchase items for Charissa and Rinara only after Selene and Mantides have been taken care of.
Trouble at the Track
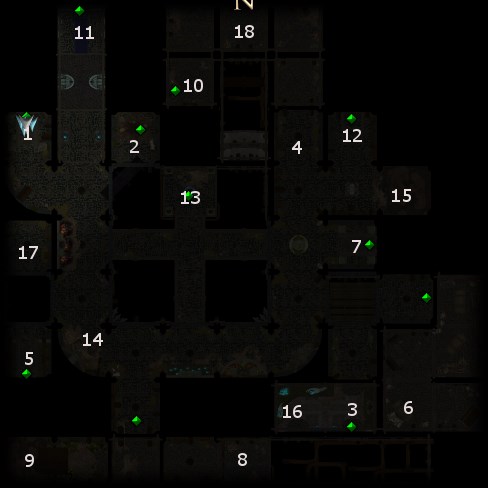
The next quest is available only after completing the Deathtrap quest. Starting it requires speaking to a Halfling named Thurlow Fezziwink at #13 on the Arena District map. He gives me a Vial of Spices and directs me to see his relative at a placed called The Track. The entrance is at #14.

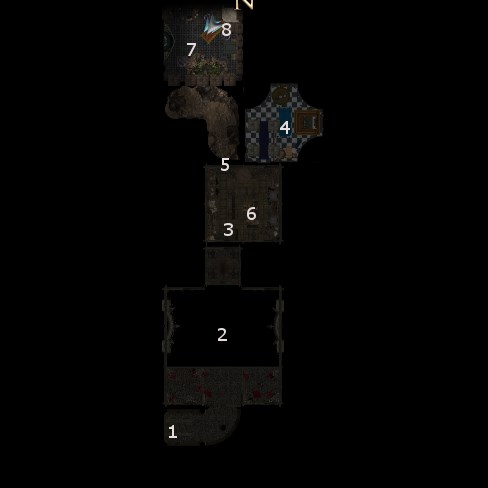
I enter and start off at #1 on the map of The Track. The guard near the door will insist on searching for any Potions of Speed. If I happened to have any, the guard would have confiscated them but given me a Potion Redemption Ticket so that I can get them back upon leaving The Track.
I bring the Vial of Spices to Tudor Fezziwink at #2. He wants my help fixing a race between his dog, Daleland Downs, and the dog named Big Bruiser, who races on behalf of the proprietor of The Track, Mordecai. To start, he wants me to buy three specific drinks for him, Mordecai's Punch, Sembian Swill, and Souleman's Sublime. I buy the drinks from the Barkeep at #3. He then uses the Vial of Spices and the drinks to put together Tudor's Brew of Speed, which now appears in my inventory. He wants me to slip it in Daleland Downs' dog dish in the Back Rooms downstairs.
At #5 is the Bookie. I place a 100gp bet, since it's a guaranteed 1,000gp return once I do the quest properly.
At #6 is the door and stairs leading down to the Back Rooms. A guard named Grunt will initially refuse entry. One way to deal with it is to get Brom at #4 drunk so that he falls asleep and I can use his Track Guard Uniform as a disguise to get past Grunt. Another approach is for the lead character to use Sleight of Hand to pilfer the key from Grunt, but I don't have enough skill points for that. My approach was to make a Bluff check (aided by Beguiling Influence) to convince him to leave temporarily, and give Rinara enough time to unlock the door.
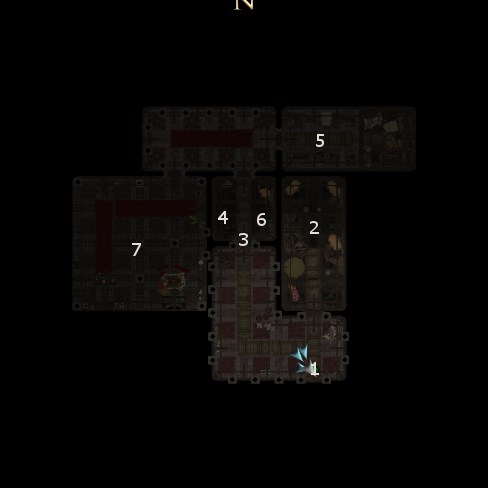
I go down the stairs and start off at #1 on the Back Rooms map.
Ahead at #2 is the room where Daleland Downs is being kept. I put Tudor's Brew of Speed into Downs' dish. A Goblin then accosts me near the door. Pretty much every possible option is enough to make him go away without blowing my cover. Trying to attack him outright would earn one alignment point towards evil. I prefer to make an Intimidate check to make him go away and earn 50xp.
This is enough to progress the quest, but there's an alternative way as well. At the door at #3, I overhear an argument between a mage named Maelstrom and a guard whereby I learn that an antidote is used to undo the speed magics on Big Bruiser after each race. The two men depart thereafter.
At #4 is an Alchemist's Bench where it's possible to make a Craft Alchemy check to make a Maelstrom's Antidote yourself. The Craft Alchemy check needs to be pretty decent.
At #5 is the guard. I could Bluff or Intimidate him into giving me the Maelstrom's Antidote and leaving, but I prefer to kill him for a little more xp. A nearby lockbox has a Healing Kit and a couple of potions.
Big Bruiser and his dish can be found at #6. I slip the Maelstrom's Antidote into the dish. Note that one or both of speeding up Daleland Downs or slowing down Big Bruiser is enough to progress the quest.
I head back up to the main level of The Track and inform Tudor of my progress. The race commences, and Daleland Downs wins.
Now I found myself in Mordecai's office at #7 on the Back Rooms map. Mordecai won't pay up. I could back down and walk away, but I don't want to. I could use a Bluff or Intimidate check into talk Mordecai into paying up without a fight. But I prefer to kill off Mordecai and his thugs, which include a Rogue named Haman, a Druid called the Beast Master, a few Mangy Dogs, and the mage named Maelstrom.
Charissa begins with a Hammer of the Gods spell. She then helps Mantides take down Mordecai as quickly as possible. Rinara positions herself to hold up the dogs while in Parry mode. Salazar uses his Brimstone Blast / Eldritch Chains over and over again.
It's a tough fight though, as Rinara and Salazar end up falling. After Mordecai falls, Charissa positions herself to catch the survivors with a Call Lightning spell. It's pretty much won after that.
Haman leaves behind the Hook (Rapier +1, +2 Parry, Two-Weapon Fighting), which becomes Rinara's interim off-hand weapon for much of the game. It's all part of the plan to have her be a Parry wall when she's faced with head on combat.
Mordecai leaves behind two items. One is the Maelstrom Mesh (Studded Leather +1, on hit Hold Person (2)), which becomes a good interim armor for Salazar. The other is Mordecai's Morningstar (Morningstar +1, +1d4 magic damage). Charissa now uses that as an interim weapon, which allows me to sell off Spider's Kiss for a lot of gold.
I head back up the main level of The Track. Tudor offers me the 2,500gp that he promised, but I make an Intimidate check to increase it to 3,000gp. I also get 1,500xp.
Lastly, I collect my 1,000gp winnings from the Bookie.
Dash
I return to the Lizardfolk Witch in the Undergate. I sell her the Spider's Kiss for over 20,000gp.
Next, I go to the Weapon Merchant in the Market Triangle. I sell him all my extra goodies that sell for less than 5,000gp (since I was heading to him anyway to buy something). I also buy Dash (Rapier +1, +5 Parry, +2 Reflex saving throws) from him. This will be Rinara's main-hand weapon for much of the game as it's integral to her set up as a Parry wall. It will ultimately become her off-hand weapon once she finds a dagger called Altama's Equalizer.
I also make another stop at Mintassan's Mysteries. I buy two more items from him. One is the Bracers of Dexterity +1 for Salazar. Salazar will take a +1 Dexterity on his 12th level up, so it will mesh with the bonus provided by the Bracers. Dexterity is important for Warlocks, since it increases their chances of landing their Eldritch Blast attacks. The other item is the Gauntlets of Ogre Strength (+2 Strength) for Charissa, since it will help her fighting ability to a degree.
I still have about 48,000gp, so I decide to stop buying for now. There's another item that I'll soon buy that sells for about 7,000gp, and I want to keep my gold above 40,000gp.
The next path depends on moral preferences. Salazar will seek out the help of the Church of Lathander, while Selen will seek out help from the Ebon Claws.