-

- Forums
- Chatrooms
- Gallery
- Gameplay Videos
- Upload
- Articles
- Mod Reviews
- Shop SP: Games, Movies, Books
|
|
Contact Pentical Bleth
An Unexpected Message
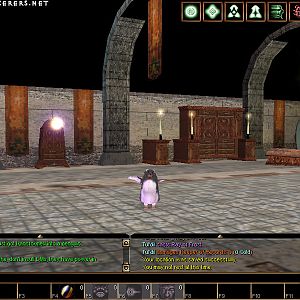
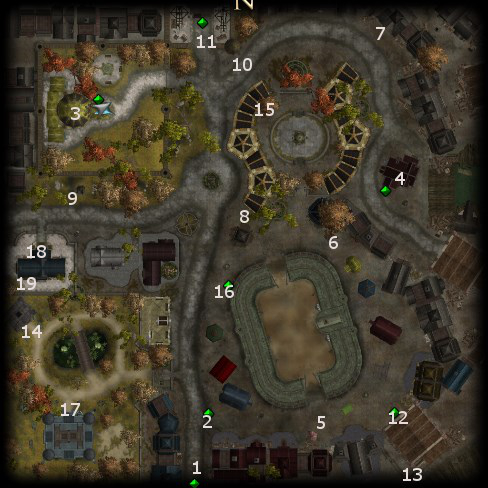
I make my way to the Morning Haven at #3 on the Arena District Map. Waiting for me near the front door will be a Messenger who indicates that somebody important wants me to see her in the Tower at the Market Triangle.
I go inside and speak to Obid. I get 5,000gp and 2,000xp for helping defend the Statue of Lathander.
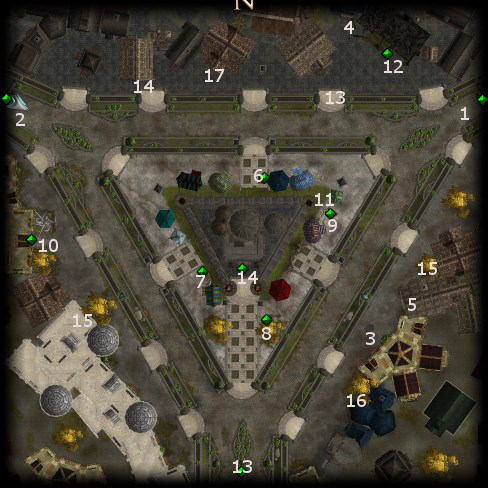
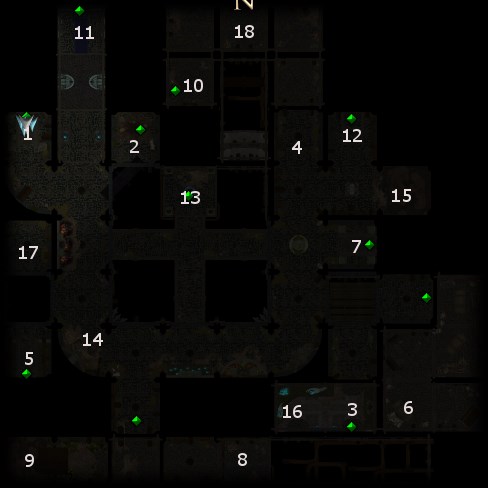
I next make my way to the south gate of the Market Triangle, at #13 on the map. I continue north, and witness another argument between Charissa and Rinara.
The entrance to the tower is at #14 on the Market Triangle map. I go inside and the Messenger tells me to go down the hall to speak to Pentical Bleth. Note that I don't need to actually speak to Bleth. It's enough to speak to the Messenger a second time to get 500xp and complete the Unexpected Message quest.
*Evil* An Unexpected Message
An equivalent video for the evil playthrough, although a bit truncated. First, the Messenger first meets Selene at the door to the Sods and Sundries.
Second, Selene receives 2,000xp and the Ebon Cape (Improved Evasion, +3 Reflex saving throws). Rinara will wear the cape, as Selene already has the Cloak of Mysteries. The video ends there.
First Meeting with Pentical Bleth
I start off at #1 on the map of The Tower.
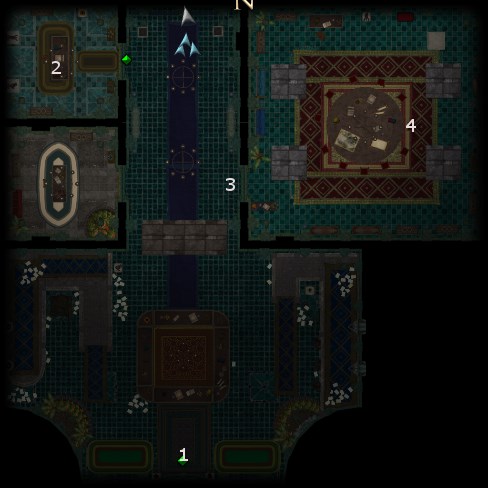
The office of Pentical Bleth is at #2. She leads me further downstairs, and speaks with me at length. The short of it is that she wants me to investigate a ship called The Dark Dahlia. Having this conversation, besides advancing the main story, is also a prerequisite to certain other side quests becoming available.
The Knot of Shou Lang
I leave Pentical Bleth's Office, and there's an apparent commotion. Near the door at #3 a Bystander indicates to me that an exhibit on the other side of the door has been closed down indefinitely. I speak with the CoS representative standing at the door, and she enlists my help in investigating a heist that forced the exhibit to close down.
On the other side of the door is Threston Arundel, who explains to me what has happened. I agree to find out who has stolen the Prized Chalice that was part of the exhibit.
I had Charissa cast a Fox's Cunning spell on Salazar beforehand. I begin by checking out the glass counter in the room at #4, where the Prized Chalice has been replaced with a Note. A successful Lore check allows Salazar to translate the note, which provides some clues regarding the theft. Had I not been able to make the Lore check, a Wizard named Aluriel Saladar would have come by and done the translation for me.
Also in the room at #4 is the Shop Counter. A successful Spellcraft check allows me to uncover the illusion surrounding the Prize Chalice, which had never been stolen in the first place. Threston then gives me the 1500gp, and urges me to discover who placed the illusion over the Chalice. I could end things then and there by refusing, but it's more beneficial to continue on. Had I not been able to make the Spellcraft check, the quest would have remained discovering the thief and the location of the Chalice would not have been revealed until much later.
The note indicates bloody footprints as a clue. So I head over to Mintassan's Mysteries and purchase a Potion of Blood Revealing from Mintassan for 100gp. I return and click on the door at #3 in the Tower, which reveals a blood-smeared corner. The result is that Salazar follows the trail of bloody footprints to the Lair of the Riddler, shown at #15 on the Market Triangle map below.
I buff up beforehand; Magic Vestment on Charissa, Bull's Strength and Greater Magic Weapon on Mantides, Cat's Grace on Rinara. I then go inside.
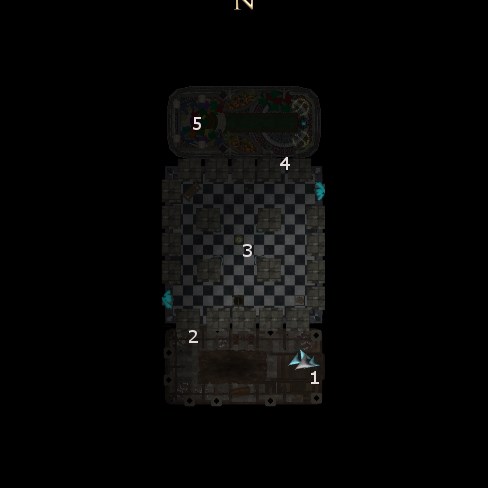
I start off at #1 on the map of the Lair of the Riddler. An Iron Golem immediately attacks me. This battle can be really tough, because the Iron Golem can hit really hard and enjoys significant damage reduction. Charissa immediately casts Battletide, with the intention of increasing as much as possible Mantides' chances of hitting the Golem, on which my surviving this battle depends. Even so, it was a nail biter, and I managed to get the killing blow just in the nick of time. I suppose I could have made things easier on myself by purchasing the Golemslayer for Charissa beforehand, but I'm in this mode of wanting to save as much gold as I possibly can.
The Iron Golem leaves behind the Golem Key, which is used to open the door at #2 on the Lair of the Riddler map.
At #3 is a riddle room, and a door at #4 which requires a riddle to solve. The riddle is based on the length of certain segments that are part of the floor's mosaic. The answer to the door is 4, 8, 11, 2 and then opening the handle.
At #5 is an Androsphinx named Porthyria. The short of it is that she wants me to recover the Oil of Laduguer for her from some Duergar that inhabit the Undergate.
The entrance to the Duergar Quarters is located at #12 on the Undergate map. I buff up beforehand, Magic Vestment and Weapon of Impact for Charissa, Bull's Strength and Greater Magic Weapon for Mantides, Cat's Grace for Rinara, and Death Ward for Salazar.
The Quarters are straightforward. It starts off with three rooms filled with Duergar that I'll have to kill. A Duergar in each room will drop a Duergar key that allows me to open the door to the next room.
On the other side of the third door will be the main room. The Duergar High Priestess will be within. She wants me to kill off a nearby rival group of thugs for her in exchange for the Oil of Laduguer. I could refuse the offer, kill her and the remaining Duergar then and there to get the Oil and conclude the quest shortly afterwards. But it's more beneficial to fall in with her offer for now.
The thugs in question are at #6 on the Undergate map, and include a Drow Wizard, an Ogre, a Troll, and a Bugbear. I rest up and buff up beforehand. A fight with the group is inevitable. I could end the fight by killing the Drow first and foremost, which will cause the others to run away. I prefer to kill the others first, before going to work on the Drow in order to maximize my xp. The downside is that the Drow has time to protect himself, and then go to work, including casting a Confusion spell on the party. Salazar manages to finish off the Drow and it's a matter of waiting for the Confusion effects to wear off.
The Drow leaves behind two items. One is an amulet called the Grinning Skull (darkvision, +1 saving throw bonus vs. cold, +1 saving throw bonus vs. negative energy), which I'll just sell. The other is the Archer's Belt (piercing 5/-), which I happened to get as a random drop. It also becomes Salazar's belt for the rest of the game. Salazar likes to stay back and use his Eldritch Blast power, but he still has to account for missile fire interrupting his attacks. The belt lowers the damage from missile fire, and improves his chances of making the needed Concentration checks as a result.
I rest and buff up again. A chest behind where the Drow had been contains a Dragon's Egg. Looting it causes a lot of Duergar to surround me. Charissa leads off with her offensive spells, while Mantides hacks away and Salazar blasts away. It's a tough battle, but I eventually manage to outlast them. The fallen Duergar will only leave behind minor random loot.
I rest up again and make my way back to the High Priestess. I buff again, and initiate dialogue with her. One of her Duergar minions ingests some of the Oil of Laduguer to become the Essence of Laduguer. A battle against the Essence of Laduguer, the High Priestess, and a few other Duergar begins. I don't bother with offensive spells, since they have high spell resistance. Charissa simply leads off with Battletide, to tip the scales of melee combat. Mantides' first target is the Essence of Laduguer, and then the High Priestess. It becomes a mop up after that.
Most of the Duergar leave behind random loot. The Essence of Ladugeur left behind a Diamond, which may be useful for crafting purposes.
The High Priestess leaves behind:
Now I visit the Drow Merchant at #2 on the Undergate map. I sell him the Dragon's Egg for 500gp, and have my alignment shift by 1 towards Chaotic. The alternative was to sell the Egg to Captain Fennesh for 500gp but with a 1 point alignment shift towards Lawful. I preferred the former because I need to maintain a Chaotic Good alignment in order to keep Salazar as a Warlock.
I also pay the Drow Merchant a 100gp to identify the belt. It turns out to be a Greater Swordsman's Girdle (slashing 20/-), which is definitely fortuitous for me. It becomes Mantides' belt for the rest of the game. Mantides is a Damage Dealer instead of a Tank, so it makes sense to prioritize him for an item that provides hefty damage reduction since his armor class won't be as good as Charissa's. It is often advisable to recognize that a Damage Dealer will be struck more often, and therefore to emphasize damage reduction instead of armor class.
I bring the Oil of Laduguer back to Porthyria. She in turn brings the party back to The Tower and uses the Oil to unravel the Knot of Shou Lung. Had I not previously uncovered the illusion covering the Prized Chalice, it is now that Porthyria would reveal the Chalice.
Threston Arundel rewards the party with 3,500gp, 2,000gp, and the Prized Chalice which can be sold for another 2,000gp. The party members also get the Riddle Master feat (+1 Lore, +1 Diplomacy).
11th Level
And here is where the party advances to their 11th level of experience.
Enkidu's Armor
I now sell off all of my excess loot to the Lizardfolk Witch in the Undergate, including Gol'Kai's Cry which sells for almost 19,000gp.
A portal at #7 on the Undergate map leads to near the Black Eye Tavern in the Harbor Loop. I go west a little, and a brief argument ensues between Mantides and Rinara. At the end of it, I can either side with Rinara and gain +1 influence with her but lose -1 influence with Mantides, or vice versa. I chose the latter because I value Mantides becoming a Paladin again.
I enter Okuzo's Imports, where I buy two items for Charissa. One is the Helm of the Horselords (immunity to fear, +1 Concentration, +5 Intimidate). The bonus to Intimidate is meaningless for Charissa. The immunity to fear and bonus to Concentration are both very welcome for her however.
The other item is Enkidu's Armor (Full Plate +1, slashing resistance 5/-, piercing resistance 5/-). A Full Plate armor that provides damage reduction is certainly welcome for a front-line tank. Charissa can always use a Magic Vestment spell to raise the enhancement bonus.
A Star is Born
I start the next quest by speaking with Mintassan and asking him "What's the matter?". He explains that he dropped a Diamond that he needs for one of his experiments down a grate. He speculates that it has fallen amongst Trolls in the Undergate.
The entrance to the Troll Lair can be found at #9 on the Undergate map. The Lair itself is fairly straightforward. There will be plenty of Wounded Trolls throughout the Lair. It's a matter of bringing them down, and Salazar finishing them off with Vitriolic Acid.
*Evil* The evil party doesn't have Vitriolic Acid as a resource. So beforehand I changed Charissa's 5th level spells so that they were all Flame Strikes. And it may be that if I run out of Flame Strikes then I'll need to retreat back up to the Undergate, rest up, and get the other Trolls before they're all dead.
The Troll Chieftain's Hut will be in the southwest corner of the Lair, on the other side of a narrow gangway that runs along the west side of the Lair. Once I enter, some Mercenaries who've killed the Chieftain refuse to give up Mintassan's Diamond and teleport away. They do, however, leave behind a Signet Ring.
I return to Mintassan and ask him about the Signet Ring. He indicates that Salty Jack may know something of it.
Although I haven't mentioned it previously, Salty Jack is the beggar who will have often harassed the party whenever it goes a little east of the Black Eye Tavern in the Harbor Loop. Now I can ask him about the Signet Ring. He marks the location of the Mercenaries' Hideout on the map of the Market Triangle, and also gives me the password.
The Mercenaries' Hideout is at #4 on the Market Triangle map. I click on the door and give the password. An Ogre comes out and attacks me, but I kill it easily. It gives up a Greataxe +1. The door is now open.
I go inside, and end up having to fight a LOT of Mercenaries, including their Leader and their Gnome Wizard. Charissa unleashes her offensive spells whenever she can. Rinara maintains her Parry mode. Mantides is chopping away. Salazar starts off with Walk Unseen so that he can slip away, take up a safe position, and then blast away. It's a tough battle, but I do eventually manage to outlast them.
A lot of the Mercenaries leave behind armors and weapons of +1 or +2 enhancement bonus. There may also be a unique random item drop. The Gamebanshee walkthrough indicates that Greater Gloves of Swordplay were received, which would have been nice for me but oh well. I happened to get a Mage's Battle Robe instead. The Leader also leaves behind Mintassan's Diamond.
I bring the Diamond back to Mintassan. He apparently uses it to create a new shooting star in the heavens. I get rewarded with 3,000gp and 2,000xp.
Priest of Ilmater
I head back down to the Undergate, and make my way to the Lizardfolk Witch. I sell her all of my excess loot.
There will be a door north of the Witch. I go through it and other doors to reach the Priest of Ilmater at #10 on the Undergate map.
I speak at length with the Priest of Ilmater. With enough prodding, helped along by a Lore check, I can get the Priest to expose himself as a fraud. He and several Derro Dwarves promptly attack, but I'm powerful enough now that I have little trouble wiping them out. The Priest will leave behind a random gem, and a Beholder Ring (Slow) (+3 Spot, Slow (5) 1 / day). I have no use for it, and prefer to sell it to the Witch for almost 9,000gp.
The Dark Lady's Promise
Now I make my way to a shrine of Shar called The Dark Lady's Promise, the entrance to which is at #11 on the Undergate map.
Within the shrine itself, straight ahead, will be High Priestess Valeshia. She has some goods for sale, including a watered-down Belt of Shar (+1 deflection bonus to armor class, +2 Strength, evil only), some Rings of Divine Power, and various curative and healing potions.
There are only two items of interest to me. One is a Potion of Heal, which may be useful during particularly tough battles. The other is the Ring of Holiness (+1 0-level Clerical spell, +1 1st-level Clerical spell, +1 2nd-level Clerical spell, +1 3rd-level Clerical spell, +1 4th-level Clerical spell), which I buy for Charissa for obvious reasons.
*Evil* The Dark Lady's Promise will be the site of interest if I want to turn Mantides into an evil Champion of Shar. I'll explain more fully once I finish my evil playthrough of NWN2.
Boots of Hardiness +2
Now I return to Mintassan's Mysteries. I purchase the Boots of Hardiness +2 (+2 Constitution, +2 dodge bonus to armor class) for Charissa. Boots that provide a boost to Constitution and a bonus to armor class that will stack with everything else is certainly ideal for any front-line tank.
Head of the Pirates
Another quest is available. I return to the front entrance of the Bent Mermaid Inn, which is at #4 on the Arena District map. A crowd has gathered at the entrance, excited over news that somebody named Aloster Drake has claimed the bounty for the head of the infamous pirates, Galandaro.
I enter the Bent Mermaid Inn, and standing outside the door to the room to the left is Breel. A Bluff or Intimdate check, or a bribe, suffices to get him to abandon the door. I chose the Intimidate check.
Now I speak to Aloster Drake, who's on the other side of the door. Drake, however, indicates that he hasn't yet received the bounty and that perhaps I should speak to Harbormaster Grenn about it.
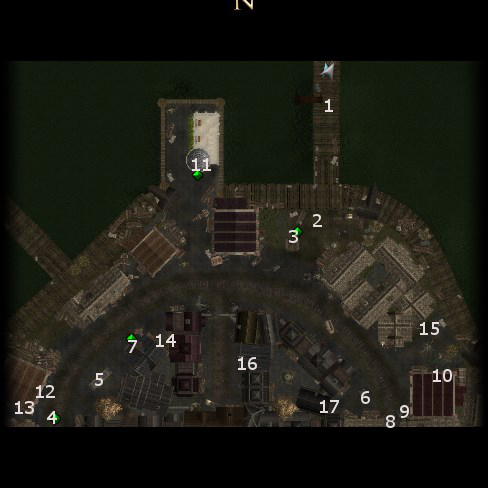
Harbormaster Grenn can be found in the Harbormaster's Office, at #11 on the Harbor Loop map. Green wants an independent and honest witness to verify that the head truly belonged to Galandaro before he pays out the bounty.
Now I come back to the Bent Mermaid. To the right will be a Gnome named Sami Horngold. She'll eventually let on that she can recognize Galandaro, and she'll be willing to identify him.
And so we return to the Harbormaster's Office. Sami identifies Galandaro's head, but then throws a wrench into things by saying out loud that she has seen Galandaro's first mate, a Bugbear named Rabid Red, prowling around the docks.
Aloster demands to speak with me in private, and that's when he explains what's really going on. Rabid Red killed Galandaro in a mutiny, boarded Aloster Drake's ship, took Drake's crew hostage, and forced Drake to collect the bounty on Red's behalf. Drake would like me to rescue his crew, but without involving the city guard who are sure to screw it up.
Rabid Red's Hideout is at the east end of the Harbor Loop, #9 on the map. I enter within. I could Intimidate the Half-Orc Pirate into leaving, but it's better to select the fighting immediately option. The reason is that several pirates come out to help, and once I kill them that means less pirates that will be threatening the Captive Crew Members.
Through the next door will be Rabid Red, another pirate, and Elf wizard named Wilgum the Worm, and four Captive Crew Members. One choice is to take up Rabid Red on his offer to let him go in exchange for sparing the Crew Members. That will gain influence with Mantides by +1, but lose -1 influence with Charissa and Rinara. The other choice is to kill Rabid Red then and there. That results in losing -1 influence with Mantides, but gaining +1 influence with Charissa and Rinara. I chose the latter. I can take at least a small hit in my influence with Mantides, and this is where I choose to do it for the sake of greater loot rewards.
I'm easily able to win the fight without losing any Crew Members, since the three of them are going to ignore the Crew Members and come straight for me anyway.
Wilgum the Worm leaves behind some random scrolls and such, as well as Bracers of Dexterity +3, which becomes Salazar's bracers for the rest of the game. The +3 Dexterity will mesh with the Dexterity of 17 after Salazar adds +1 Dexterity during his 12th level up. More Dexterity means connecting more often with the Eldritch Blasts. It turns out I never needed the Bracers of Dexterity +1, as I hadn't been expecting Bracers of Dexterity +3. Oh well.
Rabid Red leaves behind:
I leave out the back door, and arrive at #10 on the Harbor Loop map. That's when the influence consequences of my choice take effect.
The reward for bringing in Rabid Red's Head to Harbormaster Grenn is 5,000gp and 400xp. The reward for completing the quest itself is 1,600xp.
Aloster Drake rewards me with Aloster Drake's Falchion (Falchion +1, +1 electrical damage, +1 saving throws vs. electricity) for keeping all of his crew members alive. Whether or not I talk Sami in to joining Drake's crew has no in game consequence.
Now it's time for me to do the first quest for Pentical Bleth.