-

- Forums
- Chatrooms
- Gallery
- Gameplay Videos
- Upload
- Articles
- Mod Reviews
- Shop SP: Games, Movies, Books
|
|
Catacombs
Pentical Bleth's Journal
I return to Pentical Bleth's office in the Market Trianngle tower. She has apparently been sucked dry by vampires. I inevitably discover her journal, for which I get an xp bonus. The journal itself provides a clue as to my next destination, a winery in the Arena District.
The BTW Mystery
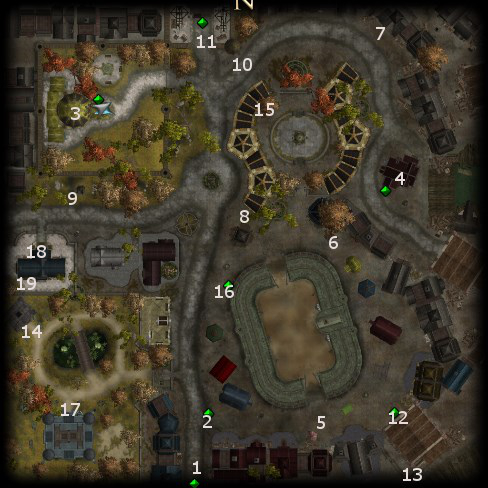
The entrance to Brother Tobias' Winery is at #17 on the Arena District map. I buff up before going in. In particular, I make sure Charissa casts Death Ward on everyone in the party. Death Ward last a long time, and will immunize party members against the ability / level draining attacks of Vampires.
I start off at #1 on the map of the Winery. At #2 will be Brother Tobias Timble, along with several Monks. He's pretty free about letting the party walk around.
But it's also obvious that the whole set up is suspicious. Blowing the cover requires the discovery of at least three clues. One such clue can be found amongst the Monks themselves. A successful Spot check against one Monk leads to the discovery that the Monk's robe is stained with blood instead of wine. A successful Spot check against another Monk leads to the discovery that the Monk is quietly sneering at the party. Another clue, which doesn't require any skill check, involves clicking on any of the numerous weapon racks in the room and deducing that the weapons have been put to recent use.
At #3 is a table that has the Monks' Journal, which will provide another clue.
At #4 is the door leading to the cellar. Simply listening at the door reveals that there aren't any rats on the other side, contrary to what Brother Timble said.
The weapon racks, the Journal, and listening at the door are enough to get the three clues needed to progress the game, although the Spot checks on the Monks themselves earn 50xp each.
I now confront Brother Timble after getting three clues, and earn 3,000xp once he and the other Monks are forced to drop their ruse. Charissa and Mantides, protected by Death Ward, manage to overwhelm the Vampires.
Brother Timble leaves behind:
Winery Cellar
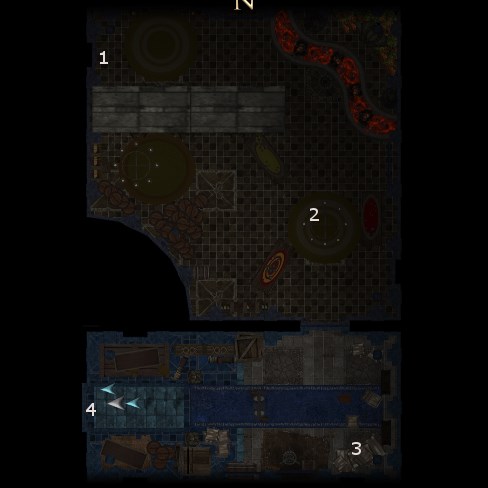
The door itself leads to the Winery Cellar. A successful Spot check on the bucket with a DC of 10 earns 50xp, and reveals that the bucket has blood instead of wine.
A secret door on the other side of the Cellar reveals stairs that lead further down.
Golden Bamboo Staff
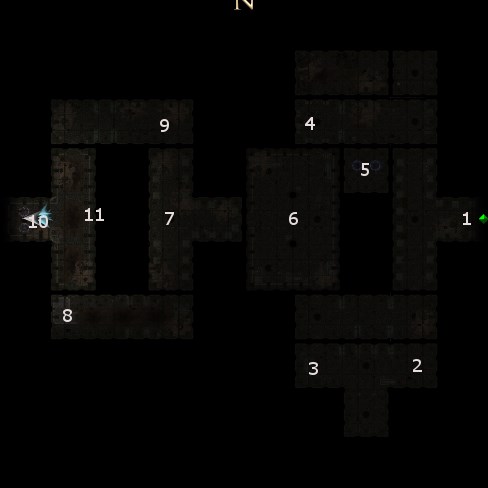
I start off at #1 on the Catacombs map. There will be plenty of traps around. Unfortunately, I cannot do anything about them since Rinara has left.
I explore the south edge of the Catacombs, having to fight a few Skeletons and Zombies along the way. The sarcophagus at #2 has a Scarab of Protection +2, which I'll sell, plus some random loot.
The sarcophagus at #3 has scrolls of Fireball and Delayed Fireball, plus random loot. I insist on reloading until I can turn that random loot into a Ruby.
I thereafter leave the Catacombs for a while. I purchase the Golden Bamboo Staff (Quarterstaff +2, Stun DC=22 75% / 3 rounds) from Okuzo. This was the last priority in terms of purchases that I wanted to make, since I pretty much have Salazar avoid physical combat all the time. But now I've gotten everything else I wanted, I may as well get him as good a two-handed weapon as I can find for him.
I purchase a Weak Fire Essence from the Crafting Merchant. I then go the workbenches in Mintassan's Mysteries. I place the Golden Bamboo Staff, the Ruby, and the Weak Fire Essence into the Magician's Workbench. Charissa temporarily changes one of her Spell Resistance spells into a Flame Strike spell, and rests up. She then casts her Flame Strike spell on the Magician's Workbench to add +1d6 fire damage to the Golden Bamboo Staff. She then changes back to having all of her 5th level spells as Spell Resistance. Salazar has his weapon for what's left of the game.
Grace Strongheart's Tomb
I return and clear the north side of undead like Ghouls and Skeletons. There are two sarcophagi at #4. One of them has a Bag of Holding.
Salazar puts on his Domino Mask now. I bash open the door leading to #5, and the undead form of Grace Strongheart attacks me, along with a few Wraiths. Physical combat plus a Vitriolic Acid / Eldritch Chain from Salazar is enough.
The mask is also needed to see a sarcophagus at #5, which has two items. One item is the Shining Light of Lathander (Greatsword +2, light, Searing Light (5) 1 / day), which I don't have any use for. The other is a Full Plate +2, which is a temporary upgrade for Mantides.
Latasha and Kreel
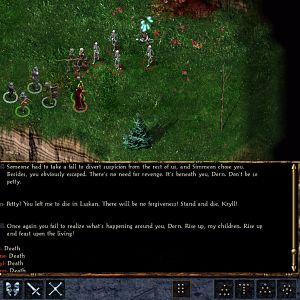
At #6 will be the Vampires named Latasha and Kreel. Combat is inevitable after the dialogue. They are also helped out by a pair of Night Mask Thugs, and a Night Mask Mage. Physical combat by Charissa and Mantides, protected as they are by Death Ward spells, plus Vitriolic Acid / Eldritch Chains by Salazar, is enough to win the combat.
Latasha's and Kreel's coffins are at #7. Clicking on one of them causes Rinara to appear and throw me a couple of convenient Wooden Stakes. I welcome her back in the party. If I rejected her, she would be at Kajeel's establishment where I could then recruit her back in.
Using a Wooden Stake on Latasha while she's in her coffin will kill her permanently and yield the Vampire Dust. Using a Wooden Stake on Kreel while he's in his coffin will kill him permanently and yield the Sacrificial Dagger. These are both quest items that I will need very shortly. I also get 500xp.
Descent Into Darkness
There are plenty of traps in the corridors north and south of #7, but Rinara can now handle them.
A trapped sarcophagus at #8 has a Potion of Heal plus some random loot. A trapped sarcophagus at #9 has a Beljuril gem, plus some random loot. I can't really do anything with the Beljuril though, since I don't have the essences or items to be able to use an applicable recipe.
An Altar is at #10. I begin by using the Vampire Dust to begin the ritual. Second, I select letters to spell out the word "G-A-R-L-I-C." Third, I select letters to spell out the word "S-U-N-L-I-G-H-T". Lastly, I use the Sacrificial Dagger to offer a little blood to the Altar and complete the Ritual.
I get 3,000xp. Rinara has enough to advance to her 15th level of experience, and I get her the Improved Parry feat in anticipation of improving her offensive ability in the last stages of the game.
If there's anything you want to do before going through the portal, now's the time to do it. There's no going back once you step through the portal to the Inner Sanctum.