-

- Forums
- Chatrooms
- Gallery
- Gameplay Videos
- Upload
- Articles
- Mod Reviews
- Shop SP: Games, Movies, Books
|
|
Arena District
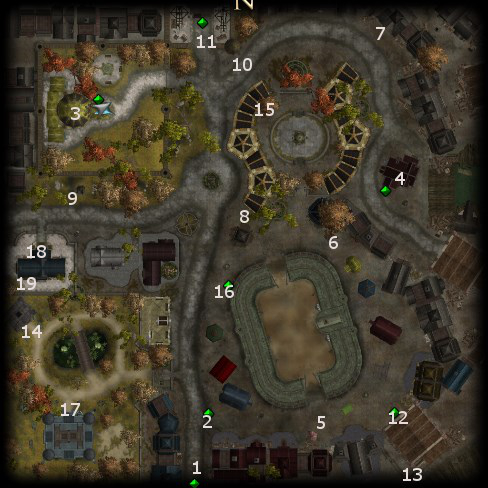
The Bent Mermaid Inn
At #4 on the Arena District Map is the Bent Mermaid Inn, which I enter. At either side of the entrance are two locked doors.
The door to the left has a chest on the other side, which has a few minor items.
The door to the right requires a very high DC for the Open Lock skill check. Charissa helps out by casting a Cat's Grace spell on Rinara, which allows Rinara to pick the lock. There are two chests in the room. One chest has more minor items. Another chest has a few random items, plus a Healing Kit +10 and a Swordsman's Girdle (+5 slashing resistance/-). Mantides will wear the belt for much of the game. Damage reduction is always a good thing for any warrior. And besides, he'll get his Strength boost from a pair of bracers.
The Brotherhood of the Ferret
I leave the Inn and make for #5 on the Arena District map. There I will find a peddler named Ding Thrush, as well as a Hamster cage. It is advisable to inspect the cage in order to notice both the 'butterscotch-colored hamster', and that the rest of the hamsters or ferrets are no more than common street rats.
I then speak with Ding Thrush, who will try to hawk his rats on me, but I insist on the butterscotch-colored Hamster. He'll then try to sell me a month's supply of Hamster feed, but I refuse since it's just sawdust mixed with other debris.
The Hamster now appears. Activating it will cause it to indicate generally where it wants me to go. Its desired destination is the Garbage Pile at #6. I enter the pile, which actually leads to a cave. I have to kill off several Ferrets once I enter the cave, which is easy enough.
At the other end of the cave is a tree. I eat one of its berries at the Hamster's urging. The Hamster reveals itself as a guardian of sorts, Reet, in an obvious tip of the hat to Boo of BG2 fame. Reet entrusts me with ending a cult that is trying to bring back Mintak the Ravager of Rodentkind. The cult's location is at the north end of the Arena District.
But first, I have to buy the disguises that will let me enter the Cult's house. I enter the Undergate through the Lamp Post at #2.
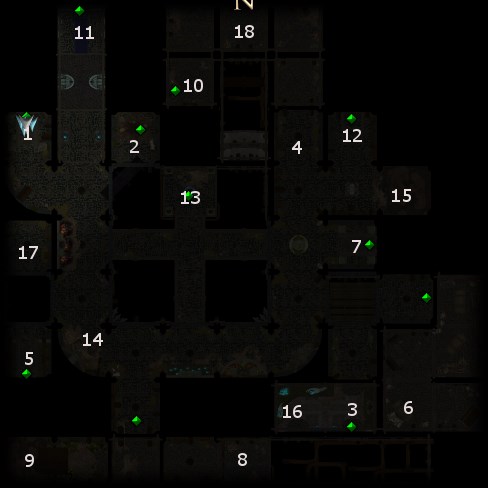
I start off at #1 on the Undergate map. Once there, I see a vision of a woman in purple who speaks rather cryptically. It is tied to the main quest, but that will not become apparent until much later.
I go to the Drow Merchant at #2. A conversation ensues, whereby I have a chance of making either a Bluff or an Appraise check to gain +1 influence with Rinara. I succeed at the latter.
I buy a Black Cowled Robe for each party member from the Drow Merchant. A Druid merchant in the Market Triangle also sells the Robes.
I leave the Underdark and make my way towards #7 on the Arena District map. I take a moment to have everyone switch out their armors for the Black Cowled Robes. I then click on the door. A conversation leads to the inevitable password, "Mintak", and me gaining entry. Once inside, everyone puts their armors back on. The Black Cowled Robes are needed only for initial entry.
I go on ahead, and the Cult, lead by the Grand Whisker, begins the ritual to summon Mintak. The Grand Whisker wants me to eat a sacred berry. If I did, then Reet would arrive and kill everyone in the Cult and reward me with 1,500xp.
However, I prefer to refuse the berry and cause the Cult to attack me. This way, I get the xp for killing the Cult members (54xp each) and the Grand Whisker (336xp) and also get the 1,500xp afterwards anyway.
This can be a tough fight, because there are a lot of Cultists who can make sneak attacks who will surround Salazar. The Grand Whisker can also cast spells. However, Charissa makes things a lot easier by hitting all of the Cultists with a Hammer of the Gods spell. It will both inflict damage and daze enemies, but without affecting party members. She then follows up with a Call Lightning spell. It becomes a mop up once those two spells come off.
I loot the Grand Whisker. One item he leaves is a Staff of Command (immunity to mind-affecting spells, Charm Monster (5) / 5 charges, Charm Person (2) / 2 charges, Dominate Person (7) / 5 charges, Sorcerers and Wizards), which Salazar will use as an interim weapon.
The other item is a Ring of Protection +3, which will be one of Rinara's rings for the rest of the game, as it is consistent with her role as Parry tank and decoy.
I return to the cave beneath the Garbage Pile, and eat another berry from the tree. Reet gives me 1,500xp for stopping the Cult.
Cloak of Mysteries
I begin the next quest by speaking to Garrett the Bold at #8 on the Arena District Map. He wants my help uncovering treasure from a hidden temple. I follow him to #9, whereupon he does some gestures and opens the way to the Hidden Temple map.
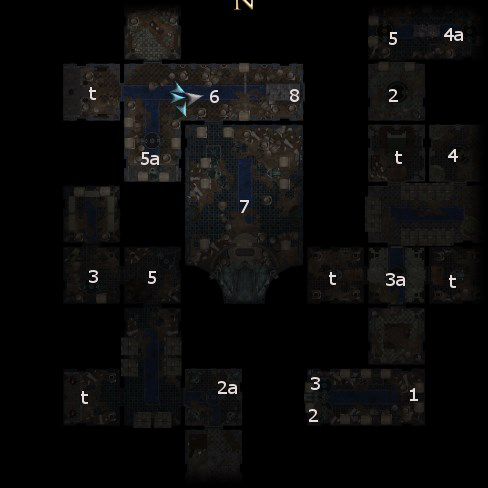
I start off at #1 on the Hidden Temple map. Garrett then explains that he's after an artifact called the Cloak of Mysteries. I agree to help him find it. I go up just ahead and seemingly an image of the priestess of Leira will bid me to leave. I refuse.
Shimmering Pools of Mist appear at various locations. They are marked by numbers 2 to 5. If you use them, they will teleport the party to another Shimmering Pool of Mist with the corresponding number followed by an 'a'. For example, if you use a Shimmering Pool of Mist at a location marked by #2, it will take you to the Shimmering Pool of Mist at #2a. The Shimmering Pools of Mist at #2a, #3a, #4a and #5a can themselves lead back to the Shimmering Pool of Mist that you initially used beforehand.
Roomed marked with a 't' have footlockers and treasure chests. Sometimes they have worthless mundane items. Sometimes they have small amounts of gold. There will be lots of traps in these rooms. No one in the party can find and disarm traps just yet, so I let Garrett do it.
I take what is in my view the most efficient path. I take the Pool just ahead at #3 to the Pool at #3a. I loot the containers in the surrounding room. I take the Pool at #4 to #4a. From there I go to the Pool just a little southwest of #4a at #2, and reach #2a. From there I loot the treasure in the room just a little west of #2a. I then use Pool at #5 towards the west side of the temple (not the one near the northeast corner) to reach the pool at #5a. I loot the treasure from the room just a little to the northwest.
At #6 the image of a priestess of Leira will confront me a second time. If I insist on going ahead, I'll lose a little influence with Mantides. I instead indicate that I'll leave the dead in peace. There are a few reasons for doing that. One is, I can go on ahead and get the Cloak of Mysteries anyway. Another is that I'll gain influence with Mantides. Another is that Garrett will plunge ahead in search of the Cloak and get himself killed, which is what I actually want to be honest.
At #7 is Skyrim Bloodfang, his Ogre Henchman, and his Orc Henchman. I simply wear them down in physical combat, although Charissa ends up getting knocked out after taking a critical hit from Skyrim.
Skyrim leaves behind a Greatsword +1, which is an interim upgrade for Mantides. He also leaves behind the Cloak of Mysteries (+3 deflection bonus to armor class, Spell Focus: Illusion, +3 Bluff), which becomes Salazar's cloak for the rest of the game. The armor class bonus is hard to pass up, but the Bluff bonus may come in handy during certain conversations as well. Garrett got himself killed and leaves behind a Shortsword +1 that I can sell.
Note that if Garrett was still alive, he'd demand that he keep the Cloak. If I insisted on taking it for myself, I'd have to kill him for it and lose -1 influence with Mantides as a result. The advantage of letting Garrett rush on ahead and get himself killed is that I keep the cloak and raise instead of lose influence with Mantides in the process. However things go, I get 500xp for finishing the quest.
At #8 is an exit, which leads to #3 on the Undergate map.
*Evil* Cloak of Mysteries
The equivalent video for the evil playthrough, but with a couple of key differences. During the conversation at #6, I choose to show disrespect to the undead and insist on pressing ahead for the treasure. That ends up losing another -1 influence with Mantides.
That means that Garrett stays with the party. He will want to keep the Cloak of Mysteries after I've finished off killing Skyrim and his minions. But now Selene insists on keeping the Cloak for herself, which she wears for the rest of the game. That loses another -1 influence with Mantides. I also get 336xp for killing Garrett as well. He leaves behind a Shortsword +1.
Now it's time to do a few quests in the Harbor Loop.