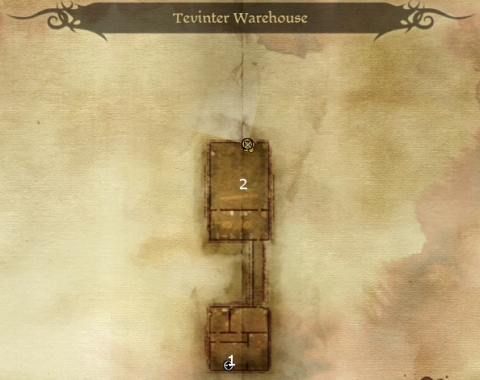
Here is the initial entry point, and the way back to the Elven Alienage at #14. Several Guards will accost you. You can either choose to attack them now, or parley with them. If you choose to parley, the head guard will take you straight to Caladrius at #2.
Here is the leader of the Tevinter Slavers, a blood mage named Caladrius. You can fight him now, or choose to negotiate with him. His initial offer is that he'll give you Slaver Documents that can be used against Teryn Loghain. What he wants in return is 100 gold, and to leave freely with all his goods and slaves in tow. How much you can talk him down from his initial offer, whether that involves leaving the slaves behind, or leaving his goods behind, or giving you the letter for free, or more than one of those, depends on your Persausion or Intimidation skills. Needless to say, the more concessions you want to wring from him, the greater your skill check will need to be. If you successfully reach a negotiation with him, you'll get the documents and then he and his men will depart without a fight.
Note that Zevran will dislike any option that involves leaving the Elves in slavery.
If you insist, or if negotiations fail, you may wind up in combat with him. Caladrius is himself a powerful Blood mage, and he'll have plenty of Archers and Warriors around him. Plant storm-type spells over him and his archers, Storm of the Century in particular if you can pull it off. Single Caladrius for highly damaging single-target spells, or Mana Clash if you've got it, though unlike other mages this will only partially cut Caladrius down to size. Let your fighters wait for his warriors to come up the stairs before engaging. Once Caladrius is near death, he'll try desperately to bargain for his own life. He'll offer to use the life force of the Elven Slaves to enhance your attributes. Suffice to say, this offer won't go over well with your good aligned companions or with Zevran.
If you take him up on his offer, it will result in a +1 added to your Constitution. You also won't be able to trade with Alarith in the Alienage. If you refuse, he'll be almost out of health, and with everyone up close, so he'll be easy to kill. He'll leave behind the Slaver Documents and the Robes of the Magister Lords. However you do it, obtaining the Slaver Documents is what brings the 'Unrest in Alienage' quest to a close.
Sorcerer's
Place is a project run entirely by fans and for fans. Maintaining
Sorcerer's Place and a stable environment for all our hosted sites requires a substantial amount of our time and funds on a regular basis, so please consider supporting us to keep the site up & running smoothly. Thank you!
Supporting Sorcerer's Place
Has Sorcerer's Place been useful? If you'd like to show your appreciation
for our hard work on the site, and help us pay the bills the site generates
every month, please consider helping support SP.
Thank you!